Custom fields are data items (also called metadata) associated with a particular order. These might include measurements, radiation dosage information, flags, and so on. You can customize these fields for each site.
Technologists and nurses can assign values to custom fields on unreported orders through the PowerScribe 360 | Reporting Administrator Portal; radiologists can do so during reporting in the PowerScribe 360 | Reporting client. Administrators can assign values to custom fields in the Administrator Portal at any stage.
A custom field might be a free-form text field or a pick list. For example, you might use the Technologist QA custom field to allow radiologists to identify reports where the image quality was poor. For this field, you can design a set of possible values such as image clipping and motion blur.
You can designate a custom field as required, meaning that the provider must enter or select a value in the custom field before signing the report. As with AutoText, however, you can tie a custom field to one or more procedure codes; the provider is required to enter a value in a custom field only if that field is tied to a procedure code that is in the order. When a technologist logs into the Administrator Portal and selects an order, he has an opportunity to assign values to the custom fields related to that order's procedures. The radiologist sees these values when she begins work on the report.
Custom field data can be exported in the HL7 message. For example, the PowerScribe 360 | Reporting software exports data in any fields tied to mammography procedures to the RIS for tracking and letter generation.
Custom fields can be very useful for reporting. You can create worklists that retrieve only the orders and reports in which a custom field contains a particular value. You can design AutoText that contains custom fields.
To create a custom field:
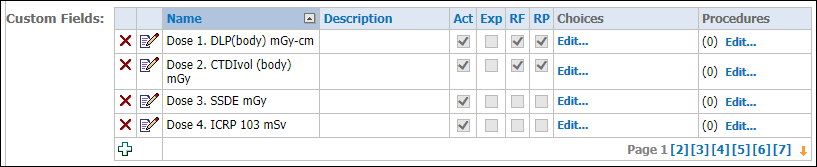
1. In the Setup group, select the Sites tab.
2. Click the plus sign at the bottom of the Custom Fields section. A new row is added.
3. Enter a name and optional description for the new custom field.
4. Select the Act check box to activate the custom field, making it available for use.
5. Select the Exp check box if you want this custom field to be exported by the Bridge and sent to the RIS. This option has effect only if you have enabled export of custom fields by selecting the Send Custom Field Segment option for the Bridge service.
6. Select the RF check box if this custom field is required for Final reports.
7. Select the RP check box if this custom field is required for Preliminary reports.
8. Click the Save icon![]() to save the custom field.
to save the custom field.
9. If the field is to be a pick list:
a. Click Edit.... The Custom Field Choices dialog box opens.
b. Click the plus sign to begin entering the first value.
c. Enter the Value. If the value is very long, you can also enter a shorter Label; users will see the label in the drop-down list.
d. Click the Save icon to save the value.
e. Repeat Steps B through D for each of the possible values for this field.
f. Click Close Window.
10. To associate the custom field with one or more procedure codes:
a. Click Add... next to the field. The Procedure Code Selection window opens.
b. Find the procedures you want to associate with this custom field: Place a check mark next to any modality or anatomy whose codes you want to display. Then click Search. Any procedures connected to the items you chose appear in the All Procedures list.
c. In the All Procedures list, place a check mark next to each procedure you want to add to this custom field.
d. Click Add. The procedure(s) appear in the Selected Procedures list at the right.
e. Click Close Window when you are finished adding codes.