You can create print, fax, and cover sheet templates for your facility’s needs. A template might be a plain text file, or it might contain advanced features such as merge fields, headers, footers, page numbering, and tables. You can create and edit simple templates in WordPad; for the more advanced features, you will need to use Microsoft Word.
Print and fax templates must be saved as .rtf files, not as .doc files, before you upload them to your system in the Portal. You can use any .rtf file as a basis for a new template.
|
NOTE: Cover sheet templates are not .rtf files; these have a .cov extension and you can create them only in the Microsoft Fax Cover Page Editor utility. |
Use the procedures below to create and edit templates for the entire system, for an individual site, or for a location within a site.
To add a new print template at the system or site level, you must first create the template as an .rtf file in Microsoft Word or WordPad. Once you have created it, you must add it to your PowerScribe 360 | Reporting system.
To create the template:
1. Create the template file in Microsoft Word or WordPad . Use Word’s advanced features to add headers, footers, page numbering, and so on, if desired.
A print or fax template must, at the minimum, contain the <maintext> merge field. This field will contain the text of the report; you must place this field at the position where you want the body of the report to appear. You can add other merge fields such as the patient name, patient MRN, attending name, and so on.
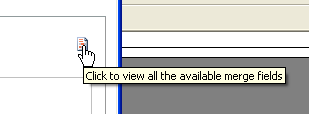
To see a list of all available merge fields:
a. On the System or Sites tab in the Setup group, click Templates....
b. Click the icon at the upper right of the Print Template tab.
A window showing the list of merge fields opens. You can copy any merge field from the list to insert it in the Word document. For example, to insert the visit number, copy the field <401:Visit Number> and paste it at the position in your template where you want the visit number to appear.
Although you can use the field number alone or the field name alone, it is recommended that you copy the field exactly as it appears, including the brackets. To insert a custom field, use this format: <10000:Custom:Custom Field Name>. For example, if the custom field name is Radiation Dose, type <10000:Custom:Radiation Dose>.
2. When you have finished creating the template, save it as an .rtf file. Make a note of the path and folder location where you saved the file. Then continue with the procedure below to upload the template to your system.
To add a print template at the system level:
1. On the System tab in the Setup group, click Templates....
2. Select the Print Template tab.
OR
To add a print template at the site level:
1. On the Sites tab in the Setup group, select the site from the drop-down list at the upper right.
2. Click Templates....
3. Select the Print Template tab.
OR
To add a print template at the site location level:
1. On the Sites tab in the Setup group, select the site from the drop-down list at the upper right.
2. Next to the location for which you want to add a template, click Edit... in the Templates column.
To finish creating the new Print template:
1. Click New.... The Create Template dialog box opens.
2. Type a Name for the new template.
3. Click Browse.
4. Navigate to and select the file you created in Word. Click Open. The path and file name appear in the File field.
5. Click Save. The template appears in the plain-text preview window.
6. To preview the template as it will appear with a report, click the link below the editing window. At the prompt, click Open. A sample report appears in a Word window. (This preview does not display any real data in the merge fields, but shows how a typical report might appear in the template.)
To create a fax template:
1. Create the fax template file in Microsoft Word or WordPad . Be sure to include at least the <maintext> merge field. To see a list of all available merge fields:
On the System or Sites tab in the Setup group, click Templates….
Click the icon at the upper right of the Fax Template tab. A window showing the list of merge fields opens.
You can copy any merge field from the list to insert it in the Word document. For example, to insert the visit number, copy the field <401:Visit Number> and paste it at the position in your template where you want the visit number to appear. Although you can use the field number alone or the field name alone, it is recommended that you copy the field exactly as it appears, including the brackets. To insert a custom field, use this format: <10000:Custom:Custom Field Name>. For example, if the custom field name is Radiation Dose, type <10000:Custom:Radiation Dose>.
2. Save the template as an .rtf file.
To add the fax template at the system level:
1. On the System tab in the Setup group, click Templates....
2. Select the Fax Template tab.
OR
To add the fax template at the site level:
1. On the Sites tab in the Setup group, select the site from the drop-down list at the upper right.
2. Click Templates....
3. Select the Fax Template tab.
OR
To add the fax template at the site location level:
1. On the Sites tab in the Setup group, select the site from the drop-down list at the upper right.
2. Next to the location to which you want to add a fax template, click Edit... in the Templates column.
3. Select the Fax Template tab.
To finish creating the new Fax template:
1. Click New....
2. Type a Name for the new fax template.
3. Click Browse.
4. Navigate to and select the file you created in Word. Click Open.
5. Click Save. The template appears in the plain-text preview window.
6. To preview the template as it will appear with a report, click the link below the editing window. At the prompt, click Open. A sample report appears in a Word window. Close the window when you have finished.
7. Click Save and Close to save the fax template.
Begin by creating a fax cover page in the Microsoft Fax Cover Page Editor utility.
NOTE: The method you use to access this utility might differ from that shown below, depending on your version of Windows. The procedure below assumes that your computer is running Windows XP.
To use this utility in Windows XP, you must first install the Fax service. Refer to your Windows documentation for information on installing this or other Windows components.
To create the fax cover sheet:
1. Select Start > All Programs > Accessories > Communications > Fax > Fax Cover Page Editor. The editing window opens.
2. Use the utility’s editing features to create the cover sheet. For more information, refer to the Fax Cover Page Editor’s online help.
The utility allows you to insert merge fields by selecting Insert from the menu bar and then selecting fields from the Recipient, Sender, and Message submenus. The PowerScribe 360 | Reporting application supports only the following fields:
Recipient: Name, Fax Number
Sender: Name, Fax Number
Message: Note, Subject, Date Sent, Number of Pages
3. Click File > Save As....
4. Save the cover sheet to a folder on your computer. The cover sheet file has a .cov file extension.
To add the fax cover sheet at the system level:
1. On the System tab in the Setup group, click Templates....
2. Select the Cover Sheet tab.
OR
To add the fax cover sheet at the site level:
1. On the Sites tab in the Setup group, click Templates....
2. Select the Cover Sheet tab.
OR
To add the fax cover sheet at the site location level:
1. On the Sites tab in the Setup group, select the site from the drop-down list at the upper right.
2. Next to the location to which you want to add a fax template, click Edit.. in the Templates column.
3. Select the Cover Sheet tab.
To finish creating the Fax cover sheet:
1. Click New....
2. Enter a name for the cover sheet.
3. Navigate to and select the cover sheet file and click Open. Cover sheet files have a .cov extension.
4. Click Save. The template appears in the Select Template list.
5. Click Save and Close to save the template.