Report Type Reports
Reports - Custom Fields
The Custom Fields report shows information about reports in which certain custom fields contain specified values.
Running the Custom Fields Report
To run this report:
1. On the Reports tab in the Logs group, select Report Custom Fields from the drop-down list. A drop-down list containing names of all the custom fields defined for your site appears.
2. Select a custom field from the list, and then click Add Custom Field. The field is added to the list below.
3. Select Equals, Not Equals, or Contains. Then select or enter a value.
4. Repeat Step 2 and Step 3 for each custom field you want to include. You can remove any field by clicking Remove next to it.
5. Click View Report. Any reports that contain the values you indicated in the specified custom fields appear in the report.
Reports - Anatomy Modality Summary
This report shows a summary of reports submitted, organized by body region and modality.
Running the Anatomy Modality Summary Report
To run this report:
1. From the Reports tab, select the Reports- Anatomy Modality Summary report from the list.
2. Use the following table as a guide for entering values in this screen:
|
Parameter
|
Definition
|
|
Signed From and Signed To
|
Indicate the date range for this report.
Click the calendar icons  and select the beginning and ending dates. Beginning and ending times are required. and select the beginning and ending dates. Beginning and ending times are required.
|
|
Site
|
Select one or more sites for your report, if your organization has multiple sites.
|
3. Click View Report.
Results Screen and Explanations
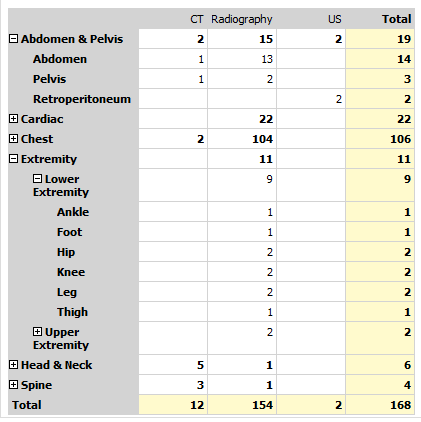
The illustration below shows the content of the Anatomy Modality Summary report.
The Reports - Anatomy Modality Summary report shows the following information in its table:
-
Each row: Shows a body region, such as Spine or Head & Neck
-
Each column: Shows the modalities, such as CT or Radiography, found within the report's date range, with totals for each anatomical region and grand totals for each modality.
Click the plus sign next to an anatomical region or a modality to see more specific details:
Reports - Assure Consistency Check
NOTE: Assure consistency check is a purchasable option. Ask your Nuance representative for more information.
This report provides information about any Assure consistency checks that were run on the system within the parameters you enter.
1. From the Reports tab, select the Reports - Assure consistency check report from the list.
2. Use the following table as a guide for entering values in this screen:
|
Parameter
|
Definition
|
|
Processed From and Processed To
|
Indicate the date range for this report.
Click the calendar icons and select the beginning and ending dates. Beginning and ending times are required.
|
|
Site
|
Select one or more sites for your report, if your organization has multiple sites.
|
|
Account
|
Select the user you want to include, or select All.
|
|
Accession
|
If you know the specific accession number for the report, enter it here.
|
3. Click View Report.
Results Screen and Explanations
The illustration below shows the content of the Assure consistency check report.
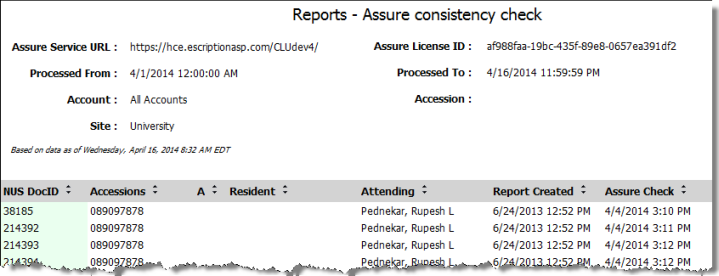
The Reports - Assure consistency check report shows the following information:
-
NUS Doc ID: The identifying number assigned in the RIS
-
Accessions: Site from which the report originated
-
A: The addendum’s sequence number. For an original report, this column is blank.
-
Resident: Last name, first name, and middle name of the resident who created the report, if applicable
-
Attending: Name of the attending radiologist who signed the report
-
Report created: Date and time the report for which the Assure check was run was created
-
Assure check: Date and time the Assure check was run.
Reports - Medical Order with Barcode
This report shows the medical order information, including the barcodes for both the patient and the study, based on the Order Number.
Running the Medical Order with Barcode Report
To run this report:
1. From the Reports tab, select the Medical Order with Barcode report from the list.
2. Enter the order number (usually the accession number).
3. Click View Report.
Results Screen and Explanations
The illustration below shows the content of a typical PowerScribe 360 | Reporting report using the Reports - Medical Order with Barcode report.
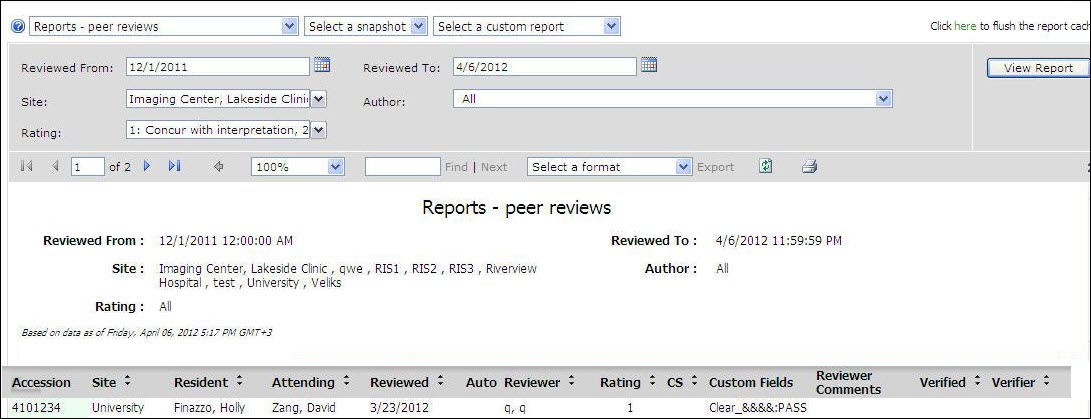
Reports - Peer Reviews
To run this report:
1. From the Reports tab, select the Reports - Peer Reviews report from the list.
2. Use the following table as a guide for entering values in this screen:
|
Parameter
|
Definition
|
|
Reviewed From and Reviewed To
|
Indicate the date range for this report.
Click the calendar icons and select the beginning and ending dates. Beginning and ending times are required.
|
|
Site
|
Select one or more sites for your report, if your organization has multiple sites.
|
|
Author
|
Select the user who created the peer-reviewed reports you want to include, or select All.
|
|
Rating
|
Select one or more ratings to include in the report, or select all ratings.
|
3. Click View Report.
Results Screen and Explanations
The Reports - Peer Reviews report shows the following information:
-
Accession: The identifying number assigned in the RIS
-
Site: Site from which the report originated
-
Resident: Last name, first name, and middle name of the resident who created the report, if applicable
-
Attending: Name of the attending radiologist who signed the report
-
Reviewed: Date the peer review occurred
-
Auto Reviewer: The provider who conducted the peer review
-
Rating: The rating the reviewer assigned
-
CS (Clinically Significant): With a rating of 3 or 4, a check mark in this column indicates that the reviewer considers the misinterpretation likely to affect the patient’s outcome.
-
Custom Fields: Content of any custom fields in the review
-
Reviewer Comments: Any additional remarks made by the reviewer
-
Verified: The date the report was verified
-
Verifier: The administrator who verified the report
Reports - Report List
This report shows all reports that meet your criteria. For example, you can view all reports that include a particular AutoText entry, or that are concerned with a certain anatomical part.
To run this report:
1. From the Reports tab, select the Reports - Report List report from the list.
2. Use the following table as a guide for entering values in this screen:
|
Parameter
|
Definition
|
|
Last Modified From and
Last Modified To
|
Indicate the date range for this report.
Click the calendar icons and select the beginning and ending dates. Beginning and ending times are required.
|
|
Site
|
Select one or more sites for your report. This parameter is applicable only to organizations with multiple sites.
|
|
Modality
|
Select one or more modalities for your report. The report includes only documents concerned with the modalities you select.
|
|
Anatomy
|
Select an anatomical part, or select All Anatomies. The report includes documents that are related to the anatomy you specify.
|
|
Account
|
Select one or more user accounts to include in the report.
|
|
AutoText Used
|
Select an AutoText, or select Any AutoText. The report includes only the documents that contain the AutoText.
|
|
Reports
|
Select Originals Only, Addendums Only, or All.
|
3. Click View Report.
Results Screen and Explanations
The Reports - Report List report shows the following information:
-
Accessions: The identifying number assigned in the RIS
-
A: The addendum’s sequence number. For an original report, this column is blank.
-
Site: The site where the report was created
-
Patient Name: The name of the patient who is the subject of the report
-
MRN: The unique identifying number assigned to the patient
-
Resident: The name of the resident who created the report, if applicable
-
Attending: The name of the attending radiologist
-
Status: The current state of the report
-
Modified: The date the report was last changed
Reports - Unsigned
This report lists reports that are currently unsigned by staff or resident providers.
Running the Reports- Unsigned Report
To run this report:
1. From the Reports tab, select the Reports - Unsigned Reports report from the list.
2. Use the following table as a guide for entering values in this screen:
|
Parameter
|
Definition
|
|
From Date and
To Date
|
Indicate the date range for this report.
Click the calendar icons and select the beginning and ending dates. Beginning and ending times are required.
|
|
Site
|
Select one or more sites for your report. This parameter is applicable only to organizations with multiple sites.
|
|
Correction Workflow
|
Select Self-edit, In-house, Delegated, or All.
|
|
Author
|
Select an author, or select All.
|
|
Editor
|
Select an editor, or select All.
|
|
Reports
|
Select Originals only, Addendums only, or All.
|
3. Click View Report.
Results Screen and Explanations
The Reports - Unsigned report shows the following information:
-
Accession: The identifying number assigned in the RIS
-
A: The addendum’s sequence number. For an original report, this column is blank.
-
Site: The site at which the report was created
-
MRN: The unique identifying number assigned to the patient
-
Dictated: Date and time the report was created
-
Editor: Name of the individual who corrected the report
-
Author: Name of the provider who created the report
-
Corrected: Date and time the report was edited
-
Approved: Date and time the report was approved
-
Audio Duration: The length of the report's audio, in hours, minutes, and seconds