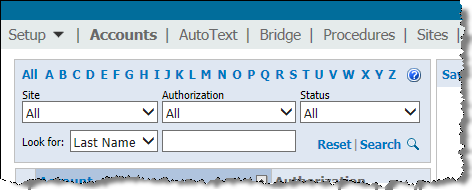
Use the Accounts tab in the Setup group to search for users already in the system.
You have several choices for searching.
Use the All link to display all the users on the system.
Use the A through Z links to display last names beginning with a particular letter.
Use the Site, Authorization, or Status options to filter your search:
Site filters based on each site in the system
Authorization filters based on the user’s role in the system
Status searches based on logon status, or whether the account is active or inactive
In the Look for field, select Last Name, First Name, Email, Identifier, or Username and enter the text to filter your search.
Click Search when using the Site, Authorization, Status, or Look for fields. The All and A through Z links refresh automatically.
Click Reset to return all search field to their defaults.
TIP: In the Look for text field, you can use an asterisk (*) as a wild card character. For example, if you do not know the exact last name of a provider but you know the name starts with a B, type B* and click Search.
You can combine any of these filters to narrow your results. For example, you can select a specific Site and Authorization to limit your results.
After you perform a search, the results appear below the search criteria.
To view the details of an account, click the user’s name in the Account column. The user’s information appears in the right side of the window.
Just above the user information portion of the window is a group of tabs that allow you to modify an existing user, or create a new user. These tabs are slightly different depending upon which of these two tasks you intend to perform.
Create New: Click this link after you have finished entering the information for a new user. (Once the window refreshes, this tab becomes the Save Changes tab. In addition, the other grayed out tabs become active.)
Clear: Removes the contents of the user information area. This link does not delete a user. It simply removes the information you have typed and allows you to begin again.
Save Changes: Click this link after you have made changes to the user.
Clear: Removes the contents of the user information area. This link does not delete a user. It simply removes the information you have typed and allows you to begin again.
Delete: Deletes a user from the system. A dialog box containing the following text opens: "Deleting this account will cause all its data, including its speech profile to be lost. Are you sure you want to continue?" You can click either OK or Cancel.
Deactivate: Deactivates the user’s account. When clicked, this button changes to Activate allowing you to reactivate the account if you choose to do so. Use Deactivate as an alternative to Delete to simplify system maintenance.
Preferences: Opens the Account Preferences dialog box.
Audit: Opens the Account Events dialog box. From here you can view and print information about a user’s activities in the system.