NOTES: This feature must be enabled by your administrator in order for you to use it. Currently, only Epic integrations support table uploads. |
Tables can contain dictated or typed text, or you can add merge fields to the cells. Merge fields can be pulled in from data integrations or DICOM measurements.
Best Practice: Always put either a fill-in field in the cell and/or a merge field. This allows for easy navigation through the table.
To insert a table into your report:
Place your cursor where you would like the table to appear in your report or AutoText.
Click the Table icon and hover your cursor over the grid to select your table size (or click Insert > Table, select the number of rows and columns for the table, and click OK).
The illustration below shows the table management tools available when you right-click anywhere in a table.

The following table describes the tools:
Table Tool |
Description |
Insert |
Use to insert columns to the left or right of the current column, or to insert rows above or below the current row. |
Delete |
Use to delete the column, row, or table where your cursor currently resides. |
Select |
Use to select the cell, row, or table where your cursor currently resides. |
No Border |
Select to hide the table borders. |
All Borders |
Select to show the table borders. |
View Gridlines |
Select to view the table gridlines (when the table borders are hidden). |
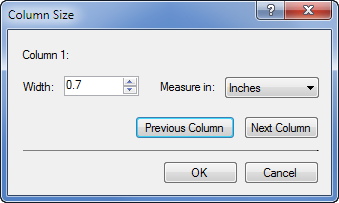
Column Size |
Select this item to open the Column Size dialog box. From here you can manage the width of all the columns in your table. You can select from inches, millimeters, or centimeters for your measurement gauge, and move from one column to another without exiting the dialog box.
|
Table Voice Command |
Function |
Examples |
“Go To Next <Table Item>” |
Navigates to the next cell, row, or column |
“Go to next cell” “Go to next column” |
“Move To Next <Table Item>” |
Navigates to the next cell, row, or column |
“Move to next row” “Move to next cell” |
“Go To Previous <Table Item>” |
Navigates to the previous cell, row, or column |
“Go to previous cell” “Go to previous column” |
“Move To Previous <Table Item>” |
Navigates to the previous cell, row, or column |
“Move to previous row” “Move to previous cell” |
“Go <Direction> <Number> <Table Item>” |
Navigates to a specified cell, row, or column |
“Go up three rows” “Go right three columns” “Go left two cells” |
“Select <Cell/Row/Table>” |
Selects the current cell, row or table |
“Select cell” “Select table” |
“Select Next <Cell/Row>” |
Selects the next cell or row |
“Select next row” “Select next cell” |
“Select Previous <Cell/Row>” |
Selects the previous cell or row |
“Select previous row” “Select previous cell” |
“Insert <Column/Row/Table>” |
Inserts the elements to the left for column, above for row (or displays the Insert Table dialog box for “Insert table”) |
“Insert row” “Insert column” “Insert table” |