eTIPS eTIPS

Automatic Concurrent Review allows
you to send predetermined quantities of created or
edited documents to the QA staff for review prior
to completion. Because these documents are
withheld from any distribution until QA review is
complete, this can impact the turnaround time for
them. The TextSystem allows you to bypass sending
stat (high priority) jobs to the Automatic
Concurrent Review queue so that turnaround time is
impacted at a minimum for these jobs.
Click the play button on the video
image below to view a short demonstration on how
to configure a group of transcriptionists to avoid
sending stat jobs to Automatic Concurrent Review.
Perform the following to configure
the system to ignore stat jobs when determining
which documents to send to the QA staff:
- Launch the TextSystem
Explorer application and login.
- Navigate to and expand the User
Types.
- Right click the user type for the
transcriptionists where ACR filters are
configured and choose Edit User
Type.
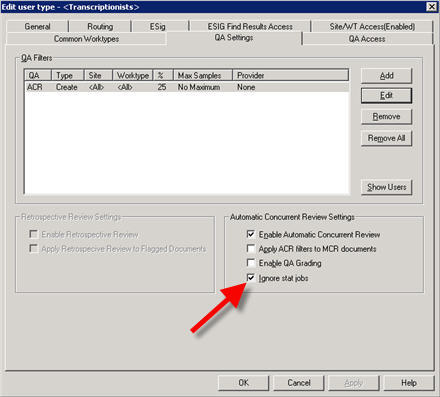
- Navigate to the QA Settings
tab.
- Check the box labeled Ignore Stat
Jobs.
- Click OK to save the
changes.
Keep in mind that stat jobs are
defined as those that have a priority greater than
the setting for these same users in Voice
Explorer. Perform the following to locate
this setting:
- Launch VoiceSystem Explorer
application and login.
- Navigate to and expand the
Site/Master Profile.
- Right click the master profile and choose
Modify Master Profile.
- On the Transcription tab,
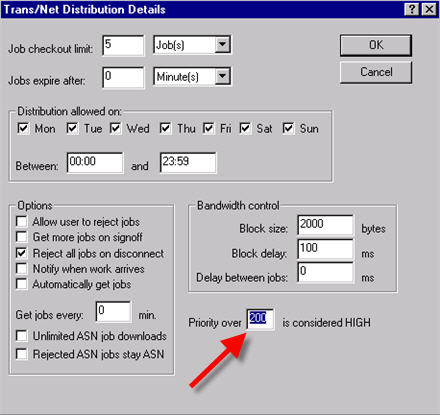
choose Transnet Details.
- Locate the Priority over x is
considered HIGH setting and enter
a value.
- Click OK to save and exit.
Please note: In the
example above, this value is set to 200.
This means that any job with a priority greater
than 200, or 201 and above would be considered a
stat job and ignored by the ACR filters.
Priority 200 jobs will
not be considered stat
jobs in this example. However, changing the value
to 199 will allow the priority 200 jobs to ignore
the ACR filter.
For additional information
about the Text System user administration, login
into iSupport and search for
"Administrator Courseware and Reference
Guide, Enterprise Text L-2955-006." If
you are not an ISupport subscriber, click iSupport Timesaver for more
information.
Did
you know that
the Olympus DS-5000 portable is supported on the
VoiceSystem running version 7.5 and
greater?
With Version 7.5 or greater of the
DESS VoiceSystem software, you can use the DS-500
digital portable to dictate and transfer reports
to the VoiceSystem. The following provides
step-by-step instructions on how to install and
configuring the portable with its associated
software.
Before
you begin make sure you have the following items
available:
- Olympus DS-5000 portable
- Olympus DSS Player Pro version 5.x software
CD (supplied with portable)
- Olympus DSS Player Pro version 5.x license
key (supplied with portable)
- Nuance (Dictaphone) Olympus Upload Utility
software CD
- The name and IP address of the VoiceSystem
you plan to connect to
- The VoiceSystem login ID and password for
the portable user
The
following describes how to install the Olympus
DS-5000 and configure it for a user:
- Install the Olympus DSS Player Pro version
5.x software.
NOTE: If you are
replacing an Olympus DS-4000 with a DS-5000 on
the same computer then you must first uninstall
both the Nuance Olympus Uploader client software
and the Olympus DSS Player Pro 4.x before
attempting to load the 5.x
version.
IMPORTANT: The
Olympus DSS Player Pro software installation
requires a unique, Olympus provided license key
during installation. The license key is printed
on a card that is shipped with the DS-5000
portable. Keep this card in a safe place. The
license key will be required should you ever
need to reinstall the software. The
license key cannot be replaced if it is lost.
You can only use a license key on one
computer.
- Install the
DS-5000 Nuance (Dictaphone) Olympus Upload
Utility software. This software is shipped
with the DS-5000 when you purchase the portable
and VoiceSystem license from Nuance. If
you have not already purchased the required
license for the Nuance (Dictaphone) Olympus
Upload Utility software please contact Nuance
Sales at 888-350-4836.
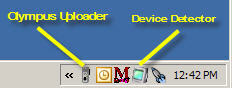
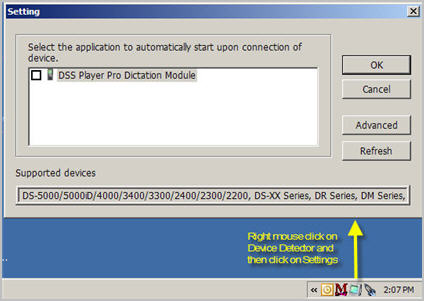
- After the
software has been installed, make sure the icons
for the Olympus Device Detector and the Nuance
(Dictaphone) Olympus Upload Utility show in the
computer's systray, indicating they are running
in the background. You may need to double-click
the Olympus Uploader icon to enable it in the
Systray.
- Right click on
the Device Detector icon in the Systray. Verify
that DSS Player Pro Dictation module shows in
the list and that it is unchecked to not start
automatically.
On
the first run of the Nuance (Dictaphone) Olympus
Upload Utility you may need to create an EXV
(VoiceSystem) Commander Selection entry. Click
the New button in the Commander Selection
screen. Enter a descriptive name in the first
field, leave the second field set to TCP/IP;
enter the IP address of the local VoiceSystem
server in the third field.
Note:
Ichart hosted customers should use the IP
address of the local voice capture VoiceSystem
server (if you have one) not the main IDC
datacenter server.
- When the portable is docked for
the first time, the Olympus DSS Player Pro
application will prompt for a User ID and
Password. Replace the default Olympus user
"DS5000" with the user ID and password for the
VoiceSystem.
- Assign the
portable to a user (provider). To do this, dock
the portable and launch the Nuance (Dictaphone)
Olympus Upload Utility. From the menu click File
then Configure Portable. A list of users that
are configured with "Olympus" privileges in
their VoiceSystem profile will be returned.
Select the user from the drop down
list.

The following describes how to
create a test dictation on the portable:
- Undock the portable and power it
on.
A list of VoiceSystem
Worktypes (WT) should be displayed on the
portable.
- Select one of these
worktypes and then click the
OK/Menu button.
- Click the Finish button to
skip entering an Account or
MRN number.
The Dictation screen
should show New File and the Author's User ID in
the upper left hand corner.
- Move the Slide switch, on the side
of the portable, to the REC
position and create a test dictation.
- Move the slide switch back to the
Stop position.
- Place the portable in the docking station
and the test dictation will upload to the
VoiceSystem. Multiple test files can be created
by using the New button on the side of portable.
NOTE: VoiceSystem
user profiles that will be using Olympus portables
must be configured with Olympus Uploader
privileges. Optionally, if the user is to be
presented with a list of Worktypes to choose from,
then these Worktype must be checked in that user
profile, under the Portables tab.
For additional
information and step-by-step instructions to
install and configure the Olympus portable, login
into iSupport and search for
solutions:
- L-3211-003 - Olympus DS-5000 Recorder
Administrator and Provider Installation and User
Guide
- L-3077-003 - Olympus DS-5000 System
Administration Guide for EXVoice 8.0
- L-3211-001 - Administrator and Provider
Installation and User Guide for the Olympus
DS-4000 Recorder
If
you are not an iSupport subscriber, click iSupport Timesaver for
information on how to get started with
iSupport.
Did you
know the DESS VoiceSystem can be configured
to alert users, of certain VoiceSystem client
applications, about the number of days remaining
until their password will
expire?
By
default, the DESS VoiceSystem is configured so
that many VoiceSystem client application user
login password never expire. This configuration is
unobtrusive and suits most organizations' needs.
If desired, system administrators can modify this
option so that users of these client applications
are forced to change their login password
periodically. Additionally, the system can be
configured to alert the user each time they login
of the number of days remaining before they must
change their current password and offer the user
an opportunity to change it at that time. This
feature can be configured for the following
clients:
- Job
Lister
- Explorer
- Client
Viewer
- Lucid/Personal
Job Lister
- Customization
Client in Build 8 or higher
Note:
Password days-remaining expiration notices are not
supported for the TransNet application.
To
enable password expiration, perform the following
steps.
- Launch the VoiceSystem
Explorer application and login
with your administrator account.
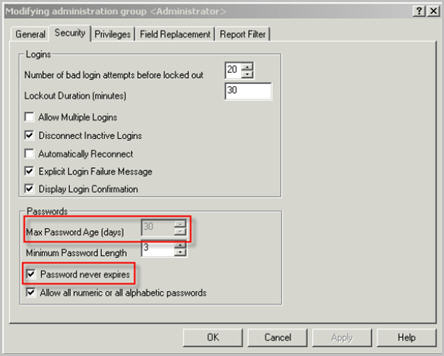
- Right
click the Administration group you wish
to modify the password policy for and choose
Modify
from the context menu.
- Uncheck the Password never
expires checkbox.
- Choose a Max Password
Age (days) that you wish the password
for users to expire in.
- Click Ok to save
your changes.
From
this point forward, users will be required to
change their password on or before the number of
days specified.
Some
customers may have an interest in prompting client
application users the additional information of
how many days remain before their application
password expires when they log in.
Once configured, on subsequent logins these
users will be prompted with days remaining before
their passwords expire. Please
note that the standalone Transnet application does
not support a number of days alert to
users.
Once
the password expiration options are set in the
administration group, follow these steps to
disable/enable the password expiration days
remaining functionality for users.
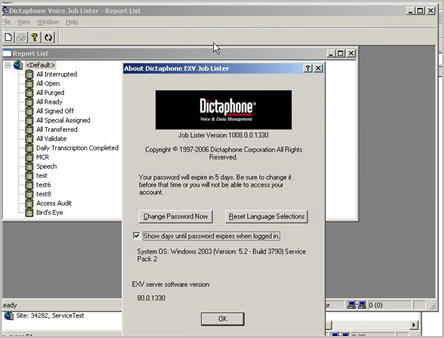
These example steps illustrate the Job
Lister application however other applications
(except standalone TransNet) behave the same
way.
- Launch
the VoiceSystem Job Lister
application.
- From
the top menu bar, click
Help and then select
About.
- Check
the box Show days until password expires
when logged in:
The
next time that a VoiceSystem client application
user logs in, depending on their previous password
configuration options, they will receive one of
two dialogs:
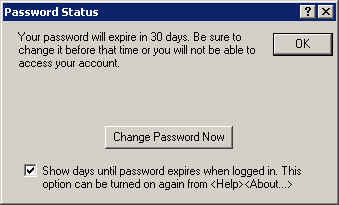
- Users
in the following categories will receive the
Password Status dialog message
as illustrated below describing the expiration
period and an option to change their
password:
- New
users.
- Users
that have been created within the date range of
the password expiration window.
- Users
that have had their password administratively
changed in (Explorer administration group) as an
overall part of this reconfiguration within the
date range of the password expiration
window.
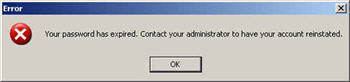
- Users
in the following categories will receive the
following dialog message, and will require
intervention by the system administrator to
reset their passwords:
- Users
that have never had password expirations
configured and have been on the VoiceSystem
longer than the date range of the password
expiration configuration.
- Users
that were previously within the date range of
the expiration time but are now outside of that
window because of a reduced password expiration
window (e.g. changing the expiration from 90 to
30 days).
For more
information about VoiceSystem configuration,
including administration group options, log into
iSupport
and search for solution 10136, "System
Administrator
Guide L-2957-008. If you are
not an iSupport subscriber, click iSupport Timesaver
for information on how to get started with
iSupport.
_______________back to
top_______________
Did
you
know that you can monitor your DESS Turbo
SpeechSystem backlog in order to determine if you
need additional Recognition
Servers?
DESS
Turbo SpeechSystem job recognition turnaround
performance is related to the number of
recognition servers in a given system. Typically
systems are sized with enough recognition servers
to handle periods of heavy dictation without
causing a significant backlog of queued jobs
waiting to be processed for recognition. Over time
your system usage could increase, to the point
where you may experience longer turnaround times
than desired for speech job recognition. Dictation
could create a corresponding growth in speech
recognition demand. As your system utilization
grows the turnaround time for speech recognition
may increase. These normal increases in speech
recognition performance typically suggest the need
for additional recognition servers.
Beginning with DESS Turbo
SpeechSystem version 8, additional standard
reports were added to the system, several of which
can be used to help determine speech recognition
performance. In particular, the Daily Summary and
Backlog History reports are useful tools to
monitor backlog and overall recognition turnaround
performance.
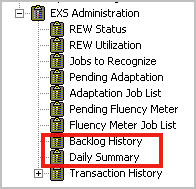
Perform the following to access
these reports:
- Launch
the DESS VoiceSystem Explorer
application and login with an administrator
ID and
Password.
- Expand
the EXS Administration node in
the system tree.
The
Daily Summary report will show you the total
number of jobs that are recognized, per day for
the past several months. If you notice this number
increasing over time it means you have more jobs
being routed to the SpeechSystem for recognition.
The Daily Summary report contains a report column
titled Max
Wait. As it's name
suggests, this value shows you the longest waiting
period for a job to be recognized on a given
day.
The
Backlog History report will show you the number of
jobs which were queued and waiting to be processed
by the SpeechSystem in 10 minute increments for
the last 30 days. This report will also show you
the time stamp of the oldest SRK job for that
period. From that information, you can easily
determine how long jobs are waiting to be
recognized throughout the day. If you find those
times are longer than your desired recognition
turnaround times, you should contact Nuance Sales
to assist you in further determining the need, and
helping you acquire additional recognition
servers.
Remember,
jobs that are queued to the SpeechSystem are not
available for editing until they have been speech
recognized processed. Jobs awaiting speech
recognition have the status flag SRK.
For additional
information about SpeechSystem reports, login
into iSupport
and search for solution 10128,
"EXSpeech Operator Manuals."
Locate your version of the Administrator
Courseware and Reference Guide. If you are not an
iSupport subscriber, click iSupport Timesaver for information
on how to get started with iSupport.
back to top
|