|
 eTIPS eTIPS
Did you know you could configure the search results content and column names that display when executing a search in Word Client or Enterprise Editor?
When selecting Search for Documents in Word Client or Enterprise Editor, you are presented with the Find Documents dialog box where you can enter search criteria such as; Site, Worktype, Patient MRN, etc. The Dictaphone Enterprise Speech System (DESS) TextSystem software allows for the column names and data displayed from the Find Documents dialog box to be custom for all users included in a particular User Type as well as for an individual Medical Transcriptionist (MT). Customizing these settings will help the MT see the results of the search populated with data most useful to him or her, such as DocumentID, SiteID, VoiceRecordID, Worktype, CreateDate, CreatedBy, to name a few.
Perform the following to customize the search results content and column names:
- Launch the DESS TextSystem Explorer application.
- Select a User Type or an individual MT to modify.
- Right click and choose "Word Client Settings…" These setting apply to both Word Client and Enterprise Editor.
- In the Word Client Settings window, navigate to the Find Documents Dialog tab.
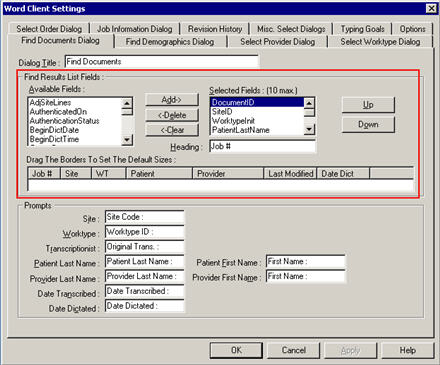
- Locate the section labeled Find Results List Fields: and select from the Available Fields section by clicking the desired field(s) and then clicking the Add button.
Please Note: You may add up to 10 fields.
- You can customize the name of the field by typing it in the section labeled Heading:. The Up and Down buttons allow you to configure the order in which the selected fields will be displayed from left to right along with a sample of the end results. In addition, you can adjust the default width of the field column by dragging the field's vertical border left or right, as shown below.

TIP: The additional tabs in the Word Client Settings window, such as Select Order Dialog, Find Demographics Dialog, Select Provider Dialog, and the Select Worktype Dialog tab, allow for similar customized changes.
For more information about managing these and other Word Client / Enterprise Editor settings, log into iSupport and search for Courseware & Ref Guide, EXText System Admin and select the document pertaining to your version of DESS software. If you are not an iSupport subscriber, click iSupport Timesaver for information on how you may get started.
_______________back to top_______________
Did you know there is a configuration setting allowing providers to remove reports from their ESig queue without electronically signing these reports?
If you have providers who are signing transcribed reports by using the EWS Electronic Signature (ESig) feature, there is an option to allow these providers to remove any transcribed documents waiting for signature in their EWS ESig queue. This may be useful if someone accidentally forwarded a report to the wrong provider, or if a site administrator mistakenly configured a signature script incorrectly, thereby, sending unsigned reports to the wrong providers for signature. Below are the steps required to add or remove this option, as well as details about how this option works. This feature is available in all versions of EWS.
Please Note: These settings are DESS VoiceSystem Site settings that will affect all EWS Self-Edit Users configured within the site.
- Launch the DESS VoiceSystem Explorer application and login with your Administrator User ID and Password.
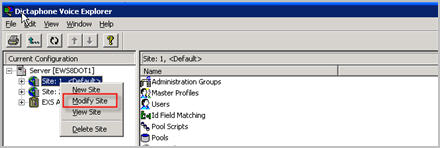
- Right click on a site and choose Modify site.
- Navigate to the Enterprise Workstation tab.
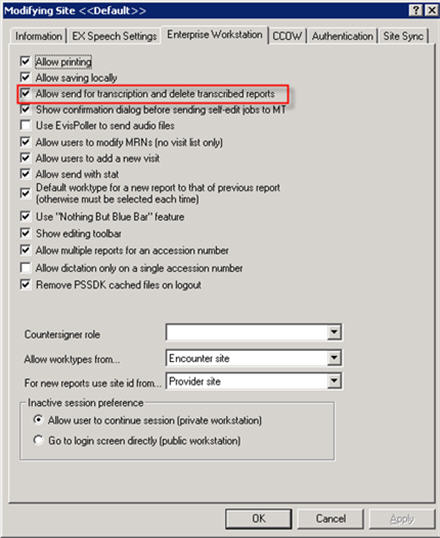
- On this tab, there is an option labeled Allow Send For Transcription And Delete Transcribed Reports. (see above)
Enabling this option offers the provider two features including:
- Feature Number 1: It provides the EWS ESig Users with a Delete button. This Delete button is available when an ESig user clicks the View/Sign Report button found on the Reports tab of EWS. By clicking Delete from within EWS, the system will remove the report from the provider's I Can Sign queue. The system DOES NOT delete the actual document, the document will remain in the DESS TextSystem database and available for Administrators/MTs to view and/or edit by using Word Client or Enterprise Editor. When a provider clicks the Delete button, the system simply changes the authentication status from Waiting to Cancelled, thereby, removing it from the provider's ESig queue.
It is important to understand that once a provider clicks the Delete button, the report will no longer be waiting in anyone’s signature queue to be electronically signed. However, if the report does require electronic signature, an administrator or MT can recalculate the signature requirements for the report by performing the following:
- Log into the DESS TextSystem Explorer application and make sure the correct Signature Script is in place to ensure the transcribed document will route to the proper provider.
- Log into either Word Client or Enterprise Editor and search for the document.
- Edit the document and access the VES screen by pressing Ctrl + J in Word Client, or Ctrl + Alt + J in Enterprise Editor.
- Clicking OK on this VES screen will recalculate the signature requirements for this document based on the current signature script in place.
- Press Ctrl + N to save the recalculation of the signatures for this document. At this point, the document will route to the provider defined by the associated signature script.
Below is an example of where the provider would click View / Sign Report, and then locate the Delete button:
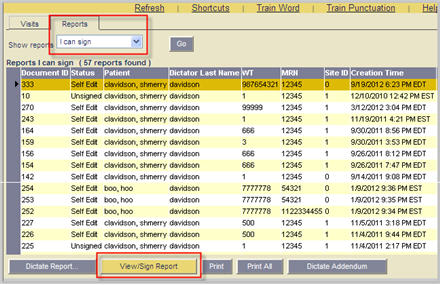
Once View/Sign Report is clicked, the user will see the following options at the bottom of the EWS program:

- Feature Number 2: This setting also provides EWS Self-Edit users with a Send for transcription button. This feature is only available to EWS users who log in with Voice Editing Enabled and dictate reports using real-time speech recognition. The Send To Transcription button gives the provider an option to send the dictation to an MT for editing as opposed to the normal process where the provider would self-edit the dictated report. This offers the provider the ability to move on to something more important rather than spending time to edit the report on his or her own. Clicking the Send To Transcription button will send the audio file, along with the optional recognized text, to the DESS voice server where it will be pooled out to an MT for editing. Once the MT completes the edits, the resulting document will go back to the provider's ESig queue to be electronically signed.
When a provider initiates a dictation on a patient with self-edit enabled, he or she will see the following options at the bottom of the EWS dictation screen:

Clicking Send For transcription will result into the following dialog box to appear prompting the provider to confirm this choice. Clicking Send for transcription in this dialog box, shown below, the system will delete the document id placeholder created for the Self-Edit Report, and then send the audio and recognized text to the Voice Server where it will pool to an MT.
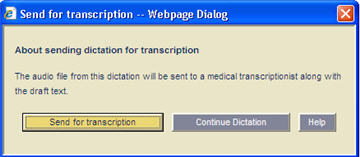
Please note: Enabling this setting provides all EWS Self-Edit users within the VoiceSystem Site combined privileges. Both the "Delete" and "Send For Transcription" features are made available by enabling this setting. Currently, there isn't a way to enable only one of the combined features.
As stated above, there is an additional option to send only the dictation (the audio only) or to send the dictation along with the recognized text to transcription. This additional option is specific to EWS Self-Edit users who ‘Uncle’ out of an EWS Self-Edit dictation by clicking the Send To Transcription button. This is a SERVER WIDE (not Site Wide) option, so, however you choose to have it configured will affect all EWS Self-Edit users who login to this EWS SERVER.
For more information about Enterprise Workstation, log into iSupport and search for solution:
- 10207 Enterprise Workstation Operator Manual
- 10115 EXText System Administrators Courseware and Reference Guide
If you are not an iSupport subscriber, click iSupport Timesaver for information on how you can get started.
_______________back to top_______________
Did you know Nuance's DESS Speech Recognition Servers perform many unique functions?
The Dictaphone Enterprise Speech System includes one or more recognition servers that work together to perform many important tasks. In addition to their normal job of processing speech recognition, these servers also perform functions important to the ongoing performance of speech recognition for your users. Most importantly, many of these functions work in the background and require no administration. These functions include:
-
Language Model Identification (LMID) - This process assigns a specific Language Model, a more focused word list, to a dictator. This helps improve recognition by reducing the total number of options the server needs to pick from to recognize a given word or phrase. For example, a radiologist may use one Language Model while a cardiologist uses another, as commonly used terminology can vary between disciplines.
- LMAdapt - This process will search providers' typed documents looking for words that do not currently exist in the factory language models. It will compile the missing words and make them available in Customization Client where a system administrator can evaluate them. The administrator can then add them to the Customized word list, resulting into increased recognition probability.
- Fluency Meter - This process runs for all providers who are currently in the collection process. It compares what the system recognized with what was typed by transcription. The closer those files match the higher the score and the better chance for the provider to qualify for DRAFT status.
- Adaptation - This process enables the system to learn how a provider speaks. It makes adjustments to help account for dictation speed, accent and pronunciation, so recognized text is as clear as possible.
- Recognition - This process is where recognized text is generated and returned to the VoiceSystem to allow for correction.
- SmartReWrite - This process enables the system to learn and anticipate common corrections made by a transcriptionist. This feature is available in all DESS SpeechSystem 7.5 and 8.x versions.
- Transcoding - This process occurs with any job sent to Speech System. The original recording format is required for optimal recognition but is not required for storage on the VoiceSystem. During Transcoding the recognition server will modify the job to a format that occupies less space in the voice path but does not result in any quality loss.
For more information about your DESS SpeechSystem and its components, log into iSupport and search for solution 14962: Recognition Server Functions. If you are not an iSupport subscriber, click iSupport Timesaver for information on how you can get started.
_______________back to top_______________
Did you know you could send feedback about Dragon® Medical 360 | Mobile Recorder directly to Nuance's product development team?
You can send feedback to the Nuance's product development for consideration in future versions of Dragon Medical 360 | Mobile Recorder by using the DM 360 application on your mobile recording device. Within the Dragon Medical 360 | Mobile Recorder application, running on your Apple® iPhone®, iPad®, or iPod®, perform the following:
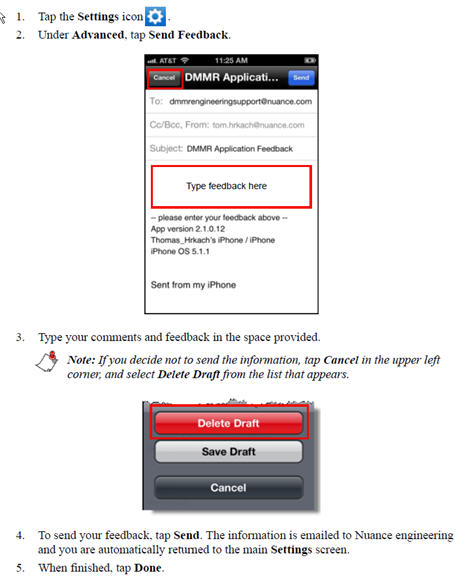
For more information about Dragon Medical 360 | Mobile Recorder, log into iSupport and search for solution 14339: Dragon Medical 360 | Mobile Recorder User's Guide. If you are not an iSupport subscriber, click iSupport Timesaver for information on how to become a member.
back to top
|