|
Top
This Month's eTips
Using and managing Auto-texts within Dragon Medical One.
Auto-texts are standard blocks of text (also called 'normals' or 'canned text') that you can insert into your document with a short voice command. Using auto-texts reduces the time you need to record and improves the consistency of your documentation.
Example
- You often speak to your patients about the dangers of smoking. In the report, you will say The patient was advised to quit smoking and counseled on effective smoking cessation strategies.
- You define an auto-text called 'quit smoking' that contains this information.
- You say the voice command insert quit smoking to insert the information.
Working with auto-texts
- To display a list of available auto-texts, say what can I say and scroll to the Auto-texts section.
- When you are recording, the application uses a keyword to identify that there is an auto-text to process. The default keyword is insert (if this does not work, contact your administrator to find out the keyword for your system). You must say the keyword and the spoken form, for example, insert quit smoking.
- You can navigate to the fields in auto-texts via voice commands such as next field and go to previous field.
- To use the default values and remove the field delimiters of all fields, say accept defaults.
- To use the default value and remove the field delimiters of the field with the focus, say field complete. If a field contains several values, separated by |, the first value will be used.
 |
Note: After saying accept defaults, pause to ensure that the command is performed before you continue. |
Managing auto-texts
All auto-texts that you created are listed in the Manage Auto-texts dialog box. You can edit existing auto-texts and add new ones.
To add an auto-text, do the following:
- Click
 and select Manage Auto-texts; the corresponding dialog box is displayed.
- Click + and fill in the required fields (repeat as necessary).
- Click Apply All.
Spoken form
If how the auto-text name is written and how it is pronounced are very different, make sure that the Spoken form (how it is pronounced) reflects this. You can only use alphabetic characters in spoken forms. For acronyms that are spelled out use capital letters, separated by spaces.
For the spoken form, do not use:
- Very short phrases (such as one syllable only)
- Capital letters (except for acronyms, for example, CIA)
- Abbreviations
- Digits (use 'twelve' and not '12')
- Punctuation marks (for example, ", !, ?, etc.)
- Symbols (for example, +, -, &, $, etc.)
Fields
Auto-texts can contain fields. Fields are gaps in the auto-text where you can enter specific text, for example, patient data. To add a field to an auto-text, enter [ ] in the relevant place of the auto-text's contents; you can enter any text between the field delimiters as default content, for example, CBC results [within normal limits], vital signs [within normal limits]. When you insert the auto-text, you can decide whether you want to replace the default values with specific text or use the default values.
Tips
- To open the Manage Auto-texts dialog box, say manage auto-texts.
 means that the auto-text is not properly filled in. The Apply All button is not active if any auto-text contains invalid data. means that the auto-text is not properly filled in. The Apply All button is not active if any auto-text contains invalid data.  means that you can undo any changes that have not been saved. Click the icon to revert any changes. means that you can undo any changes that have not been saved. Click the icon to revert any changes.- You can add/edit multiple auto-texts before clicking Apply All.
- Click
 to copy an existing auto-text and use it as a template for a new one. The template will have the same description and content as the one you copied; the Name and Spoken form fields will be empty. to copy an existing auto-text and use it as a template for a new one. The template will have the same description and content as the one you copied; the Name and Spoken form fields will be empty.
- Click x to delete an auto-text. You can undo this action until you have clicked Apply All.
- To undo changes, copy or delete an auto-text, right-click it and select Revert Changes, Copy or Delete.
- By default, fields are indicated by square brackets. You can change the characters used as field delimiters on the General pane of the Options dialog box; any previously defined fields using different delimiters will then no longer work. Do not use { } or | as field delimiters.
To learn more and to keep current with any changes to this topic, review this topic within the Dragon Medical One Desktop Application's Help resource.
Top
Enabling DMPE 4.0 Web extensions in Chrome and IE.
Customers can install and enable the Dragon Web extension for Dragon Medical Practice Edition (DMPE) 4.0 to receive Full Text Control in most websites for supported browsers like Chrome and Internet Explorer.
This optional, Dragon browser add-on is installed to enable:
- Commands that allow you to click Web page objects, like buttons and links, by voice.
- Full Text Control in most Web page fields and in Web applications.
Without the extension installed, you'll need to use your mouse and keyboard to click Web page objects. You might also need to use the Dragon Dictation Box to dictate text into fields and Web applications.
Browser requirements
| Microsoft Internet Explorer |
- Version 11, 32-bit or 64-bit. |
| Google Chrome |
- Use latest version.
- Dragon Web Extension feature is not supported for either the Chrome Metro mode or Chrome Incognito mode. |
| Microsoft Edge |
- Not supported.
- You cannot click Web page objects by voice in Edge. |
Installation
For Internet Explorer, you install both an extension and a plug-in. For Chrome, you install only an extension.
Prerequisites
- Ensure the Enable HTML Support option on the Options dialog box—Commands page is enabled. This option is enabled by default.
- Ensure you're using a supported browser with the appropriate version.
- If you're using Internet Explorer, ensure you've selected the Enable third-party browser extensions option:
- Open Internet Explorer.
- From the Tools icon
 , select Internet options. , select Internet options.
The Internet options dialog box opens.
- Click the Advanced tab.
- In the Browsing section, select the Enable third-party browser extensions option, and then click OK.
- Close and then reopen Internet Explorer.
If you don't enable this option, the Dragon Web Extension can't load the Dragon HTML Component. In addition, the component is not visible in the Manage Add-ons dialog box after installation.
Install the Dragon Web Extension for Internet Explorer:
- Open Internet Explorer.
A prompt appears when you first open Internet Explorer after Dragon installation.
|
Note: This prompt does not appear if you selected either the Do not ask me again check box when the prompt first appeared, or the Do not show tips option on the Options dialog box—Appearance page. |
- Click Proceed.
Installation instructions appear.
- Follow the instructions provided.
Install the Dragon Web Extension for Chrome:
- Open Chrome.
A prompt appears when you first open Chrome after Dragon installation.
|
Note: This prompt does not appear if you selected either the Do not ask me again check box when the prompt first appeared, or the Do not show tips option on the Options dialog box—Appearance page. |
- Click Proceed.
Chrome prompts you to install the extension.
- Click Add to Chrome button.
Chrome prompts you to confirm the installation.
- Click Add extension.
Chrome installs the extension.
Determine whether the Dragon Web Extension is enabled:
Internet Explorer
- Open Internet Explorer.
- From the Tools icon , select Manage add-ons.
The Manage add-ons dialog box opens.
- Locate the Dragon Web Extension and Dragon HTML Component under Nuance and ensure they are Enabled.
- Click Close.
If extensions are not enabled, do the following:
- Select the extension or HTML component.
- Click Enable.
- Close and re-open your browser.
Chrome
The Dragon Web Extension icon  is visible on your toolbar when the extension is installed and enabled. is visible on your toolbar when the extension is installed and enabled.
- Open Chrome.
- Click the Menu icon
 and select Settings.
The Settings page appears. and select Settings.
The Settings page appears.
- Click Extensions.
- Look for the Dragon Web Extension and ensure it is Enabled.
If it's not enabled, select the Enable check box, then close and re-open your browser.
To learn more and to keep current with any changes to this topic, review this topic within the Dragon Medical Practice Edition client's Help resource.
Top
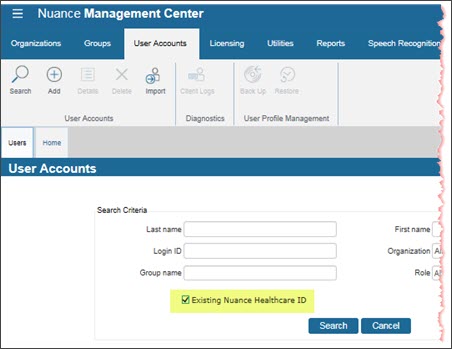
Workaround for blank search result with user accounts in Nuance Cloud (NMS 5.9).
With the release of Nuance Management Server (NMS) version 5.9, and the subsequent update to the Nuance Cloud, there is an issue in our hosted environment whereby some user accounts may not display when using the Nuance Management Console (NMC) User Accounts > Search feature.
Workaround
For user accounts that do not display when searching in the Cloud NMC, check the checkbox Existing Nuance Healthcare ID and perform the search again. User accounts that have a Nuance Healthcare ID assigned will now display.
|
 Nuance Healthcare customers asked us to share survey results about the effectiveness of our Dragon Medical Provider training program. We're pleased to report that the program has been a resounding success, with 76% of participants giving Nuance a '9' or '10' 'promoter' rating on a 0-10 rating scale. Our overall net promoter score (NPS) for Nuance Dragon Medical Provider training is 70, a solid standing.
 March 7, 2018 - In an announcement at HIMSS 2018, Nuance and Epic revealed that Nuance's artificial intelligence (AI)-powered virtual assistant platform is integrated into Epic's EHR. With this new capability, Epic's EHR further improves caregiver productivity and efficiency across the continuum of care. This announcement comes as new CHIME survey data reveals that 70 percent of hospital CIO's surveyed would consider adopting virtual assistants with AI capabilities in the coming year.