|
PowerScribe One is now available
Announced and demonstrated at RSNA 2018, PowerScribe One is now generally available! This next-generation reporting solution harnesses the power of AI and the cloud to deliver unmatched workflow efficiency and accuracy to improve diagnosis, follow-up, and treatment. PowerScribe One is a game changer for individual radiologists and the industry itself, augmenting workflow and assisting radiologists at the point of care, allowing them to focus on what matters most – the patients they serve.
Join us on April 17, 2019 for a webinar to learn more about how PowerScribe One frees the radiology team from distractions, interruptions, and delays that get in the way of staying focused, moving quickly, and working smarter.
Click here to register for the PowerScribe One webinar.
Top
This month's eTips
Did you know that you can add patients and create orders directly in the PowerScribe 360 Reporting system?
Users assigned the Order Entry role are authorized to perform order entry tasks; these users see the Order Entry Portal upon logging in. They can:
- Create new orders and add new patients.
- View a list of the exams ordered today.
- View a list of unreported orders.
- Use any combination of search criteria to find orders.
They can also use the Order Entry Portal to manage their user profiles, including changing the password, address, phone, and other information.
Order Entry users who are also administrators can create and manage physicians through the Physicians tab in this Portal.
To add a new patient to the system:
-
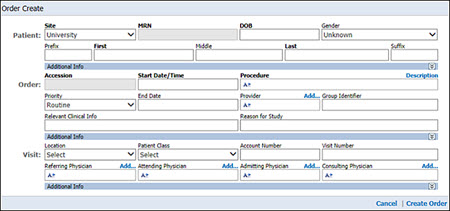
Click the Add New Patient link. The Order Create dialog box opens. (For new patients, you must enter the required patient demographic information at the top of the window.)

- Fill in the information for the required patient demographic fields:
- Site: Select the patient's site.
- MRN: Enter the patient's MRN. Note that in the example above, the MRN field is not available. This means that the system has been set up to automatically generate MRNs; this field will be populated once the patient/order information is created and saved.
- DOB: Enter the patient's date of birth. You can click the month/year on the calendar to select different months/years, or you can type directly into this field.
- First: Enter the patient's first name.
- Last: Enter the patient's last name.
- Fill in the order information:
- Accession: Enter the accession number. Note that in the example above, the Accession field is not available. This means that the system has been set up to automatically generate accession numbers; this field will be populated once the patient/order information is created and saved.
- Start Date: Enter the date and time for this order. You can select the date from the calendar or type directly into this field. Date format is m/d/yyyy. Time format is either h:mm AM/PM, or 24 hour (military) time hh:mm.
- Procedure: Type the first few letters of the procedure for this order. A list of procedures that begin with those letters opens, allowing you to make a specific selection.
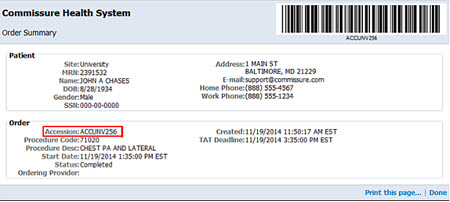
- Once you have entered the required information, click Create Order. The Order Summary window opens.

Notice that the automatically generated accession number (from our example) now appears in the order.
- From here you can either click Done to return to the main order entry window or click Print this page to print the order and scan the barcode into your RIS or the PowerScribe 360 Reporting system.
Top
Did you know that you can send a report back to the last person who worked on it with a note attached?
Attending providers and residents in some cases may want to send a report back to the previous person who last edited the report. This can be done by Rejecting the report. Rejecting a report returns a report to the last person who worked on it and changes the report status from Corrected to Pending Correction.
The following table shows which users can reject a report.
| User |
Reject Privilege |
Attending |
Sends a report back to a Resident or an Editor for further corrections. |
Resident |
Sends a report back to an Editor for further corrections. |
Editor |
Editors cannot reject a report. |
To reject a report:
- Open either Explorer or the Report Editor, and select the report you want to reject.
- Click the
 icon in the toolbar, or select File > Reject. The Report Note dialog box opens, allowing you to either dictate or type a reason for rejecting the report. icon in the toolbar, or select File > Reject. The Report Note dialog box opens, allowing you to either dictate or type a reason for rejecting the report.
- Add a note to the report and click OK to return the report to the resident or editor for further work.
Note: Select Tools > Preferences > Workflow, and make sure the preference Warn on sign
if new notes exist is set to either Always or From Transcription. This ensures that you are
notified when a new note has been added to a report that you are about to sign.
Top
Did you know you can add a contributor to a report that is not the attending or resident physician?
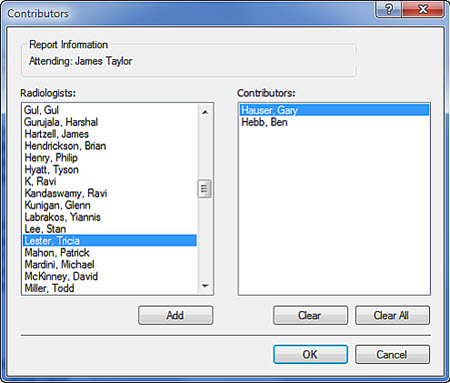
You can use the Contributors dialog box in the PowerScribe 360 Reporting client to identify additional radiologists who helped create the report (other than the attending and resident).
Note: Adding a contributor to a report does not send a copy of the report to the
contributor.
To insert a contributor into your report:
- In the Report Editor window, select Properties from the navigation panel and click the Insert Contributors link, or select Insert > Contributors from the menu bar. The Contributors dialog box opens.

- From the Radiologists list, select the name, or names of the radiologists you want to add as contributors and click Add.
- To remove a contributor, select the name from the Contributors side of the dialog box and click Clear. To remove all contributors from the list, click Clear All.
- When your contributors list is correct, click OK. The names you selected appear in the Contributors section of Properties.
|