|
PowerScribe One
We’re very excited to share the general availability of PowerScribe One, Nuance’s next generation radiology workflow and reporting solution. PowerScribe One combines ground-breaking AI and cloud-powered innovations with advanced quality and productivity improvement capabilities to provide a vastly improved reporting experience. It’s a game changer for radiologists and the industry. It augments workflow and assists radiologists at the point of care, delivering more accurate, consistent, reliable, and actionable reporting that gives radiologists time back in their day — so they can take care of more patients, enjoy their work, and derive maximum value from their technology investments.
To learn more about how PowerScribe One frees the radiology team from distractions, interruptions, and delays that get in the way of staying focused, moving quickly, and working smarter, click here to watch a pre-recorded PowerScribe One webinar.
Top
This month's eTips
Did you know that you can manage users Speech Profiles from within the Administrator Portal?
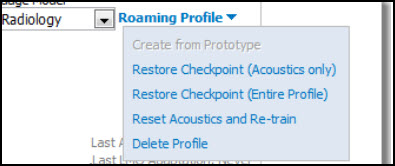
As administrator in the Administrator Portal, you can use the Setup – Accounts - Roaming Profile menu to:
- Create a roaming profile for a user from a prototype, if one exists in your system.
- Restore a user’s entire speech profile from a backup or restore only the acoustic portion of the profile.
- Reset the user’s acoustic model and begin training again.
- Delete a roaming profile.
Creating a Roaming Profile
You can assign a ‘dummy’ Dragon profile to a user who does not use speech recognition; with this profile, the user does not have to go through speech training on application startup. A prototype (trained) profile must exist in the Administrator Portal for this option to be available; this profile is put in place by Nuance personnel during the system installation.
Restoring a Profile
As administrator, you can overwrite a user’s current roaming speech profile with the last profile backup, or checkpoint.
Every time a user performs training or selects the Checkpoint Speech Files option from PowerScribe 360 Reporting client application’s Speech menu, the software makes a backup of a user's speech profile. The system keeps only the most recent backup. If necessary, you can restore the entire speech profile from the backup. Or, you can restore only the acoustic portion of the profile; use this option when you want to retain any
vocabulary changes the user has made in the profile.
To restore the entire speech profile:
-
Find the user account associated with the speech file you want to restore.
-
Float your mouse cursor over the Roaming Profile link.
-
Select Restore Checkpoint (Entire Profile).
-
Click OK at the confirmation message. The profile is restored.
To restore only the acoustic portion of the profile:
- Find the user account associated with the speech file you want to restore.
- Float your mouse cursor over the Roaming Profile link.
- Select Restore Checkpoint (Acoustics Only).
- Click OK at the confirmation message. The acoustic portion of the profile is restored.
Resetting the Acoustic Model
As administrator, you can reset a given user’s acoustic model, while keeping intact any added, trained, or disabled words. You might take this action when there are enough recognition issues to warrant the user’s restarting the training process from scratch, but you want to retain any vocabulary changes the user has made.
To reset a user’s acoustic model:
- Find the user account associated with the acoustic model you want to reset.
- Float your mouse cursor over the Roaming Profile link.
- Select Reset Acoustics and Re-Train. A confirmation message appears.
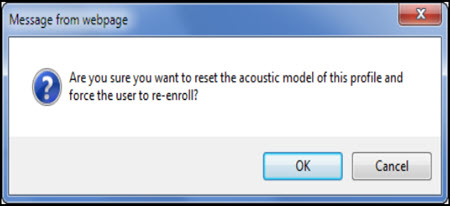
- Click OK. The user is prompted to begin training again at the next login.
Deleting a Speech Profile
You might need to delete a user’s speech profile if you want her to re-train without saving any added or trained words. If you use this option, the user is warned at the next login that a new profile will be generated, and the user will have to re-enroll.
To delete a speech profile:
- Find the user account associated with the speech profile you want to delete.
- Float your mouse cursor over the Roaming Profile link.
- Select Delete Profile. A confirmation message appears.
- Click OK to delete the profile.
Top
Did you know that that you can use your Procedure Master Translator (PMT) to Add or Modify Procedure Codes?
In most cases you do not need to add individual procedure codes to your system because they are added automatically as new orders are received through HL7.
The following methods can be used to modify the procedure codes in the system.
Best Practice Method: Modify and rename your most recent PMT worksheet, then re-import the PMT worksheet.
In order to maintain the integrity of your PMT worksheet, use the following steps when adding, removing, or changing information. Updating the most current worksheet using these steps ensures that you always have an up-to-date backup copy of your latest changes.
- Using Excel, open the most recent copy of your PMT worksheet.
- Enter your changes as required:
- Add new procedure codes to the bottom of your existing list of codes.
- Modify existing procedure codes as needed.
- Use the Save As function in Excel to save your worksheet. By renaming your most recent copy (using the current date at the end of the name) and performing a Save As, you create a series of PMT worksheets that contain the changes you have made over time.
Tip: Using the current date is the key to the name change; the rest of the name can remain the same.
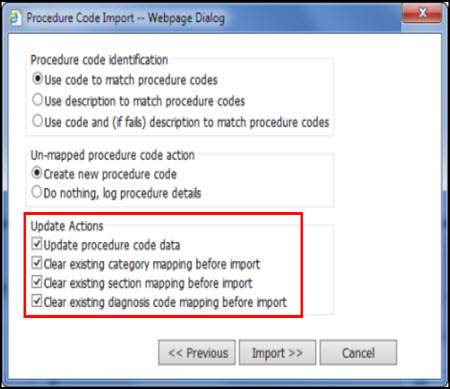
- From the PowerScribe 360 Reporting Administrator Portal Setup – Procedures page, begin the import process of this newest version of the PMT when you reach the Update Actions section, select all four of the check boxes as shown below, and click Import.
- Once the Import is complete, click Close.
Top
Did you know you can assign a diagnosis codes that have been mapped to procedure codes for a report?
If your organization has imported mappings for diagnosis codes, a short list of possible diagnosis codes is displayed for you to select from, as shown in the example illustration below.
- After signing a report, the Diagnosis Codes dialog box opens.
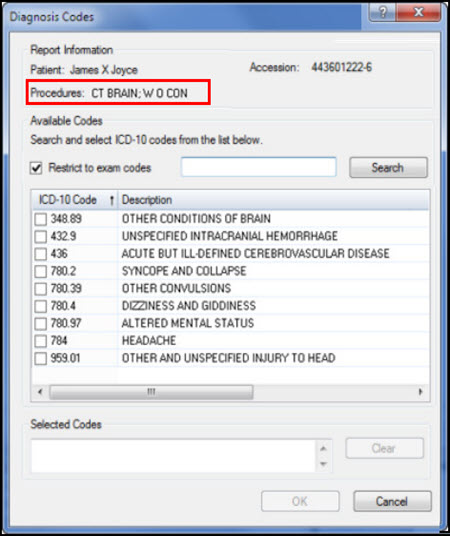
- Make sure that the Restrict to exam codes check box is selected. Selecting this check box limits the codes that are presented to the ones that are mapped to procedure codes.
- From the search results list, select the check box next to the diagnosis code you want to use. The code then appears in the Selected Codes area of the window.
- When finished, dictate “OK” to close the Diagnosis Codes window.
|