|
 eTIPS eTIPS
Did you know you could use the "Resume With" voice command to quickly re-dictate from a defined point forward?
PowerScribe has a voice command that allows a provider to quickly re-dictate content. For example; if an undesirable portion of a sentence was dictated, you could quickly go back to a specific word or phrase within the sentence and re-dictate the content from that point forward. This is accomplished by using the "Resume With" voice command followed by the last word or phrase you would like to resume dictation after.
Click the play button on the following eTIPS video image for a brief demonstration on how to use the "Resume With" voice command.

Here's an example of how to use the "Resume With" voice command:
Dictate: The patient is a 35-year-old male who presented to the ER complaining about abdominal pain.
Problem with sentence: the patient is actually a 45-year-old male who was complaining about chest pain.
Solution: Dictate, "Resume with patient" followed by, "is a 45-year-old male who presented to the ER complaining about chest pain."
Result: The patient is a 45-year-old male who presented to the ER complaining about chest pain.
_______________back to top_______________
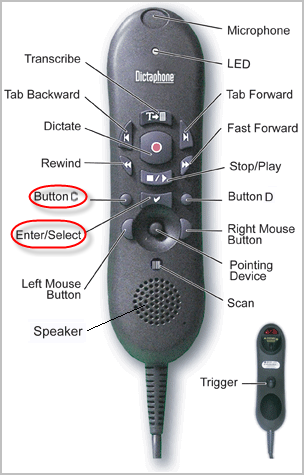
Did you know you could sign a self-edit report by using buttons on the PowerMic II?
By default, the PowerMic II is configured to allow a dictated report to be signed by pressing "Button C" on the PowerMic. However, once "Button C" is pressed, the system presents the user with a confirmation box, forcing the user to either press the "ENTER" key on the keyboard or click the OK button by using the mouse. Most users don't know that the PowerMic II button identified by a check mark symbol is identical to pressing the "ENTER" key on the keyboard. Therefore, signing a report by only using the PowerMic II buttons is easily accomplished by pressing "Button C" followed by pressing the button that is marked with a check mark. Refer to the image below for information about where these two buttons are located on the PowerMic II.
_______________back to top_______________
Did you know you can be notified when a specific iSupport Knowledge Base solution has been updated?
There is a feature in iSupport that allows you to save iSupport Knowledge Base solutions, of your choice, into the Quick Link section of the iSupport Home page. When any of the solutions, listed in the Quick Link section of the iSupport Home page, are updated, you will automatically receive an email notification informing you that the solution has been updated.
This is a valuable feature in that it allows you to be informed when a new version of software has been released or to simply be notified when a solution of your choice has been updated.
Perform the following to learn how to add the PowerScribe for Radiology User Documentation solution to the Quick Links section on your iSupport Home page:
- Navigate your browser to Nuance's iSupport website:
https://iSupport.nuance.com
- At the Welcome page, login with your iSupport credentials.
- In the How can we Help you group on the iSupport Home page, click the Find a Solution link to move to the Knowledge Base page.
- In the Search Solutions text box, type PowerScribe User Documentation.
- Click PowerScribe for Radiology User Documentation link and solution "10129: PowerScribe for Radiology User Documentation" will appear.
- To save this article as a Quick Link on the homepage, click the Add To Quick Links button found on the upper right.
- Click the Home tab.
- Verify that solution is listed in the Quick Links section on the Home page.
Note: To remove a Solution from the Quick Link group on your Home page, click the article number link to view the article. While viewing, click the Remove from Quick Links button found on the upper right.
back to top
| 
 Contacting Support