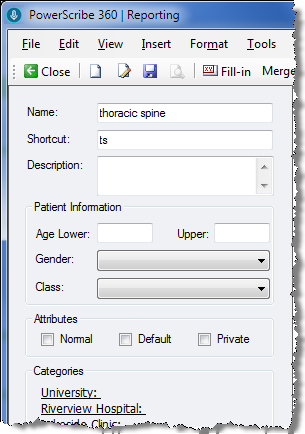
This is the name of the AutoText. Select a name that the speech engine will recognize to make it easier to insert the AutoText using voice commands.
In addition to using a voice command to call an AutoText, you can assign a shortcut to an AutoText. A shortcut is a keystroke sequence you assign to an AutoText. For example, you might type the shortcut ncx for a normal chest x-ray AutoText. When you begin to type in the report editor, and enough text is typed to uniquely identify a single AutoText shortcut, a tooltip appears, displaying the name and contents of the AutoText. You can then press Enter on your keyboard to insert the AutoText.
This is a short description of the AutoText. The description is optional.
If there is an age limitation on the AutoText, specify the upper and lower age limits (in years) here. If the patient's age is not within the selected age range, the AutoText does not appear on the list of relevant choices. The age limit specification is optional.
Note that the upper limit value is inclusive. For example, an AutoText with a lower limit of 1 and an upper limit of 2 applies to children from 12 months old to 35 months old. If you want to include only one-year olds, set both the lower and upper limits to 1. If you want to include only infants/newborns (less than 12 months old), set both the lower and upper limits to 0.
In some cases, the upper limit is optional. For example, an AutoText for adults only could have a lower limit of 16 and an empty upper limit. Similarly, for a pediatric AutoText, you can set only an upper limit. The maximum upper limit is 130.
If the AutoText is gender specific, it can be specified here. If the gender of the patient does not match the gender specified in the AutoText, the AutoText does not appear on the list of relevant choices. The gender specification is optional.
Allows you to select a patient class. For example, Inpatient , Outpatient, Emergency, and so on. (Class is optional.)
Each AutoText can be flagged as Normal, Default, or Private. (Attributes are optional.)
If there is a unique Normal AutoText associated with the procedure code for an order, you can create and sign the report in one button click.
If there is a unique Default AutoText associated with the procedure code for the order, the AutoText is inserted automatically when you create the report (if you select the Start with default AutoText user preference in Tools > Preferences > Reporting).
An AutoText marked Private is only visible to the user who created it. If User A searches on User B’s AutoText list, all those marked Private are not visible to User A.
Allows you to assign procedure codes to an AutoText.
To assign procedure codes to an AutoText:
1. Click one of the sites in the Categories section to open the AutoText Categories dialog box.
2. Browse for the procedure codes you want to assign to this AutoText.
3. From the list of codes that appears in the Matching Procedure Codes section, select the codes to assign.
4. Click Add. The codes appear in the Assigned to AutoText list.
5. When finished, click OK.
For more information on using the AutoText Categories dialog box, click here.