 on the toolbar. The Fill-in Field Definition dialog box opens.
Fill-in fields are used in AutoText to allow you to easily move to specific areas of a report that you change frequently, such as blood pressure, pulse, or temperature. Using a voice command or your microphone you can navigate to each of these fields, and then either accept its default value or dictate a new value in the field. You add fill-in fields while you are creating or editing your AutoText.
You can specify the type of field you want to use, and add findings codes to the field.
To create a fill-in field:
1. Open (or create) the AutoText into which you want to insert the fill-in field.
2. Place your cursor at the location in your AutoText in which you want the fill-in field to appear.
3. Click the Fill-In icon on the toolbar. The Fill-in Field Definition dialog box opens.
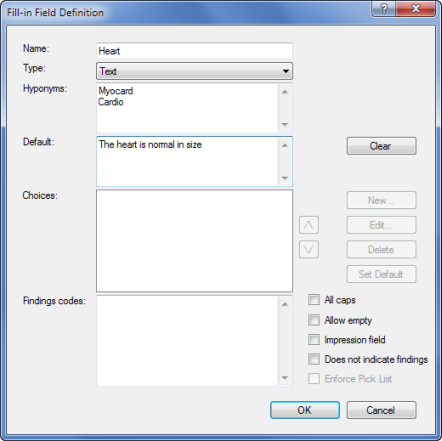
Use the following descriptions to help you understand how to create the fill-in field.
Each Fill-in field requires a unique name. In the report screen, field names are accessible by voice, so it is recommended that field names be real words such as Impression or Technique.
Three fill-in field types are supported: Text, Numeric, and Pick List.
Text fields are used to accept any amount of text. Text fields may have a default value. If you do not specify a default value, the field is left blank when you insert the AutoText.
Numeric fields allow only numerals. A field can have a default numeric choice, or left blank as a blank numeric area.
Pick List fields allow you to enter a predetermined set of choices. You can select one field as the default to automatically populate the field.
A hyponym is a word or partial word used to identify a field. Click here for more information on hyponyms.
Default indicates what appears in the field when the AutoText is first inserted.
Enter all valid choices for the pick list here. (This region is enabled only if the field type is Pick List.)
To add a new pick list choice:
1. Click New, or click Edit to modify an existing choice. The Choice Definition dialog box opens.
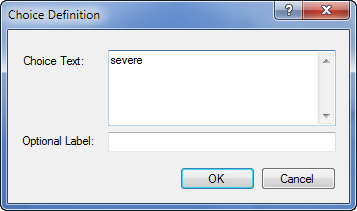
2. Enter the text for your choice.
3. You can create an Optional Label for each of the choice texts. This allows each choice text to be picked using a shortened label which represents the text in its entirety. For example, use the label Normal for a choice with the text “The kidney is normal in size and texture.”
4. To set a particular choice as the default, select that choice in the list and click the Set Default button.
5. To remove a choice, select it from the list and click the Delete button.
Use this area to enter findings codes.
Select this check box to automatically set text to ALL CAPS when dictating into this field.
Select this check box to allow empty fields in a report; prevents the empty fields message box from opening when you sign a report.
Select this check box if the fill-in field contains the report's impression section. Automatically selects the Does not indicate findings check box as well.
In most cases you will not select this check box. Select it for fields such as History and Technique that do not include clinical findings. These fields are then omitted from participating in Findings Mode dictation.
Select this check box to ensure that an item is selected from the pick list (if used). This box is grayed out unless you select Pick List in the Type drop-down list.