|
eTIPS

Did you know the DESS TextSystem can show when and where documents were routed?
You probably already leverage information from the DESS TextSystem to determine where documents will be routed. However, it is likely just as important to determine where and when a document was distributed. The Text System has the capability of storing information abut the historical routing events that took place for a document.
Click the play button on the following eTIPS Video player to watch a demonstration about determining where and when documents where distributed.
Perform the following to view the routing history of a document.
- Launch the DESS TextSystem EXEditor or WordClient application.
- Search for a document you wish to view historical routing events for.
- Click the Route button.
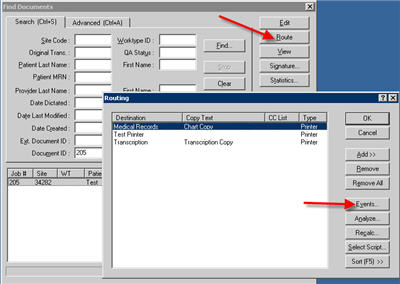
Note the above Routing window does not indicate where this document has already routed – it only shows where the document would go right now if it was routed, based on the current document data and routing rules that are in place.
- In the Routing window, click the Events button.
Note: By default the Routing Events button is not enabled on the Text System. If this feature was not previously enabled and you wish to use it, please contact Technical Services to enable this feature.
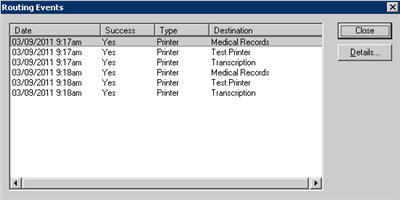
- The Routing Events window shows the successfully routed copies of this document, where the copy was sent, and when.
Routing Events are stored for 14 days by default. Each type of destination displays a success at a potentially different time:
- Printers - to the print queue on the print server (print server now responsible for completion)
- Email - to the email server (email server now responsible for completion)
- Fax - After RightFax has confirmed successful fax completion.
Note: Batches to email and fax are typically sent in groups of 20 documents (by default). Because of this, we can only receive confirmation of one transmission for this group of documents. The success event will only be available for the first document of each group of documents sent. For example, if you have 100 documents that are sent in a batch, the first of each 20 documents would have the success event in the Text System, so you would have only 5 events present for the 100 reports.
For additional information and step-by-step procedures about Routing events as well as other transcription application features, login into iSupport and search for solutions:
- L-3233-005 - Enterprise Editor Transcription/Editor Courseware and Reference Guide.
- L-2956-003 - Word Client Courseware and Reference Guide.
- L-2957-008 - System Administrator Courseware and Reference Guide.
If you are not an iSupport subscriber, click iSupport Timesaver for information on how to get started with iSupport.
_______________back to top_______________
Did you know that you can locate and identify split jobs in the DESS VoiceSystem Job Lister application?
The Split Jobs feature was added to the Dictaphone Enterprise Speech System (DESS) VoiceSystem starting with Version 8.0. This feature makes it very convenient to maintain a one-to-one association of audio files and text documents when providers dictate more than one report into a single audio file. With the Split Jobs feature, the Medical Transcriptionist (MT) can split the audio file at the point where the next dictated report begins within the audio file. To split a voice job the MT presses Ctrl+Shift+N or Ctrl+Shift+L. This keystroke combination causes the VoiceSystem and TextSystem to act together and respond by:
- Creating a duplicate audio file
- Assigning a new job ID to the copy of the voice file
- Marking the starting position at the point of split in the duplicate audio file
- Either signs off the original voice job and complete/submit the current text document (Ctrl+Shift+N) or sign-off and flag the job for QA review (Ctrl+Shift+L).
Documents split from the same original audio file and placed in review might have different QA levels. Split Job functionality only works for new transcription work. Editing, as in the case of QA, only signs off the job, even with the Ctrl+Shift+N. If an MT needs to create another document for a job that is in QA, then it is recommended to special assign the voice job to another MT after removing the MCR or ACR flag from the job in Job Lister.
Note: Beginning with Version 8.0 Service Pack 1 (and higher versions) a MT invoking a split job will receive a notification dialog message showing all documents created from the base voice job or any job split from it when using Ctrl+Shift+N or Ctrl+Shift+L. Version 8.0 does not provide this Split Job notification dialog.
In the DESS Voice/System Job Lister application, the following columns have been added to help you view and manage Split Jobs: QA Level, Split Job Link (the split job’s original Job ID), Last QA Reason and Document ID. The use of the Split Jobs feature might be confusing for MTs; as a split job might be misinterpreted as a duplicate dictation or a duplicate-typed document. By adding the Split Job Link, along with original Job ID to your Job Lister report outputs, you can quickly see the original and Split Job IDs at a glance.
To display or modify columns for Job Lister reports:
- Launch the DESS VoiceSystem Job Lister application and login.
- In the Reports List window, right-click the report you want to change and select Properties from the context menu. The Modifying Report dialog box opens.
- Select the Output tab and select the Heading you want to add to the report.
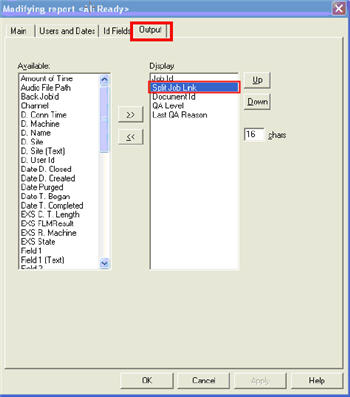
- When finished, click Ok to save and exit.
Note: If the report was open when you modified it you will need to close the report and re-run it to see your newly added column headings.
For more information about Split Jobs and other VoiceSystem features, including Operation and Administration manuals, login to iSupport and search for solution: 10136 for the EXVoice Operator Manuals. If you are not an iSupport subscriber, click iSupport Timesaver to learn more about iSupport.
_______________back to top_______________
Did you know that you can rerun fluency meter on users who were evaluated as non-speech during the Turbo Speech System evaluation process?
During the file collection stage of speech adaptation, Fluency Meter runs on each input device used by each provider to determine if these providers are good candidates for speech recognition. Fluency Meter can run up to two times for each provider. If the provider is determined to be draft status on the first Fluency Meter run, that indicates that the provider is a good candidate for Speech Recognition and the second Fluency Meter run is not necessary. If the first Fluency Meter run does not evaluate the provider as draft, Fluency Meter will run one more time. Typically most Providers will qualify as draft status by the second Fluency Meter run.
However, occasionally some providers will score as non-speech on the second and last Fluency Meter runs. If you believe the provider is a good speaker for draft status, it may be beneficial to rerun the provider through Fluency Meter manually. Fluency Meter compares the corrected documents to what was spoken during dictation as well as recognition accuracy. If there are significant differences in the corrected text compared to what the provider spoke, he/she will be evaluated as a non-speech user. For example, if there were large sections of headers/footers not tagged as such, or an MT changed the order of the text, it would negatively affect Fluency Meter scoring. Also, if the recognition accuracy was bad (perhaps poor audio quality, excessive background noise, etc.) it would affect the scoring. If one or more of these conditions occurred during the Fluency Meter collection, and the provider scored as non-speech, it would be beneficial to correct the problem and rerun Fluency Meter. If the audio quality of the dictation was a problem during file collection the user should also be set to re-adapt.
In order to re-run Fluency Meter for a provider, use the DESS VoiceSystem Explorer application. Go to the EXSpeech tab for the provider. If you simply need to rerun Fluency Meter, place a check in the Re-Fluency box next to the appropriate input device as shown in the illustration below. All jobs for this provider will be set as Marked for Re-FLMeter so that older jobs will not be used for the new Fluency Meter runs. Jobs will need to collect starting at the time when this selection is checked.
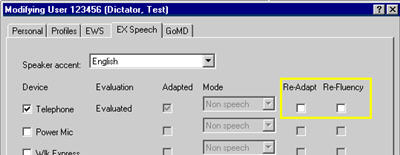
If you believe that the non-speech Fluency Meter result was from poor audio quality (static, background noise, low or excessive audio input levels) during the file collection phase, it would be beneficial to both Re-Adapt and Re-Fluency Meter the provider. In this case, you would place a check in both the Re-Adapt and Re-Fluency boxes. Again, all prior jobs from this provider will not be used for the new Adaptation or Fluency Meter runs. The job collection process will begin when this selection is checked.
For additional information about DESS Turbo SpeechSystem Fluency and Adaptation, login into iSupport and search for solution 10128, "EXSpeech Operator Manuals." Locate your version of the Administrator Courseware and Reference Guide. If you are not an iSupport subscriber, click iSupport Timesaver for information on how to get started with iSupport.
_______________back to top_______________
Did you know that you can create custom telephone keypads for the DESS VoiceSystem?
Telephone dictation uses DTMF (dual-tone multi-frequency) tones on a standard telephone keypad as controls for providers, reviewers or telephone transcriptionists. For example, a provider might press ‘2’ on the keypad to begin a dictation or ‘5’ to end a session. You can modify and assign keypads to suit the needs of your organization or specific users in specific profiles. For consistency across systems, you can modify keypads for providers in your organization that might also use systems in other facilities where keypad functions are arranged differently.
In a hospital or clinical environment there is a higher probability that a talk-off condition might occur during a dictation session. Talk-off is a condition where either a provider’s spoken voice or some kind of background noise, within the environment, emulates a DTMF tone. This might result in an unexpected VoiceSystem response during the dictation session. For example, if the VoiceSystem detects a DTMF ‘5’ during the dictation session and the ‘5’ is assigned to the disconnect function; the provider will be disconnected from the system in the middle of a dictation. A talk-off condition is typically rare and very intermittent. It could occur from several different sources. If the background is noisy; for example, if a fan is running or if there is electronic equipment generating noises, it may trigger a talk-off. The tonal quality of certain peoples’ voices has also been demonstrated to generate a talk-off. You can minimize this condition by creating and assigning a custom keypad.
Perform the following steps to create and assign a keypad:
- Launch the DESS VoiceSystem Explorer application, and log in with a user that has sufficient application rights to create keypads and make Master Profile settings.
- Expand the appropriate Site and Keypads. Right click and either create a new keypad, modify a current keypad, or copy a current keypad to modify.
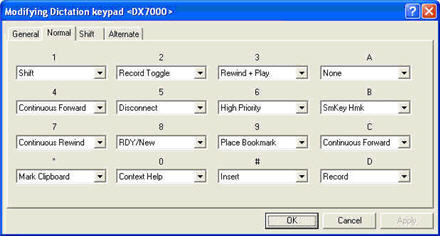
- On the Normal tab of the keypad screen, disable all keys that the provider(s) do not use by setting the value to None.
- Repeat step 3 on the Shift and Alternate tabs.
- In the case of talk-off, if you suspect a specific DTMF tone is causing a problem, then simply assign that function (such as the disconnect function) to a different key. For example, if you suspect that a ‘5’ is being erroneously detected, and it is currently sent to Disconnect, you could set ‘5’ to None and then assign Disconnect to key ‘9’, if it is not being used.
- Click OK to save your changes.
- Next, open the specific Master Profile that the dictator is using, and select the Dictation tab.
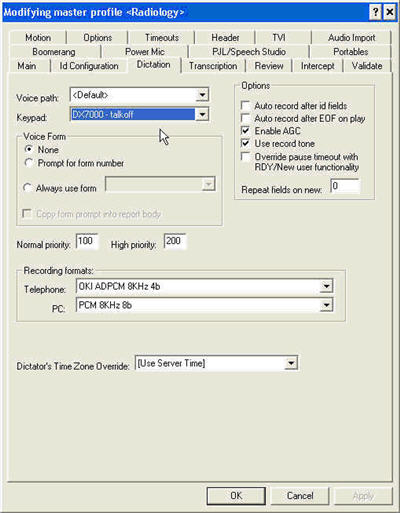
- Select the modified keypad. In the example above, the modified keypad is named DX7000 – talkoff.
- Press OK to save the change. The new keypad will take effect the next time the user logs in.
For more information about administering and configuring various features in the DESS VoiceSystem, login to iSupport and search for “System Administrator Courseware and Reference Guide, Enterprise Express VoiceSystem, L2957-008.” If you are not an iSupport subscriber, click iSupport Timesaver to learn more about iSupport.
back to top
|