|
 eTIPS eTIPS
Did you know that it's possible to suppress routing of a document to a manually added Carbon Copy (CC) recipient until final signature?
Beginning in version 8.3 of the DESS TextSystem, there is a new feature that allows for suppressing the routing of a document to a manually added CC recipient until the document has been electronically signed by the provider.
Press the play button on the following eTIPS video icon to see a demonstration on how to configure the DESS TextSystem to suppress document routing to manually added cc recipients.

The following are step-by-step instructions on how to enable this feature for a group of providers who electronically sign documents:
- Launch the TextSystem Explorer application.
- Expand the User Types.
- Right click the User Type related to the providers who electronically sign documents, and select Edit User Type.
- Navigate to the Routing tab.
- In the For Providers Route When group, select the Suppress manual CCs until final signed option.
- Click the OK button to save changes and exit the User Type settings.
For more information about suppressing routing to manually added CC recipients, login to iSupport and search for solution 14465 "Suppress CC Routing Until After Authentication." If you are not an iSupport subscriber, click iSupport Timesaver for information on how to get started.
_______________back to top_______________
Did you know that DMMR can seamlessly integrate with your existing SpeechSystem User Profiles?
Dragon Medical Mobile Recorder (DMMR) enables providers to use the Apple® iPhone® or iPad® to create and send dictation to the Dictaphone Enterprise Speech System (DESS). If the providers are already using the DESS SpeechSystem and have already completed the File Collection process; using the Telephone, Olympus, or GoMD iPaq; they can immediately start producing recognized text using DMMR. You do not need to do any additional configurations in the SpeechSystem. DMMR will automatically assign the appropriate input device type and recording format when jobs are dictated via DMMR.
For example, if a provider has already qualified as a Draft status using a telephone as an input device and then begins using DMMR on an iPhone, the existing Acoustic Model and corresponding recording format for telephone will be applied to DMMR dictation jobs. If the Provider has qualified on multiple input devices, the most desirable input device and recording format are selected in the following order: telephone, Olympus [portable], GoMD iPaq.
If the Provider, using DMMR, has never used the SpeechSystem, this provider will need to be configured in the EXSpeech tab for File Collection using Telephone as the input device. The provider will then need to go through the standard File Collection process as would any new speech recognition provider.
You can easily identify a DMMR job with the Job Lister application. DMMR jobs will contain NMS in the D. Machine column when that output field is added to the Job Lister report. There are also multiple input devices listed, despite the fact that all of those dictations were created on iPhones or iPads. Note: in this example all of these providers were already qualified for Speech prior to using DMMR. In the example below the provider who created the first two jobs had previously qualified on Speech using the GoMD iPaq. The next several jobs in the example are from a provider who had previously qualified as draft status using the telephone input device.

For additional information on Dragon Mobile Medical Recorder, login to iSupport and search for Solution 14339: "Dragon Medical Mobile Applications User's Guides." If you are not an iSupport subscriber, click iSupport Timesaver for information on how to get started with iSupport
_______________back to top_______________
Did you know there is a way to quickly view the current transcription backlog on the DESS VoiceSystem?
Having current, up-to-date information about the overall transcription backlog is a critical piece of information supervisors can use to ensure appropriate transcription resources are allocated, and as a tool to monitor TAT goals, etc. There is an easy way to determine backlog on a DESS VoiceSystem by using the Job Lister application.
When adding the Len [MM:SS] output column to a Job Lister report, a report which includes all untyped jobs, the title bar of the executed report will show the total amount of dictated time, in minutes and seconds, for all jobs listed in the report. This total represents the transcription backlog.
Perform the following to add the Len [MM:SS] output column to the All Ready report and then run this report to view the overall transcription backlog.
- Launch the VoiceSystem Job Lister application.
- In the Report List, right click the All Ready report and select Properties.
- When the Modify Reports dialog box appears, select the Output tab.
- In the Available list, double click the Len [MM:SS] field so it moves to the Display list on the right.
- Click OK to save this change and exit.
- In the Report List, double click the All Ready report to run it.
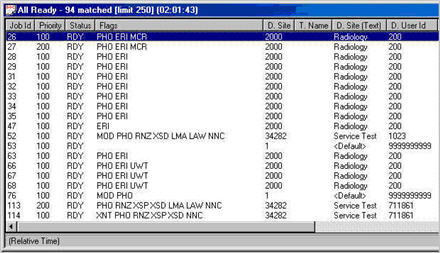
- When the All Ready report output appears, view the top bar and you will see the total transcription backlog displayed in brackets (HH:MM:SS). The following illustration shows an All Ready report which includes 94 jobs with a total backlog of two hours, one minute and forty three seconds of dictation.

While the total quantity of jobs along with the backlog referenced by the report is useful, you can also add Len [Sec] or Len [Lines] to the report columns. These columns show the backlog on the title bar in different formats including:
- Len [Sec]: Displays the backlog by showing the total amount of seconds
- Len [Lines]: Displays the backlog by showing the total amount of estimated lines of text. The lines are estimated at 10 lines per one minute of dictation by default.
TIP: This feature can be used to leverage backlog information about specific departments, or even specific pool definitions. The selection criteria for the All Ready report can be modified, so that a specific department’s backlog can be displayed by; for example, by only displaying the ready work for a specific Site, Department, or Worktype, etc. The same strategy can be used to find out the backlog for a specific pool, by setting the selection criteria in the Job Lister report to match the criteria that is configured in the pool definition.
_______________back to top_______________
Did you know the lock-out duration for DESS VoiceSystem client logins can be adjusted?
By default, after three unsuccessful login attempts to any one of the DESS VoiceSystem client applications (for example; Job Lister) the user will be locked out of the system for a set period of time. The following dialog box will display when a user gets locked out:

When this occurs, the user has a few options including:
In a production environment, a 30-minute lock-out may be excessive and counterproductive. Also, the system administrator might not be immediately available to reset the user lock-out.
Suppose you set the lock-out duration to 1 minute, instead of the default 30 minutes. In a typical lock-out situation, by the time a user, who got locked-out, contacts the system administrator, the lock-out duration (1 min) will have already expired. This eliminates the need for the administrator to access the user profile and clear the lock-out. At this point, the system administrator simply informs the user to try logging in again, and the user should be able to log into the client application.
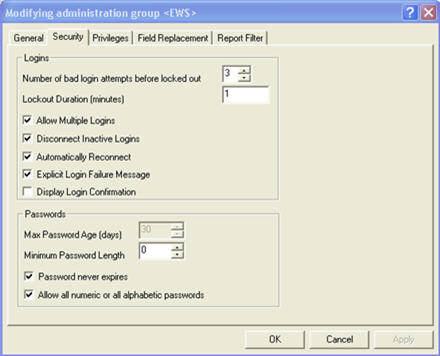
To change the lock-out duration to 1 min as opposed to the default 30 minutes, perform the following steps:
- Launch the VoiceSystem Explorer application.
- Expand the Site > Administration Groups.
- Right click an Administrative group and select Modify Group.
- Navigate to the Security tab.
- Change the lock-out Duration (minutes) setting to 1.
- Click OK to save changes and exit.

For more information about administering and configuring various features in teh DESS VoiceSystem, login to iSupport and search for “System Administrator Courseware and Reference Guide, Enterprise Express VoiceSystem, L2957-008.” If you are not an iSupport subscriber, click iSupport Timesaver to learn more about iSupport.
back to top
|