|
 eTIPS eTIPS
Did you know Enterprise Editor has a new feature that auto-adjusts Dictation Playback Speed to an optimal speed for Transcriptionists?
PlayRight is a feature available beginning with Dictaphone Enterprise Speech System (DESS) v8.3. PlayRight automatically sets the playback speed to an optimal speed for an MT/provider/mode combination, thereby reducing or even eliminating the need for the MT to continuously adjust playback speed for jobs.
The system determines the optimal playback speed by gathering playback speed data from jobs the MT receives from each provider and in each mode (traditional transcription or editing). Once it collects enough data, it gradually increases the speed over the next 10 jobs, but stops when it finds that the MT is consistently slowing down the playback speed, or when it reaches the maximum of one and one-half times the normal rate. It then saves the optimal speed setting and applies this setting to subsequent jobs for that MT, provider and mode.
The DESS system calculates and stores a separate optimal dictation playback speed setting for each transcriptionist/provider/mode combination. The MT can still adjust the speed manually if necessary.
Click the play button on the following eTIPS Video to learn how to enable the PlayRight feature.

The PlayRight feature is disabled by default. A DESS System Administrator can enable it in the user type for a group of users, or at the individual MT user level.
The following describes how to enable the PlayRight feature for a group or individual transcriptionist:
- Launch the DESS TextSystem Explorer application and login with your administrative User ID and Password.
- Navigate to a User Type to enable for a group of users, or navigate to an individual Transcriptionist.
- Right click on the User Type or Transcriptionist user and select Word Client Settings.
- When the Word Client Settings dialog box appears, navigate to the Options tab.
- In the Options tab, select Automatic play speed-up enabled.
- Click Ok to save your changes.
Note: At any time, you can restart the PlayRight adaptation process for one MT or for all MT’s belonging to a particular user type. Restarting adaptation for a user type begins the collection process again with a new set of files, starting from the current calculated rates. For individual MT’s you also have the option of discarding all adaptation history and calculating a new rate for each provider/mode combination beginning from a 100% playback rate.
For more information about how to configure and use the PlayRight feature, login to iSupport and search for solution: 140540 What’s new or changed in the Dictaphone Enterprise Speech System. Locate v8.3 Document Update and click the L-3311-002 link to open the What’s new in DESS version 8.3 document. If you are not an iSupport subscriber, click iSupport Timesaver for more information on how to get started with iSupport.
_______________back to top_______________
Did you know that an Addendum Separator can be placed on both the top and bottom of an Addendum?
Beginning with Dictaphone Enterprise Speech System version 8.3, there is optional bottom addendum separator text that can be placed beneath a reports addendum. This is in addition to the top addendum separator found in earlier versions of the software.
Perform the following steps to create a bottom addendum separator:
- Launch the DESS TextSystem Explorer application and login with an administrative User ID and Password.
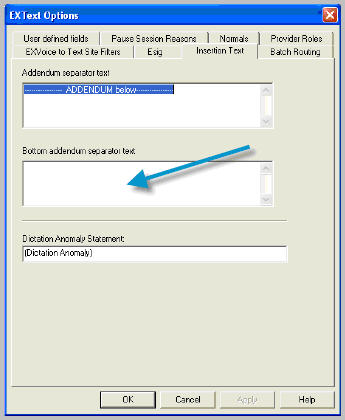
- Right click the EXText folder and select EXText Options.
- When the EXText Options dialog box opens, navigate to the Insertion Text tab.

- In the Bottom addendum separator text field, enter the text that is to appear below the addendum.
- Click OK to save your changes and exit.
For more information about how to configure and use the Addendum Separator feature, login to iSupport and search for solution: 140540 What’s new or changed in the Dictaphone Enterprise Speech System. Locate v8.3 Document Update and click the L-3311-002 link to open the What’s new in DESS version 8.3 document. If you are not an iSupport subscriber, click iSupport Timesaver for more information on how to get started with iSupport.
_______________back to top_______________
Did you know DJT scripts have a Target Site Override setting that will override the Remote ID (DJT) setting in the Site Configuration?
A feature has been added to the Dictaphone Enterprise Speech System (DESS) version 8.3, allowing a Digital Job Transfer (DJT) script’s target site setting to override the Remote Id (DJT) setting in the site configuration. This allows you to configure the target site within the DJT script, rather than at the site level.
If you need to transfer jobs from the same site to more than one target system, you can create two scripts with two different target sites. In previous versions, if you wanted to send jobs to two different target sites, you had to modify the site’s Remote Id (DJT) setting before running each script.
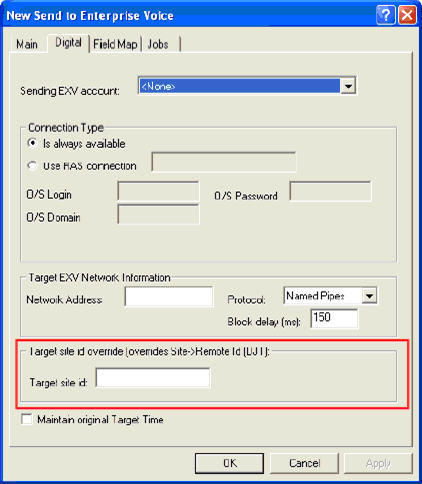
The following image shows a new Target Site ID Override setting found on the Digital tab of the a DJT script.

If you leave the Target site ID value blank, the script uses the value in the site’s Remote Id (DJT) setting as the target site ID, as in previous versions.
For more information about how the Target Site Override feature, login to iSupport and search for solution: 140540 What’s new or changed in the Dictaphone Enterprise Speech System. Locate v8.3 Document Update and click the L-3311-002 link to open the What’s new in DESS version 8.3 document. If you are not an iSupport subscriber, click iSupport Timesaver for more information on how to get started with iSupport.
_______________back to top_______________
Did you know how to configure the DESS system for Providers who would like to use the iPhone Dragon Mobile Medical Recorder application to dictate patient reports?
With Dragon® Medical Mobile Recorder (DMMR), providers can conveniently and efficiently dictate at the point-of-care with their iPhone. High-quality dictations are wirelessly and securely uploaded to Nuance’s background speech recognition platform, Dictaphone Enterprise Speech System (DESS), for rapid document turnaround time.
The DMMR application is currently available for providers to download from the iPhone App store; however, to upload the DMMR dictated reports to the DESS system requires purchasing the iPhone Mobile Dictation option for the DESS system.
Once the DESS iPhone Mobile Dictation option is purchased and installed on the DESS system, there are two basic areas of configuration required to prepare the DESS System to accept dictation from the DMMR application. Typically these configurations are performed by the administrator responsible for the DESS system configuration settings.
To begin uploading DMMR dictation to the DESS system, you will need to ensure the DESS user settings are configured as follows:
Modify existing providers or create new provider profiles in both the VoiceSystem and TextSystem.
Modify the TextSystem (EXText) user types to which your DMMR providers are assigned to. Assign the privileges required by the DMMR users to at least one user type. Instead of modifying an existing user type, you can also create one or more new user types just for DMMR users. If desired, you can also configure the user type’s site and worktype access. Users must have Document:View and eSig: Authenticate Documents privileges in the TextSystem to work with DMMR. You will need to add these privileges to the user type(s) associated with DMMR users.
DMMR users must have a client login and password configured on both the TextSystem and the VoiceSystem. These logins must match exactly.
For additional information about Dragon Mobile Medical Recorder, login to iSupport and search for Solution 14339: Dragon Medical Mobile Applications User's Guides. For additional information about DESS system administration for the Voice and Text systems, login into iSupport and search for solution 10128: EXSpeech Operator Manuals, and locate your version of the Administrator Courseware and Reference Guide. If you are not an iSupport subscriber, click iSupport Timesaver for information on how to get started with iSupport.
back to top
|