|
 eTIPS eTIPS
Did you know a Transcriptionist can compare his or her current line count with established goals?
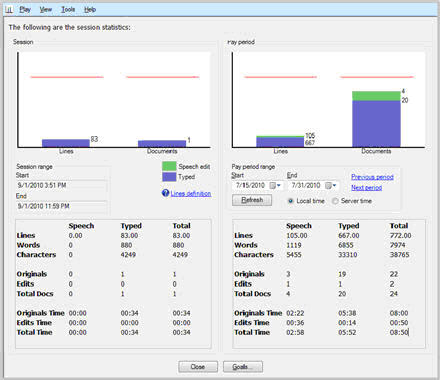
Beginning with Enterprise Speech System version 8.3, Medical Transcriptionists (MTs) can use Session Statistics to quickly compare their current transcription line count (typed, edited, and total) with their established goal. The MT can view the number of typed, edited, and total lines for the current transcription session or for the current pay period.
In version v8.3 MTs see separate statistics for traditionally-transcribed documents and for edited speech-recognized documents. The transcription statistics are available to the transcriptionist at any workstation the transcriptionist logs into.
Click the play button on the following eTIPS Video for a demonstration about session statistics and how they have improved in DESS version 8.3.

The line count calculations, shown in the report below, are based on line count settings configured in the DESS TextSystem Explorer application.

The statistics area does not display daily, weekly, and monthly graphs as in previous versions. Instead, it shows a graph for your current session and for the pay period.
You can specify the beginning and ending dates of the current pay period; the software uses this information to calculate future and past periods. You can select a link to view statistics for an earlier or later pay period.
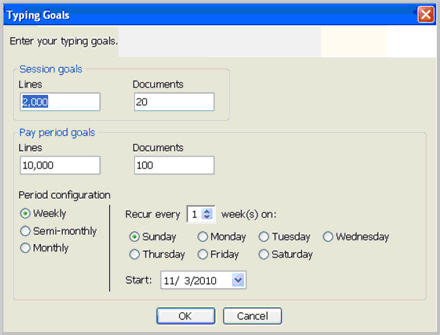
The statistics area also features a Goals... button that opens a dialog box where you configure your session and pay period line count goals.

For more information about line counts and goals, login to iSupport and search for solution: 14054 "What's new or Changed in the Dictaphone Enterprise Speech System." Locate v8.3 Document Update and click the "L-3311-002" link to open the "What's new in DESS version 8.3" document. If you are not an iSupport Subscriber, click iSupport timesaver for more information on how to get started with iSupport.
_______________back to top_______________
Did you know there is a setting in the DESS SpeechSystem that may improve recognition accuracy for heavily accented Indian speakers?
In the DESS VoiceSystem Explorer application, there is a setting in the user profile "EXSpeech" tab for Speaker accent. This feature is configured per user and defaults to English. The DESS system supports two choices; English and Indian. If the speaker has a heavy Indian accent, you will want to select Indian in the drop-down box which is shown below. Keep in mind, that if the speaker only has a slight accent, you should not select this as the recognition accuracy could suffer.
The Speaker accent must be selected before Adaptation occurs. If you change this setting for a speaker who already completed the Adaptation process it will have no effect. If you have a heavily accented Indian speaker who has completed Adaptation and has poor recognition, you can select the Indian accent and then Re-Adapt that user. After making those changes, 15 minutes worth of signed off jobs must be collected for the first Adaptation. Recognized text will be produced after that first Adaptation. Then, after 120 minutes of signed off work has been collected, the second and last Adaptation will occur.

For more information and detailed instructions for setting the Speaker accent or Re-Adapting a user, please refer to the EXSpeech System Administrator Courseware and Reference Guide for your version of the EXSpeech System. You can find these documents on iSupport. Login to iSupport and search for: Solution 13860 "Tips for Better EXSpeech Recognition Accuracy," and the Dictation Techniques for Speech Recognition section of the EXSpeech Administrator Courseware and Reference Guide. If you are not an iSupport subscriber, click iSupport Timesaver for information on how to get started with iSupport.
_______________back to top_______________
Did you know Enterprise Editor allows Transcriptionists to save time by adding CCs from the Job Information Area?
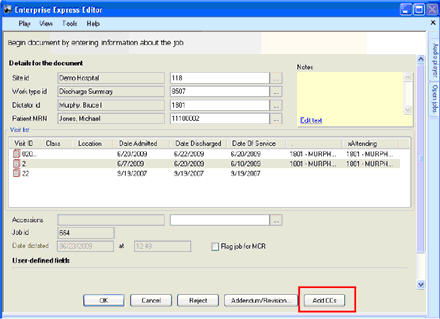
The Dictaphone Enterprise Speech System (DESS) version 8.3 Enterprise Editor Application now includes an Add CCs button on the Job Information dialog box. This allows transcriptionists to add Carbon Copies (CCs) to a new job before the document is created. The Add CCs button appears in the Document Information area during creation of a new document. You can also use the traditional Ctrl+A keyboard shortcut to add CCs from this area.

When you click Add CCs or press Ctrl+A from the Document Information area, the Add CC Items dialog box opens. It displays any CCs you have added to this document during your current session, but does not show any routing destinations the system has automatically applied.
For more information on how to add CCs from the Job Information Area, login to iSupport and search for solution: 140540 “What’s new of Changed in the Dictaphone Enterprise Speech System.” Locate v8.3 Document Update and click the “L-3311-002” link to open the “What’s new in DESS version 8.3” document. If you are not an iSupport Subscriber, click iSupport timesaver for more information on how to get started with iSupport.
_______________back to top_______________
Did you know you can prevent hidden lines of text in EXEditor by adjusting margin settings?
Speech documents created using EXEditor might appear to be missing the first few lines of inserted text at the top of the second page, or the last line of text on the first page might appear to be duplicated on the second (or third) page when using Word 2007. This happens because the top and bottom margin settings on the Worktype template can hide the inserted text and prevent the text from being properly displayed.
You can easily change this behavior by performing the following:
Print a blank copy of any Worktype templates that behaves this way. Measure the height of the header and footer of the printed template. -
Edit the Worktype template using the DESS TextSystem Explorer application. While editing the template, check the top and bottom margin settings by selecting File > Page Setup. Make sure that the top and bottom margins are 0.5" inch larger than the measured size of the header and footer of the template.
-
Adjust this value relative to the currently assigned value for the top and bottom margin settings. For example; if the current header is 1" inch in height and the current footer is 0.5" inch, (using 0.5" as the value for the currently set top and bottom margin), modify the top margin of the template to 1.5" inch and modify the footer to 1" inch. In other words, the change made is to increase the original setting by 0.5" inch.
-
Save your changes to the template by pressing Ctrl+N.
For additional information about EXEditor margins, login into iSupport and search for Solution 14076: "Text of the first few lines not visible when using EX Editor and Word 2007." For detailed information about the TextSystem and EXEditor applications please refer to: "System Administrator Courseware and Reference Guide, L-2957-008." If you are not an ISupport subscriber, click iSupport Timesaver for more information.
back to top
|