|
 eTIPS eTIPS
Did you know Enterprise Editor has an Integrated Web Search, which enables Transcriptionists to look up unfamiliar words or phrases without switching to a Web Browser Window?
When you encounter an unfamiliar term in dictation, such as a new drug or procedure name, you might want to look it up on the Internet to confirm its spelling or definition. If your workstation has internet access and you are using the Dictaphone Enterprise Speech System (DESS) version 8.3 Enterprise Editor application, there is a quick and easy way to look up words without the time-consuming process of opening a Web browser session and typing the words into a search engine. At any time during the course of transcribing a job, simply highlight a word or phrase and press the key combination Ctrl+Shift+?. The Enterprise Editor application will automatically search the internet with the search criteria equal to the highlighted text and present the results in a separate window.
Press the play button on the following eTIPS Video icon to view a brief demonstration on how to search the web while transcribing a report in Enterprise Editor (EXEditor).

Perform the following to look up a word or phrase:
-
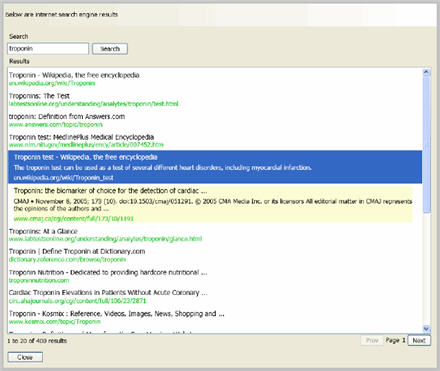
Highlight a word or phrase and press the keyboard shortcut command Ctrl+Shift+?. The Enterprise Editor software searches the Internet and presents a list of search results.
-
Hover the mouse cursor over any link to see more information.
-
Double click or select any item, and then press Enter to open the related web page.
-
If the search retrieves more than one page of results, you can use the Next and Prev buttons, located on the lower right, to navigate between pages.
-
When you have finished, click Close to return to the document.
For more information about how to use the integrated web search feature, login to iSupport and search for solution: 140540 “What’s new of Changed in the Dictaphone Enterprise Speech System.” Locate v8.3 Document Update and click the “L-3311-002” link to open the “What’s new in DESS version 8.3” document. If you are not an iSupport Subscriber, click iSupport timesaver for more information on how to get started with iSupport.
_______________back to top_______________
Did you know Site/Worktype Access settings control which documents Providers can Electronically Sign in Enterprise Workstation?
The DESS TextSystem leverages privileges and access settings is User Types to control activities a user may perform on the system, and which types of documents the user can gain access to. Site/Worktype access settings are enabled in the User Types by the system administrator who is responsible for granting Site/Worktype access to users (including providers) based on what is relevant for the user to see.
Providers can dictate on a Worktype, but the transcribed document may not be accessible to the provider for editing or electronic signature, unless he/she is granted the appropriate access to the Worktype of the transcribed report.
If the Site/WT Access is not setup correctly, the provider will receive the following error when attempting to access the report in Enterprise Workstation (EWS) to authenticate it:
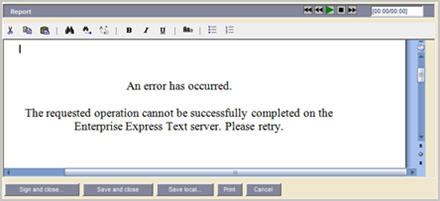
In addition, if the Worktype ID is configured for display in Enterprise Workstation (EWS), the Worktype ID will appear as -1 in the reports list.
To edit the Site/WT access for the provider(s):
- Locate the User Type the provider belongs to in the DESS TextSystem Explorer application, and then right-click and choose Edit User Type.
- Navigate to the Site/WT Access tab.
- Add access to all sites and worktypes the provider will need to be able to access. You may Grant All to allow access to any document on the system, or restrict based on specific worktypes and/or sites.
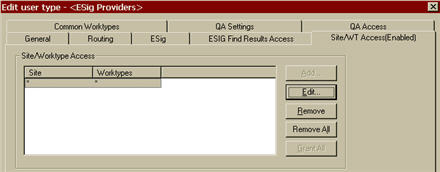
Once the correct Site/WT access has been configured, the provider will need to log out of EWS or ESig and log back in for the changes to take effect.
For additional information about Site/WT Access, login into iSupport and search for solution 10128, "EXSpeech Operator Manuals," and locate your version of the Administrator Courseware and Reference Guide. If you are not an iSupport subscriber, click iSupport Timesaver for information on how to get started with iSupport.
_______________back to top_______________
Did you know the "Reject all Jobs on Disconnect" option will automatically keep jobs moving through the transcription workflow, resulting into faster turnaround times?
The system administrator of the DESS VoiceSystem configures the flow of jobs to transcriptionists based on the turnaround time goals set by the organization. When a transcriptionist logs into the DESS VoiceSystem, a pre-defined number of jobs will automatically flow to the transcriptionist based on the criteria configured by the system administrator. The set number of jobs will download to the TransNet Queue on the Transcriptionist's workstation. While the transcriptionist transcribes the first job in this TransNet queue, the other jobs remain in the TransNet queue in a waiting state. The jobs will remain waiting until the transcriptionist either completes the current job or the jobs will eventually expire and return to the VoiceSystem where they automatically flow to another user for transcription.
If a transcriptionist logs out of the system, the jobs waiting in the TransNet queue will remain there until they expire. Eventually, the jobs will expire and return to the VoiceSystem, but the jobs are getting older as they wait to expire. There is a feature which prevents these jobs from waiting to expire before they are returned to the VoiceSystem. By enabling the "Reject all Jobs on disconnect" option in the transcriptionist user profile, jobs in the TransNet queue will immediately return to the VoiceSystem when the transcriptionist logs out. This prevents these jobs from aging while waiting to expire before returning to the VoiceSystem to get re-distributed.
Perform the following to enable the "Reject all jobs on disconnect" option in the transcriptionist user profile:
- Launch the DESS VoiceSystem Explorer application and login.
- Locate the Master Profile for the transcriptionist users.
- Right-click the Master Profile and choose Modify Master Profile.
- Click on the Transcription tab.
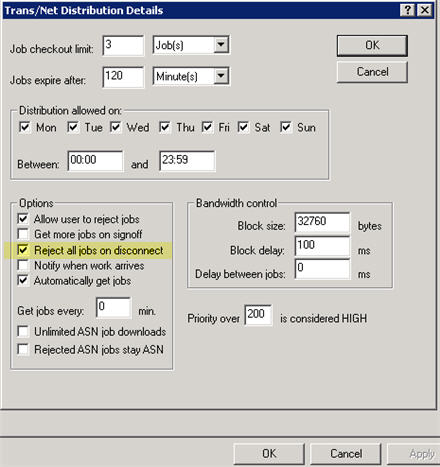
- On the Transcription tab, click the TransNet Details... button.
- In the Options group of the Trans/Net Distribution Details box, check the box labeled Reject all jobs on disconnect.
- Click the OK button to return to the Transcription tab.
- Click the OK button to save changes to the Master Profile and exit.
For additional information about pooling jobs and managing workflow of dictations, login into iSupport and search for solution 10128, "EXSpeech Operator Manuals," and locate your version of the Administrator Courseware and Reference Guide. If you are not an iSupport subscriber, click iSupport Timesaver for information on how to get started with iSupport.
_______________back to top_______________
Did you know that Microsoft® Word 2007 and 2010 default paragraph styles have changed and may affect DESS Worktype Templates created in prior versions?
Microsoft® changed the default line and paragraph spacing for Microsoft Word 2007 and Microsoft Word 2010. These new defaults can cause formatting problems when creating templates in the Dictaphone Enterprise Speech System (DESS) TextSystem. This happens because the DESS TextSystem is based on conventional paragraph styles used for documents within the healthcare industry, which typically use single line spacing without extra padding.
The default MS Word line and paragraph spacing are shown here:

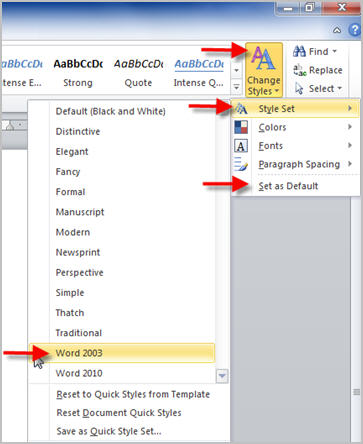
When using Microsoft Word 2007 or Microsoft Word 2010 to create templates in the Enterprise TextSystem, the default paragraph settings should be changed to Word 2003 default values. This is accomplished by performing the following steps:
- Ensure that the DESS EXEditor and DESS TextSystem Explorer applications are NOT running on the machine where you are making these changes.
- Launch the Microsoft Word 2007 or Microsoft Word 2010 application.
- Navigate to the Home tab and click Change Styles.
- Select Style Set and click Word 2003.
- Click Change Styles once again.
- Click Set as Default.
- Close the Microsoft Word application.
For additional information about transcription application features, login into iSupport and search for solutions:
- L-3233-005 - Enterprise Editor Transcription/Editor Courseware and Reference Guide.
- L-2957-008 - System Administrator Courseware and Reference Guide.
- Solution 13864: Word 2007 and 2010 Configuration in an Enterprise Text Environment
If you are not an iSupport subscriber, click iSupport Timesaver for information on how to get started with iSupport.
back to top
|