|
 eTIPS eTIPS
Did you know how to resolve access problems when attempting to open Dragon Medical user profiles?
INTENDED AUDIENCE: System Administrators
LEVEL: Intermediate
A user attempts to open a Dragon user profile and receives the following message:
The user files you have selected cannot be accessed.
This could be because you do not have
sufficient privileges to use them or because they are currently being accessed by another program.
This Dragon Medical message can be caused by another application accessing the same folder/files containing the Dragon user files. For example one of the following applications could be locking user profiles:
- Dragon creates a username.lck file (or other .lck files) within the profile when a dictator does not close the user overnight
- Dragon ACO/LMO optimization tasks
- Windows Explorer
- Malware, security, or antivirus software
- Data Backup software
- Any process or application that may access or lock Dragon user profile folders and files
This can occur with local and roaming users. Close any application on any computer that might be accessing this profile folder and try opening the user profile again (iSupport article 13560).
If still no success, look for any username.lck file (or other .lck files) within the profile and delete it. Dragon locks the profile during saving and synchronization tasks. This file is usually found under the Profile's \Current folder.
If still no success, look for any Dragon configuration files or folders within the profile whose name is appended with a "ini_DgnRenamed" extension. For instance:
C:\Documents and Settings\All Users\Application Data\Nuance\NaturallySpeaking10\RoamingUsers\[Dragon User]\current\options.ini_DgnRenamed
If found, rename the options.ini_DgnRenamed to options.ini in the folder path for the offending profile and try opening the user again. Or, if the options.ini file currently exists in conjunction with the options.ini_DgnRenamed file, simply delete the options.ini_DgnRenamed file.
For additional information on this topic, login to iSupport and search for solution 13832: Dragon Medical Message: "The user files you have selected cannot be accessed..." If you are not an iSupport subscriber click iSupport Timesaver to learn how you can become a member.
_______________back to top_______________
Did you know that the PowerMic II can be programmed to execute any application or utility?
INTENDED AUDIENCE: All Users
LEVEL: Intermediate
The execution of any application or utility can be assigned to a programmable PowerMic II button. Use the procedure below to create a Dragon Medical Step-by-Step custom command to launch any application or utility, and then assign that custom command to a programmable PowerMic II button.
- Open Dragon PowerMic user.
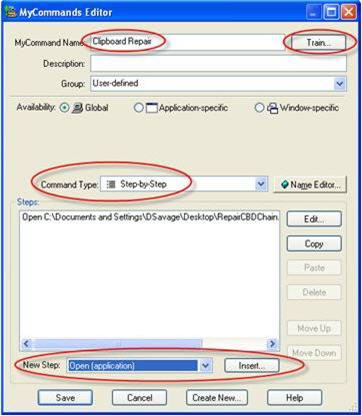
- On the DragonBar, click Tools>Command Browser>MyCommands>New...to create a custom command.
- Choose a unique name and Train Dragon to recognize that name.
- Select Step-by-Step as the Command Type.
- Choose Open (application) as the New Step.
- Click Insert and browse to the application or utility, for the New Step.
- Click Save to save your new command
- Close Command Browser and open DragonPad to dictate.
- Speak the name of the new command into the PowerMic to verify it launches.
- On the DragonBar, click Tools>Options>PowerMic II tab.
- Select an unused PowerMic button and click User Commands from the Action drop-down menu.
- Click Apply and OK.
- Test the PowerMic button function
_______________back to top_______________
Did you know that you can add multiple dictation sources to your Dragon user profile at any time?
INTENDED AUDIENCE: All Users
LEVEL: Basic
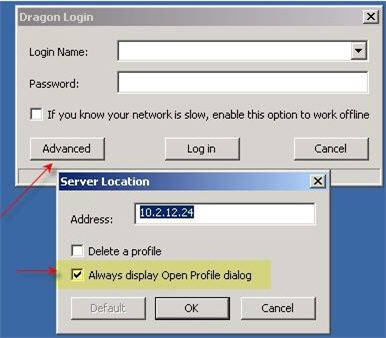
With Dragon Medical Enterprise Network Edition, you can add or remove a dictation source by enabling “Always display Open Profile dialog” option within the Dragon client. The “Always display Open Profile dialog” option is stored under the “Advanced” button on the “Dragon Login” screen.
Click the play button on the following eTIPS video image to see a demonstration on how to add new dictation sources.
These are the steps on how to add a new dictation source:
- Double click on the Dragon Medical client to bring up the login screen.
- Click on Advanced and enable the Always display Open Profile dialog option.
- Click OK to save the setting.
- Enter your login name and password then press Log In.
- Click on Source – New in the Open Profile window to add a new dictation source.
- Press OK to complete the configuration.
_______________back to top_______________
Did you know about some of the basic storage requirements and directory structures used in a Dragon Medical roaming environment implementation?
INTENDED AUDIENCE: System Administrators
LEVEL: Basic
On the File Server:

On the Client PCs:


Common File Locations:
Master Roaming User Profile:
<network share>\<Master Roaming Name>\<User>\current
For each Local User Profile running Windows XP:
C:\Document and Settings\All Users\Application Data\Nuance\
NaturallySpeaking10\RoamingUsers\<User>\current
For each Local User Profile running Windows Vista or 7:
C:\ProgramData\Nuance\NaturallySpeaking10\RoamingUsers\<User>\current
Program Directory:
C:\Program Files\Nuance\DNS 10
User Profile Templates running Windows XP:
C:\Document and Settings\All Users\Application Data\Nuance\
NaturalllySpeaking10\Data\enu
User Profile Templates running Windows Vista or 7: C:\Users\
All Users\Nuance\NaturalllySpeaking10\Data\enu
_______________back to top_______________
Did you know that using Dragon through Microsoft’s Remote Desktop Protocol (RDP) creates special challenges?
INTENDED AUDIENCE: Dragon Medical Administrators of Enterprise Edition
LEVEL: Advanced
Microsoft RDP is often used as a remote connectivity solution RDP functions in a similar manner as Citrix Independent Computing Architecture (ICA) protocol. Some features are fundamentally different between these two systems and the proper configuration of RDP will provide an enhanced experience for the end user community. These configuration adjustments will take place on the RDP Server and the Dragon Client system. Within the client computer you will be adjusting the Dragon ini files, the Dictation Box properties and the RDP Connection window options. Additionally it’s important to note that Dragon Medical 10.1 version 10.10.300.048 includes enhancement for RDP.
The process works as follows:
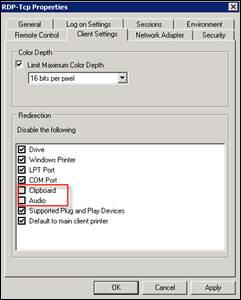
- On the RDP Server open the Terminal Services Configuration utility found in Administrative Tools.
- Right Click on the RDP-TCP Connection and choose Properties.

- Click the client settings tab and ensure that Audio and Clipboard is not disabled.
IMPORTANT:
These two options are critical for Dragon and the Dictation Box. The other settings can be configured based upon your organizational standards
- Close the Terminal Services Configuration Utility.
NOTE: This same process must be completed on every Terminal Server that will be hosting your RDP connections.
- On the Client device, navigate to C:\Documents and Settings\All Users\Application Data\Nuance\NaturallySpeaking10 and launch the nssystem.ini file.

- Under the Settings section add the line Use Clipboard Stack=1.
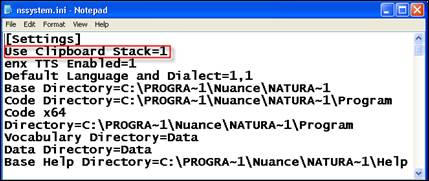
- Save and Close the nsysstem.ini file.
- On the Client device, navigate to C:\Documents and Settings\All Users\
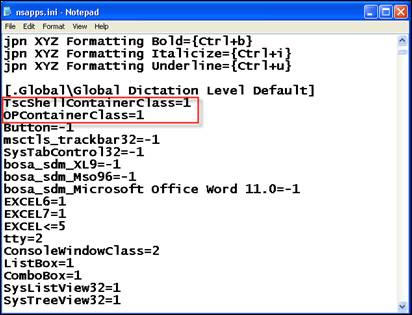
Application Data\Nuance\NaturallySpeaking10 and launch the nsapps.ini file.

- Search for the section [.Global\Global Dictation Level Default] and add the lines TscShellContainerClass=1 and OPContainerClass=1.
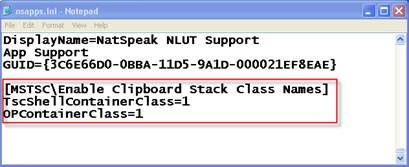
- Go to the bottom and add the section [MSTSC\Enable Clipboard Stack Class Names]. Add the values TscShellContainerClass=1, OPContainerClass=1.
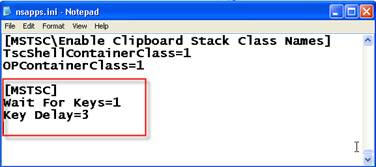
- Add the section [MSTSC]. Add the values Wait For Keys=1, Key Delay=3.
- Save and Close the NSApps.ini file.
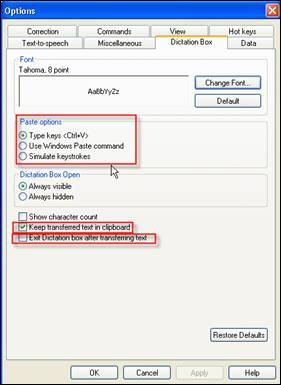
- Open Dragon and from the Dragon Bar and choose, Tools, Options and then the Dictation Box tab.
Please note: You have three choices in the Paste options section. You may want to try your new configuration with each of these three options to see which one works the best with your applications. Additionally, enable “Keep transferred text in clipboard” and disable “Exit Dictation box after transferring text” to make it easier to recover if an issue occurs.
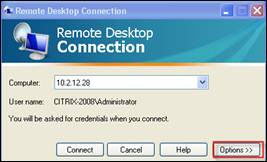
- Review your settings when you launch the RDP Connection Application. Click the Options button.
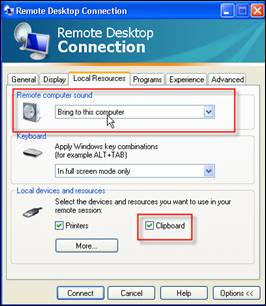
- Click the Local Resources tab and ensure that Remote computer Sound and the Clipboard are enabled.
- With these configurations in place, you should note improvement in the deployment of Dragon Medical with RDP.
back to top
|