|
 eTIPS eTIPS
Did you know there is a new automatic backup and restoration process for User Profiles in the Dragon Medical Network Edition Service Pack 1 release?
INTENDED AUDIENCE: Network Edition Administrators
LEVEL: INTERMEDIATE
The Profile Optimizer now automatically creates backups of your Master User Profiles and stores them on the Master User Profile Server. The Profile Optimizer uses this backup to automatically restore a profile that it determines has become defective.
Each time one of its Speech Nodes starts a Language Model Optimization (LMO) of a user profile, the Profile Optimizer checks to see if the profile is still valid, if it finds any defect, it replaces the profile using the last known good backup copy of the profile. As you can imagine, because of this checking before an LMO, the more often you schedule an LMO process on a provider's profile, the more likely that the profile the provider is using at any given time is valid and defect-free.
Not only can the Profile Optimizer replace a defective profile, but you can also choose to restore the last known good user profile for a provider. You might need to take this action if one of these two situations occurs:
- You receive a message in the Message utility of the NMC Console indicating the profile is defective.
- A provider reports having difficulty opening the profile.
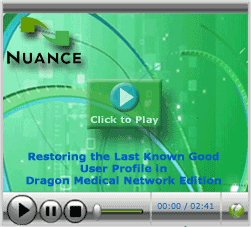
Click the play button on the following eTiPS Video icon to see a brief demonstration on how to restore a user profile.
To quickly restore the profile, perform the following:
- Login to the NMC Console and open the User Account ribbon.
- Click the Search User Accounts icon and search for the Dragon Medical Author user accounts.
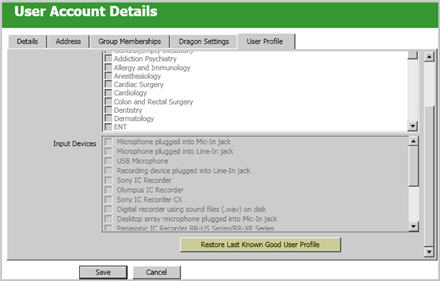
- When the list of user accounts appears, right click on the one profile you want to restore and click User Account Details for the provider.
- Next, click the User Profile tab and look for a button labeled Restore Last Known Good User Profile near the bottom of the page.
When the Restore confirmation dialog box appears, click Yes.
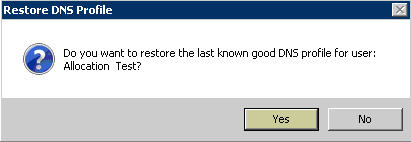
In the Messages utility, you receive messages indicating that you initiated a profile restoration, that the restoration started, and finally that the restoration is complete.
_______________back to top_______________
Did you know the Dragon Medical Enterprise Edition can be configured to automatically backup the Roaming Profile?
INTENDED AUDIENCE: Enterprise Edition Administrators
LEVEL: INTERMEDIATE
Roaming Profiles in Dragon Medical Enterprise (non-Network) Edition where Dragon Medical can be configured to automate the backup of Roaming Profiles. Historically, Dragon Medical does offer an automated Backup capability for Local Profiles through the Dragon Manage Users window, but not for Roaming Profiles.
This added capability was confirmed in Dragon Medical Enterprise, version 10.10.300.021, by simply using the Dragon Backup capability for Local Profiles that already exist.
The following step-by-step instructions will guide you through the steps to setup an automated backup process for Roaming Profiles.
- Open Dragon Medical on the workstation and click Dragon>Tools>Administrative Settings>Scheduled Tasks tab.
- Enter a Directory path (other than the default) for the "Backup Location For User Files" setting. This can be either a local or network location.
- Click Apply and OK.
- Verify that the User Options for each user profile are set to:
- Automatically Save User Files (at user close), which is found under Tools>Options>Miscellaneous tab.
- Automatically Back up User Files Every ____ Saves (default = 5), which is found under Tools>Options>Data tab. You can set the Backup frequency to "1" and verify Backup is occurring.
Please note:
- This setting is computer-dependent and will backup the locally-cached profile only.
- When restoring this backup, DRA files normally stored in the Roaming Profile for optimization may not be available.
- Even with this added Backup capability, Roaming Profile restoration is still a manual operation.
- Network bandwidth consumption should be considered when configuring any Backup scenario.
- Nuance continues to recommend the Backup of the Roaming Profiles directory by IT or a System Administrator.
_______________back to top_______________
Did you know the Dragon Medical Enterprise Network Edition (DMENE) client software can be pushed out remotely via MSI using the batch file below?
INTENDED AUDIENCE: Enterprise Edition Administrators
LEVEL: ADVANCED
This article presents a simple batch file that can be used to remotely install the Dragon Medical Enterprise Network Edition (DMENE) client software via an MSI push installation.
This is provided as a sample batch file and as a guide. See the notes below for guidelines as to how each customer will need to modify their own respective installation batch file.
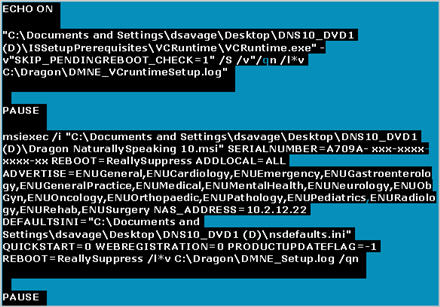
The DMNE client software consists the of VCRuntime and Dragon Medical applications. Both applications are installed via the DMNE_install.bat batch file presented below. The first lines of the batch file, following ECHO ON, installs the VCRuntime component. There is a PAUSE statement between the VCRuntime and Dragon Medical install lines for debugging purposes. This should be removed once the batch file is running successfully.
DMNE_install.bat file contents: (Content is highlighted in black to let you see where a space is needed when the line breaks.)
Please Note:
- Before running the install batch file, use command line options (below) to modify the Dragon Medical User Options and Formatting Options from an existing DMNE Client. These setting values are stored in the Dragon nsdefault.ini file which is then accessed in the above install batch file.
- natspeak /SetDefaultOptions
- natspeak /SetDefaultFormattings
- This batch file assumes the software media is located on the local computer desktop, and therefore the path will need to be modified for each customer's shared network location.
- The above VCRuntime install assumes 32-bit environment (vcruntime.exe), otherwise use the vcruntime_x64.exe file for 64-bit.
- Modify SERIALNUMBER=A709A- xxx-xxxx-xxxx-xx with the customer's serial number.
- Modify NAS_ADDRESS= for the correct default IP address of the Nuance Management Server (NMS).
- References to the roaminguserini file are removed for the DMNE (Network Edition) product as the master profile information is now pulled down from the NMS server.
- Make sure to close any Microsoft products before launching the Dragon installation.
- Verbose installation logging is enabled. Verify the log file folder path exists before running the installation. Review the log file for troubleshooting.
For more information and to access a copy of the batch file, login to iSupport and search for solutions:
- 14409: Sample DMENE Client Batch File for MSI Installation.
- 12890: Dragon Medical User's Guides. in the Version 10.1 section, click the L-3156-003 link to open the "Installation and Administration Guide." Refer to Chapter 3 - "Installing Dragon Medical Using the Windows MSI Installer.
If you are not an iSupport subscriber, click iSupport Timesaver to for more information on how to get started.
back to top
| 

 Dragon Medical Enterprise Network Edition Hot Fix 7 has been released. If you are running Dragon Medical Enterprise Network Edition with Hot Fix 4, 6, or Service Pack 1, you can install Hot Fix 7 to update the Dragon Client and vSync on a Citrix Server. Hot Fix 7 includes all fixes from Hot Fix 1 to Hot Fix 6 inclusive. Highlighted features of Hot Fix 7 are listed below.
 iSupport is a Proven Timesaver
 Contacting Support