|
 eTIPS eTIPS
Did you how to achieve the best results with RadWhere Speech Recognition?
The "RadWhere for Radiology Speech Recognition Best Practices" guide shows basic to advanced topics to assist you with achieving the best possible results from speech recognition in the RadWhere system.
There are many things to keep in mind while dictating to get the best results. Some examples are being aware of your environment to avoid background noise, using proper placement of the microphone, setting your speech options properly, using the Speed Vs. Accuracy Control bar and Vocabulary Editor.
To access the RadWhere for Radiology Speech Recognition Best Practices guide, login to iSupport and search for solution 12939 "RadSuite Operator Manuals," locate the RadWhere for Radiology v3.0 section and select the link RDWA001 "RadWhere Speech Recognition Best Practices." If you are not an iSupport subscriber, click iSupport Timesaver for information on how to get started.
_______________back to top_______________
Did you know how to setup and configure the Philips SpeechMike for use with RadWhere?
Perform the following to access and configure Philips SpeechMike:
- Launch the RadWhere Dictation Client and login with your User ID and Password.
- On the Menu bar, click Tools > Preferences.
- When the Preferences dialog box appears, expand Philips SpeechMike and click General.
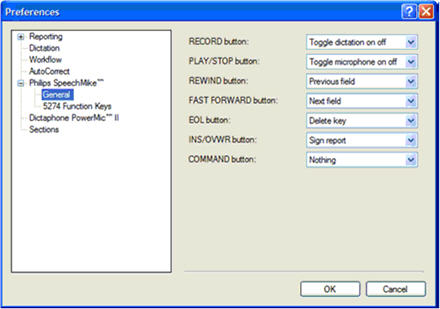
The SpeechMike General buttons are listed on the right side of the Preferences dialog box, above, and include the following functions:
- RECORD button: Used to control the dictation mode.
- Toggle Dictation On/Off: Toggles Dictation on or off; remains that way until toggled again.
- Use dead man switch: Turns dictation on for as long as button is held down.
- PLAY/STOP button: Used to control the command mode.
- Toggle Microphone On/Off: Toggles Microphone on or off; remains that way until toggled again.
- Use dead man switch: Turns microphone on for as long as button is held down.
- REWIND button:
- Nothing: Button is disabled and does nothing.
- Previous field: Selects previous field in reports that have multiple fields.
- Select backward: Selects report text, back from current cursor position.
Note: Regardless of this setting, the Rewind button always selects report text when the button is held.
- FAST FORWARD button:
- Nothing: Button is disabled and does nothing.
- Next Field: Selects the next field in reports that have multiple fields.
- Select forward: Selects report text, forward from current cursor position.
Note: Regardless of this setting, the Fast Forward button always selects report text when the button is held. The Fast Forward button may also be used on the Explorer screen to invoke the Quick Search function.
- EOL button: Same options as COMMAND button below, plus.
- Select backwards: Selects report text, backwards from the current cursor position.
- INS/OVWR button: Same options as COMMAND button below, plus.
- Select forwards: Selects report text, forward from current cursor position.
- COMMAND button:
- Nothing: Button is disabled and does nothing.
- Sign Report: Electronically signs report.
- Normal Report: Creates and signs a Normal report for the selected exam.
- New Line: Inserts new line into the report.
- New Paragraph: Inserts new paragraph into report.
- Delete Key: Deletes forward from current position.
- Delete Last Word: Delete the last word.
- Delete last utterance: Deletes the last group of words recognized.
- Play audio: Plays audio from current position.
- Toggle visibility: Shows and hides the main application window.
- Save as draft: Closes the report and saves it in draft mode.

The SpeechMike 5274 Function Keys buttons are listed on the right side of the Preferences dialog box, above, and any one of the buttons, F1 through F4, include the following functions: The functions work the same as described in the General buttons options listed above.
- Nothing
- Previous Field
- Next Field
- Sign Report
- Normal Report
- New Line
- New Paragraph
- Delete Key
- Delete Last Word
- Delete last utterance
- Play audio
- Select forward
- Select backward
- Toggle visibility
- Save as draft
MESSAGE BOXES AND DIALOG BOXES
SpeechMike buttons may be used to invoke actions in message boxes and dialog boxes.
When a message box appears:
- The EOL or INS/OVWR button select the default action (the highlighted selection).
- The second row of SpeechMike buttons corresponds to the buttons that appear in the box.
When a dialog box appears:
- The REW button is mapped to OK.
- The FF button is mapped to Cancel.
The following summarizes the SpeechMike button functions for message and dialog boxes:
- In a one-button message box:
- To select OK, use either the EOL, Rewind, INS/OVWR, or Fast Forward button
- In a two-button message box:
- To select OK or Yes, use the Rewind button
- To select Cancel or No, use the Fast Forward button
- Default action is EOL or INS/OVWR
- In a three-button message box:
- To select Yes, use the Rewind button
- To select No, use the PLAY button
- To select Cancel, use the Fast Forward button
- Default action is EOL or INS/OVWR
- In dialog boxes, the button mappings are as follows:
- To select OK, use the Rewind button
- To select Cancel, use the Fast Forward button
- Default action is EOL or INS/OVWR
For more information about the Philips SpeechMike functions, login to iSupport and search for solution 12939 "RadSuite Operator Manuals," locate the RadWhere for Radiology v3.0 section and select the link L-3221-001 "User Guide." If you are not an iSupport subscriber, click iSupport Timesaver for information on how to get started.
_______________back to top_______________
Did you know about specifying the specific port that will be used for .NET Remoting integration with the RadWhere Client?
If you are using a PACS integrated workflow with the RadWhere client that is using a COM integration you will need to specify a remote port. This can be done by accessing the System Configuration in the RadWhere Admin Portal. You can specify the necessary port number in a field called IRadWhere Remoting port in the RadWhere Client section. Typically this port will be specified as 9090. For other integrations types such as TCP or XML you will want to set the IRadWhere Remoting port to 0.
Press the play button on the following eTIPS Video icon to see a brief demonstration on how to specify a communications port for a PACs integration in RadWhere.
For more information about .NET Remoting Integration with RadWhere Client, login to iSupport and search for solution 12939 "RadSuite Operator Manuals," locate the RadWhere for Radiology v3.0 section and select the link L-3220-002 "Administrator Guide." If you are not an iSupport subscriber, click iSupport Timesaver for information on how to get started.
back to top
|


 For a complete listing of all updates for all released versions, login to
  To view an expanded What's Fixed listing, by product version, please login to
  iSupport is a Proven Timesaver
 Contacting Support