|
 eTIPS eTIPS
Did you know the Dictaphone Enterprise Speech System (DESS) allows administrators to control the checkout limit and expiration of voice jobs that are in use by a transcriptionist?
The Dictaphone Enterprise Speech System (DESS) allows system administrators to control how many voice jobs or minutes of dictation a transcriptionist is able to download to his or her computer and store in the transcription queue. DESS also allows administrators control over how long these jobs will stay in the transcription queue before they expire and are sent back for re-distribution. These settings apply to transcriptionist accounts using standalone Trans/Net, Word Client, or EXEditor.
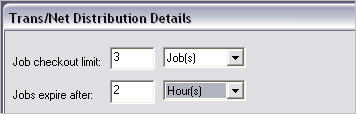
The Job Checkout Limit is the number of jobs or minutes of dictation that will download to a transcriptionist at one time. Ideally, this setting should be configured to ensure the transcriptionist will have a constant flow of work. The checkout limit should be set to at least two to ensure there will always be a job waiting for the transcriptionist when he or she finishes the current job; thereby, allowing the transcriptionist to immediately begin working on the new job as opposed to waiting for the new job to download first. Nuance recommends that the maximum number of jobs be less than 5 to ensure the transcriptionist have as few jobs as possible tied up at any given moment. Transcriptionists with slower connections may need this configured to a higher number if he or she is able to transcribe the current job faster than it takes to download the next job.
The Jobs Expire After setting is the amount of time jobs will remain in the transcription queue before they expire and become available for other transcriptionists to transcribe. Consider configuring this setting to allow the transcriptionist enough time to transcribe the jobs in his or her queue, but not so much time that the jobs may become at risk of meeting their target turnaround time goal.
Please Note: If the job expiration time is set to zero, jobs in the transcription queue will not expire. This could be a problem if the transcriptionist's computer inadvertently loses connection with the server or the user does not log out of the application at the end of his or her shift. A manager or supervisor will need to release these jobs manually to allow other transcriptionists to access the jobs. This is accomplished in the Job Lister application by changing the Job Status of each job back to RDY.
Click the play button on the following eTIPS video for a brief demonstration about how to set the Job Checkout limit and Expiration for your transcriptionists.
The following describes how to configure the job checkout limit and expiration settings in the VoiceSystem Explorer application.
- Launch the VoiceSystem Explorer application and login.
- Expand the appropriate Site and list of Master Profiles.
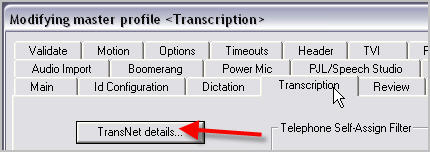
- Right click the Master Profile related to the transcriptionist accounts and select Modify.
- Select the Transcription tab and then click TransNet details... button.
- Modify the number of jobs or total minutes of dictation you would like for the checkout limit, and the amount of time you would like the transcriptionists to have the jobs before expiring.
For more information about job checkout and expiration, and other transcription and Trans/Net settings, logon to iSupport and search for solution, 10136 "EXVoice Operator Manuals." Locate the "System Administrator Courseware and Reference Guide" under the appropriate version of your system, and locate the "Managing Applications with Master Profiles" section. If you are not an iSupport subscriber, click iSupport Timesaver for information on how you can get started.
_______________back to top_______________
Did you know newly added normals by a transcriptionist will appear in the normals list once the transcription application is restarted?
Depending on how the system administrator has configured the system, transcriptionists may have the ability to create personal normals or shared normals within the transcription application. When a transcriptionist creates a new normal in the transcription application, it will not appear in the list of available normals during the current session: however, the transcriptionist may insert the newly added normal by simply typing the abbreviation and pressing the shortcut keystroke to insert the normal.
When a transcriptionist creates a normal, it is stored on the TextSystem server. The entire list of normals is cached on the local client machine when the transcriptionist launches the transcription application. In order for the new normal to appear in the list of available normals, the transcriptionist must log out of the transcription application and back in to populate the cache with the new entry.
For more information and step-by-step instructions on how to create and manage normals, login to iSupport and search for solutions:
- L-3233-005 - Enterprise Editor Transcription/Editor Courseware and Reference Guide.
- L-2956-003 - Word Client Courseware and Reference Guide.
- L-2957-008 - System Administrator Courseware and Reference Guide
If you are not an iSupport subscriber, click iSupport Timesaver for information on how you can get started.
_______________back to top_______________
Did you know signature scripts define which providers will be responsible for electronically authenticating documents?
Signature scripts define which providers will be responsible for electronically authenticating documents. They are customizable, and you may assign them at different locations within the DESS TextSystem Explorer application, so that each document, or type of document, follows a desired authentication process. Here are a few authentication process examples:
- The dictating physician will be responsible for electronically authenticating his or her own dictated reports.
- The attending physician will be the final signer of documents dictated by a resident physician.
- Any physician within this particular group may electronically sign for a specific physician or group of physicians.
- A physician or group of physicians may proxy sign documents for dictating physicians who are out on vacation or not expected to return for a long period.
A DESS System administrator can create Signature Scripts at the site level in the TextSystem Explorer application. Once created, the administrator assigns the signature scripts to one of three locations including Provider (Dictator), Worktype, or Site level.
Signature scripts are not used in conjunction with each other and the system evaluates signature scripts in the following order: Provider, Worktype, and Site. For instance, if a signature script is assigned to a Provider, the system will use that script and will not continue looking for another signature script at any other level. However, if a signature script is not assigned to a provider, the system will continue to look for a signature script assigned to the Worktype, and finally the site level.
By default, all documents are presented for authentication to the provider who dictated the report, as long as the provider is configured for electronic signature. To change this default behavior, create a new signature script and assign it to the proper location.
Note: For those providers who are not configured for electronic signature, the documents will not be presented for authentication.
Perform the following to create a new signature script and assign it to a Provider, Worktype, or Site:
- Launch the DESS TextSystem Explorer application and login with your User ID and Password.
- At the Enterprise level or Site level, right click the Signature Script folder and select New Signature Script. The Edit Signature Script dialog box will appear.
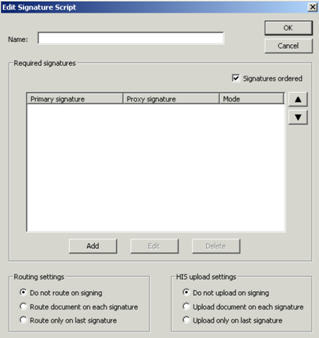
- In the Name field, type a descriptive name for the script. Use a meaningful name that will help you identify the script later, when you assign it to a Provider, Worktype, or Site.
- To add an item to the script, click the Add button. The Signature Script Requirement dialog box opens.
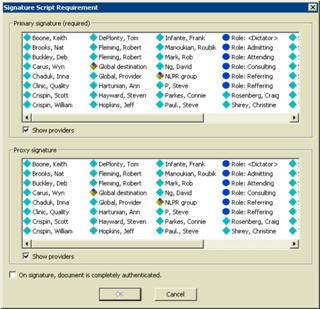
- In the Primary Signature (required) list, select a provider, provider role, or group.
Note: To hide provider names and only show provider roles and groups, clear the Show Providers checkbox.
- If you are assigning a proxy signer to this primary signature, select a provider, provider role, or group in the Proxy Signature list.
- If you want the primary signer (and optional proxy signer) you selected to have master status, meaning once they sign the document, the document is considered fully authenticated, select the check box next to On signature, document is completely authenticated.
- Click OK to return to the Edit Signature Script dialog box. The signers you selected are now listed in the row for the script item you just created.
- To specify another script item to add an additional level of signatures, i.e. resident signs first followed by the attending that provides the final signature, click the Add button and create a second script item to include the attending provider role.
- After all script items are added, decide whether you would like the signatures to be Ordered, and check or uncheck this checkbox in the Edit Signature Script dialog box accordingly Ordered signatures place the document in the first listed signer's electronic signature queue, followed by the next listed signer's queue, and so on. If this checkbox is unchecked, the document will be presented to all signers at the same time. Once the "master signer" authenticates the document, the document will be considered final signed, regardless of how many signatures have been obtained.
- Click the OK button to save the signature script and close the Edit Signature Script dialog box.
- To assign a signature script, right click the Provider, Worktype, or Site, and select Edit....
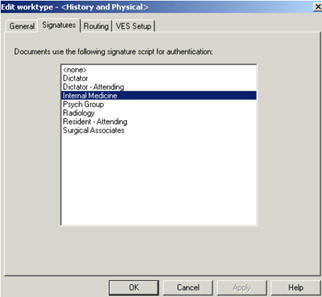
- On the Signatures tab, select the desired signature script that you created, and then click the OK button to save and exit.
To learn more about signature scripts, login to iSupport and search for Solution 10115: "EXText Operator Manuals." Locate the "System Administrator Courseware and Reference Guide" under the appropriate version of your system. If you are not an iSupport subscriber, click iSupport Timesaver for information on how to get started with iSupport.
_______________back to top_______________
Did you know Nuance Healthcare participates in many social media sites where you can get up-to-date information about our Products and our Company?
Click any of the following images to navigate to the related social media site you would like to visit.
 Click this image to navigate to the Nuance Healthcare - Click this image to navigate to the Nuance Healthcare -
Facebook web page.
 Click this image to navigate to the Nuance Healthcare - Click this image to navigate to the Nuance Healthcare -
Twitter web page.
 Click this image to navigate to the Nuance Healthcare - Click this image to navigate to the Nuance Healthcare -
Blog, "For the Health of IT"
 Click this image to navigate to the Nuance Healthcare - Click this image to navigate to the Nuance Healthcare -
You Tube site, "Save the Dr. Note - Channel"
 Click this image to navigate to the Nuance Healthcare - Click this image to navigate to the Nuance Healthcare -
Linked in web page.
 Click this image to navigate to the Nuance Healthcare - Click this image to navigate to the Nuance Healthcare -
eTIPS Newsletter subscription page where you can learn about eTIPS, change your eTIPS subscriptions, or subscribe with a new email address.
back to top
| 


 What's New
 What's Fixed
 iSupport is a Proven Timesaver
 Contacting Support