|
 eTIPS eTIPS
Did you know EXVoice Build 8.x offers three ways to define which worktypes are eligible for speech recognition for a given provider?
When configuring a provider for DESS VoiceSystem Speech recognition collection, you will need to define the dictation input device(s) and then choose the eligible worktype(s). Once configured, when a provider dictates a report, by using one of the defined devices along with one of the eligible worktypes, the dictated report will be collected for speech recognition.
Click the play button on the following eTIPS Video image to see a brief demonstration on how to configure the DESS VoiceSystem to collect dictated reports for speech recognition.

Providers are configured for speech recognition collection by using the DESS VoiceSystem Explorer application.
Perform the following to configure a user for speech recognition collection:
- Launch the DESS VoiceSystem Explorer application and login with your administrative ID and password.
- Expand the Site and Master Profile.
- Right-click the User and select Modify.
- Click the EXSpeech tab.
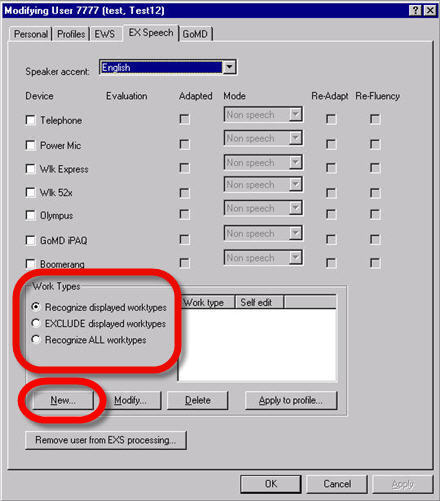
- Add worktypes to the list by selecting the New button and entering the appropriate value.
- Select OK to add to the list.
- Select the appropriate radio button to define whether these worktypes will be included or excluded from speech collection. A definition of each option is provided below.
Recognize displayed worktypes
This option will allow any listed worktypes to be sent to EXSpeech. This may be valuable if the dictator has a small number of worktypes that will be suitable for recognition based on dictation length, quality, required turnaround, or outsourcing concerns.
EXCLUDE displayed worktypes
This option will prevent any listed worktypes from being sent to EXSpeech. As with the above, it will typically include worktypes that are unsuitable while the majority of a provider's work will be processed using speech recognition. This is often applied to worktypes that have minimal dictation or to files that will be transferred for outsourcing.
Recognize ALL worktypes
This option is the catchall setting and the most commonly used. This does not require a populated worktype list, and will actually grey out all related buttons. Any dictation matching the required criteria of user, length and input device will be recognized by the system.
For more information about speech recognition collection settings, logon to iSupport and search for solution 14785 "Configuring User worktypes for EXSpeech Collection in Build 8." If you are not an iSupport subscriber, click iSupport Timesaver for information on how you can get started.
_______________back to top_______________
Did you know you can include text in a Worktype template that will automatically be removed by the HL7 interface when uploading to the EMR?
Some workflows may require a need to display certain text on transcribed reports in the TextSystem as well as on printed reports, but this certain text is not expected to be in the final output uploaded to the EMR. The TextSystem allows you to configure worktype templates to include text that is not passed in the report upload to the final repository. This is helpful when your workflow requires certain elements on a printed report that the EMR system cannot accept.
The following describes how to configure a worktype template to include text that will be removed by the HL7 interface upon upload. Please note; this configuration also requires a team member of Nuance's Technical Support or Interface Engineering teams to configure the interface application to remove this text.
Perform the following to modify a Worktype template to include text that will be removed by the HL7 interface when uploading to an EMR:
- Launch the DESS TextSystem Explorer application and login with your User ID and Password.
- Expand a Site and then expand Worktypes.
- Right-click a Worktype Template and select Edit Template to open the template for editing.
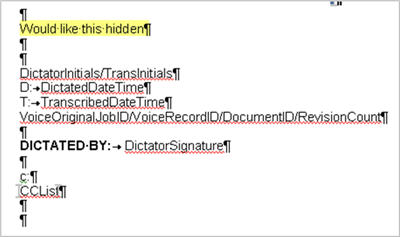
- Perform the following to hide the text, "Would like this hidden," shown in the image above:
- Enter <CUSTOM START> before the text that will need to be removed on the upload and <CUSTOM END> immediately following the text, as shown below.
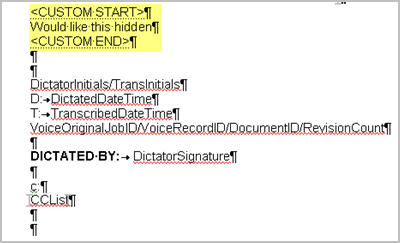
- Highlight and right-click one of the new tags you entered, <CUSTOM START> or <CUSTOM END>, and choose Font.
- Under Effects, choose Hidden to format the tag as hidden text.
- Repeat step six and seven to format the other tag as hidden text.
- Place the cursor where transcriptionists should begin typing on this worktype template, and then press Ctrl+N to save your changes.
Once hidden characters are turned off in the template, you will no longer see the <CUSTOM START> and <CUSTOM END> tags on the template/report and they will not print. The text “Would like this hidden” will display on reports in the TextSystem and will print when printed from the TextSystem. The "Would like this hidden" text will be removed by the HL7 interface when uploading to the EMR. The final report stored in the EMR will not include the text, "Would like this hidden,"
For additional information about managing worktype templates, logon to iSupport and search for solution, 10115 "EXText Operator Manuals." Locate the "System Administrator Courseware and Reference Guide" under the appropriate version of your system. If you are not an iSupport subscriber, click iSupport Timesaver for information on how you can get started.
_______________back to top_______________
Did you know there are error code definitions related to LDAP authentication failures when the LDAP server resides on the same domain as the DESS VoiceSystem server?
In the event of an LDAP authentication error, the Dictaphone Enterprise Speech System (DESS) running version 8.3 or higher can report a specific error code that is visible on the end user machine when an error is encountered. The error code is presented within a pop-up error message. This feature has the following prerequisites:
- The EXVoice server must be on the same domain as the LDAP server.
- The Windows service account under which the EXVoice server is running must have rights to query the LDAP server.
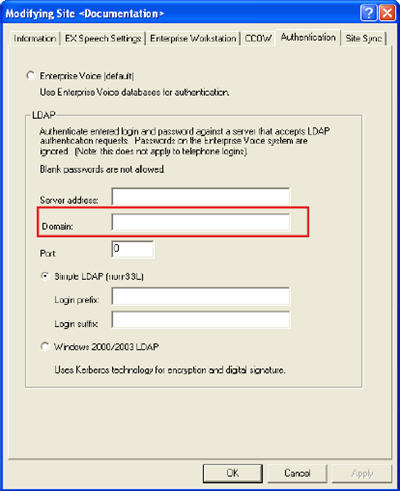
- You must specify the domain on the Authentication tab in the Modifying Site dialog box, shown below.
The error codes are defined as follows:
- Unknown user (EXV error -520)
- Password expired (EXV error -522)
- Account disabled (EXV error -521)
- Account expired (EXV error -523)
- Password needs reset (EXV error -524)
- Invalid credential (EXV error -525).
Note: The system returns this error for any nonspecific sub-codes.
For more information about the LDAP feature, login to iSupport and search for solution 14054 “What’s new or Changed in the Dictaphone Enterprise Speech System.” Locate v8.3 Document Update and click the “L-3311-002” link to open the “What’s new in DESS version 8.3” document. If you are not an iSupport Subscriber, click iSupport timesaver for more information on how to get started with iSupport.
_______________back to top_______________
Did you know iSupport now includes two new groups on the home page to provide iSupport subscribers quick access to the eTIPS Newsletter Archives and the eTIPS subscription page?
iSupport was recently upgraded to include two new groups to the home page including a "Healthcare eTIPS Newsletter" group and an "eTIPS Newsletter Archives" group. These new groups were added for our iSupport subscribers to have quick and easy access to all eTIPS content.
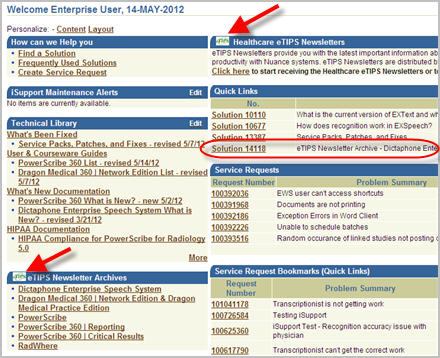
The iSupport home page is the first page seen after logging into iSupport. Near the bottom left there is a new group labeled "eTIPS Newsletters Archives." This group contains links to all six eTIPS newsletter archives pages. Clicking one of these links will take you to a solution housing links to all eTIPS newsletters that have been distributed for that specific product. This solution also provides article titles for each eTIPS article included in the archived newsletters.
On the top right there is a new group labeled "Healthcare eTIPS Newsletters." This group provides a link directly to the eTIPS Newsletters Subscription page where you can subscribe yourself or your colleagues to any of the six eTIPS newsletters, modify your current subscription to add or remove an eTIPS Newsletters, or to unsubscribe to eTIPS Newsletters altogether.
Adding any of the six eTIPS Newsletter Archives solutions to the Quick Links group on your home page, shown in the image above circled on the right, will allow you to be notified, by email, when a new eTIPS Newsletter issue has been archived and made available in iSupport. To add an eTIPS Newsletters Archives link to your "Quick Links" group, simply click one of the eTIPS Newsletters Archives links, found on the bottom left of the home page, to open the solution. When the solution is open, click the "Add to Quick Links" button, found at the top or bottom right of the solution, to save the article link to the "Quick Links" group on your home page.
If you would like to view the new iSupport home page and perhaps add the eTIPS Newsletters Archives link to the Quick Links group on your home page, click iSupport and login with your iSupport User ID and Password. If you are not an iSupport subscriber, click iSupport timesaver for more information on how to get started with iSupport.
back to top
|