|
 eTIPS eTIPS
Did you know the DESS VoiceSystem allows you to restrict viewable jobs for a select group of users in the Job Lister application?
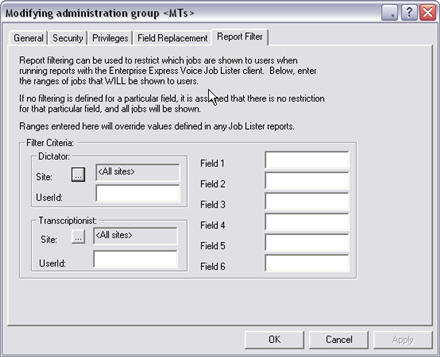
The Dictaphone Enterprise Speech System (DESS) VoiceSystem allows you to create Report Filters, restricting jobs shown to users in Job Lister. A Report filter is configured in the Administration group that is assigned to a user account. The DESS VoiceSystem Explorer application is used to modify or create a new Administration Group.
Click the play button on the following eTIPS Video for a brief explanation about configuring the Reports Filter to limit access to jobs in Job Lister.

The Report Filter tab, located in the Administration Group dialog box, is where you can restrict which jobs are viewable to a Job Lister user by filtering dictator site, dictator ID, transcriptionist site, transcriptionist ID, and fields 1 through 6. Any value, either individual or range, entered into any of these fields will limit the jobs shown in Job Lister to only include jobs meeting the values entered. The settings in the Report Filter take precedence over anything defined in a Job Lister report.
For example: If you select "1-3" in the Dictator Site field, any Job Lister report executed by this user will only include jobs from Dictator sites 1, 2, and 3; regardless if the user defined a Job Lister report to include all sites.

IMPORTANT: If you select a Transcriptionist Site or range of Transcriptionist IDs, the Job Lister user will not see jobs in a "Ready" status until the jobs are assigned to, transferred to, signed off by a specified transcriptionist or signed off by a transcriptionist from a specified site.
For more information about administration groups, logon to iSupport and search for solution, 10136: EXVoice Operator Manuals. Locate the "System Administrator Courseware and Reference Guide" under the appropriate version of your system, and locate the "Managing Security with Administration Groups" section. If you are not an iSupport subscriber, click iSupport Timesaver for information on how you can get started.
_______________back to top_______________
Did you know you could prevent EWS Self-Edit reports from routing twice when the provider completes a self-edit report.
If the DESS TextSystem is configured to route after a transcriptionist has completed transcribing a report and once again after a report is signed by a provider, you will have two copies of the report as intended. With the system configured in this manner, when an EWS user completes a self-edit report the same printing will occur. However, the initial printed copy is not wanted.
EWS self-edit multiple routing is a function of how the system processes completed reports. When the EWS provider completes a self-edit report, the system first saves the document on the server as an unsigned report and then reopens the report and signs it. The system counts it as two revisions.
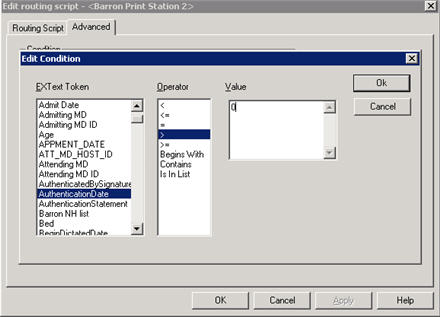
Creating a routing script for the EWS Self-Edit providers that includes an advanced condition will solve this issue. The following describes how to modify or create a routing script to prevent routing of EWS Self-Edit reports before the report is signed:
- Launch the DESS TextSystem Explorer application.
- Login with your User ID and Password.
- Modify an existing Routing Script associated with the EWS Providers in question, or create a new Routing Script.
- Click on the Advanced tab.

- Create a condition that will include, "Only route when AuthenticationDate > 0."
- Click OK to save the advanced condition.
- Click OK to save the Routing Script and exit.
- Assign the Routing Script to the EWS Self-Edit Providers.
For more information about setting up routing scripts, logon to iSupport and search for solution 14814: Providers using EWS Self-Edit workflow. If you are not an iSupport subscriber, click iSupport Timesaver for information on how you can get started.
_______________back to top_______________
Did you know the Input Type on Jobs shown in a Job Lister report could change for a DMMR SpeechSystem provider depending on which devices the provider has achieved draft status?
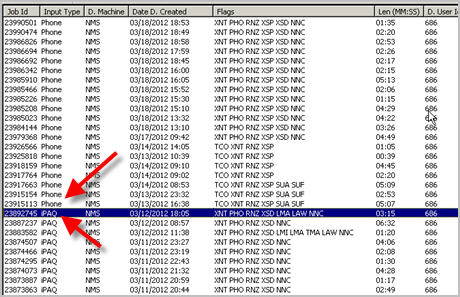
The Input Type value shown for each job in a Job Lister report is dependent upon the input device a DMMR SpeechSystem provider utilized to achieve draft status. When a provider reaches draft status on multiple input devices, the Input Type will only show one value, equal to the highest value based on the prioritized list that follows, regardless of the input device used to dictate the report.
- Telephone
- Olympus
- GoMD (iPAQ)
In the example below; a provider achieved draft status with GoMD (iPAQ device) on 3/12/2012; therefore, the Input Type will display iPAQ on each job. On 3/13/2012, the provider was configured for DESS SpeechSystem with a Device Type of Telephone. At this point, the Input Type changes to Phone for each dictation, even if the provider dictated the report on the GoMD (iPAQ). This is a result of how the system prioritizes the Input Type for DMMR SpeechSystem dictations and is not a system anomaly.

For detailed information about Dragon Mobile Medical Recorder and DESS System Administration, login to iSupport and search for solutions:
- 14339: Dragon Medical Mobile Applications User's Guides.
- 10128: EXSpeech Operator Manuals, and locate your version of the Administrator Courseware and Reference Guide.
If you are not an iSupport subscriber, click iSupport Timesaver for more information.
_______________back to top_______________
Did you know it is possible to display the properties of the USB Foot Pedal in Microsoft® Windows 7?
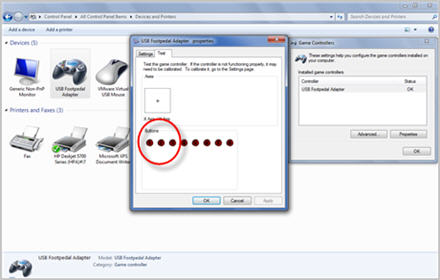
The USB Foot Pedal has the ability to be used with many Microsoft® Windows operating systems. Displaying the properties of the adaptor will allow you to visually see if the pedal actuations are being detected by Windows. The location of where Windows 7 displays the properties of the USB Foot Pedal Adaptor has changed from prior versions.
In Windows 7, locate the USB Foot Pedal Adaptor by:
- Access Control Panel > Devices and Printers.
- Right click on the USB Foot Pedal Adapter icon and select Game Controller Settings to bring up the Game Controller Status Screen.
- Select Properties to bring up the screen to test the Game Controller buttons.

- Buttons 1, 3 and 2 should light up as you press the pedals from left to right.
For more information about how to troubleshoot the foot pedal in Windows 7, logon to iSupport and search for solution 14478: Troubleshooting USB Foot Pedal Adaptor in Windows 7. If you are not an iSupport subscriber, click iSupport Timesaver for information on how you can get started.
back to top
|