|
 eTIPS eTIPS
Did you know you could enable audio headers for Transcriptionists using the DESS EXEditor application for Speech Recognition jobs?
The Dictaphone Enterprise Speech System (DESS) EXEditor application allows for use of audio headers with no disruption of dictation playback or transcription. Audio headers include detailed information about a specific job a transcriptionist has selected to transcribe in EXEditor, information such as; Dictator ID, Voice Job ID, Dictated Date/Time, Worktype, Medical Record Number (MRN), etc.
Click the play button on the following eTIPS video image for a brief demonstration on how to configure the DESS VoiceSystem to play audio headers for transcriptionists.
Perform the following to activate audio headers for a group of transcriptionists:
- Launch the DESS VoiceSystem Explorer application and login.
- Right-click the Master Profile assigned to the transcriptionists and choose modify.
- Select the Header tab and following options will be presented:
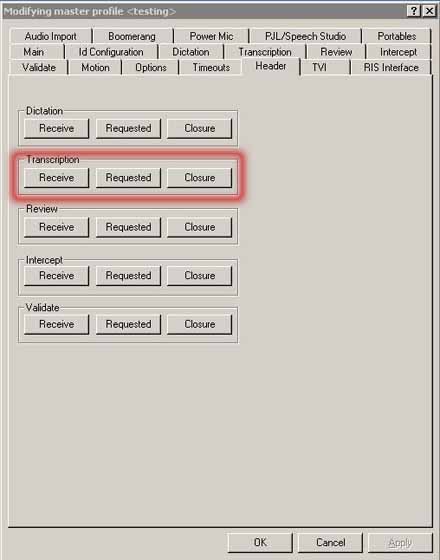
- The Transcription group, highlighted in the image above, applies to the DESS EXEditor application. There are three buttons representing different user modes including:
- Receive - Activates the audio header when a transcriptionist begins the initial playback of a job.
- Requested - Activates the audio header when a transcriptionist requests the header be played again during the course of transcribing a report. This option is limited to transcriptionists who are transcribing reports via telephone access.
- Closure - Activates the audio header when a transcriptionist has finished transcribing a job.
- Selecting the Receive button will open a "Transcription, receive header" dialog box with the following options:
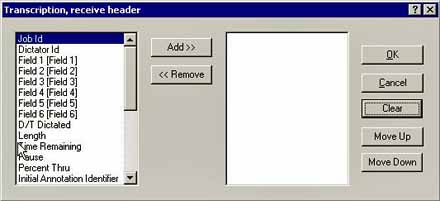
- The left column shows possible inclusions while the right column shows those selected. Highlight a desired field in the left column and click Add to move it to the right.
Note: The most commonly used fields are Dictator ID, D/T Dictated, Length, and the configurable fields representing Worktype and MRN. The “Field x [Field x]” entries correspond to those same fields in your DESS VoiceSystem Configuration. You can modify the audio that plays back for these fields under Prompt Templates on the ID Configuration tab in the Master Profile. For example; Field 1 could be configured to play "Worktype," and Field 2 could be configured to play "MRN." Therefore, adding "Field 1" and "Field 2" to the right would allow the transcriptionist to hear, for example, "Worktype 7, Medical Record Number 8675309."
- When you are finished selecting all desired fields, click OK to close the Transcription Receive header dialog box and return to the Header tab.
- Click OK to save and close the Master Profile.
Any transcriptionists assigned to this master profile will begin receiving audio headers on their next successful login to the EXEditor application.
For more information about DESS VoiceSystem Audio Headers, login to iSupport and search for Solution 14847: Enabling Audio Headers for EXEditor Transcriptionists. If you are not an iSupport subscriber, click iSupport Timesaver to learn more about iSupport.
_______________back to top_______________
Did you know you could recreate a corrupted Normal.dot / Normal.dotm template file?
When launching the DESS Word Client or EXEditor application, it opens a session of MS Word™ and uses MS Word's Normal template, commonly referred to as the normal.dot file (normal.dotm in MS Word 2007/2010). This Normal template determines what default styles, macros, AutoText entries, and other customized settings will be used for the document. In instances where the file becomes corrupt or damaged, it can exhibit unusual behavior such as; certain CTRL functions no longer working properly, unusual error messages, or MS Word simply freezes or closes abruptly. Recreating the Normal Template file will help resolve these types of issues.
Perform the following to recreate the Normal Template file:
- Close any applications that are using MS Word such as DESS Word Client or EXEditor.
- Locate the existing Normal.dot or Normal.dotm file:
- Windows XP, the default location is:
C:\Documents and Settings\<user-name>\Application Data\Microsoft\Templates
- Windows 7, the default location is:
C:\Users\<user-name>\AppData\Roaming\Microsoft\Templates
- Once located, rename the file to something like normal.old. This will prevent the file from being used when MS Word starts up again.
IMPORTANT: We recommend renaming the Normal.dot file as opposed to deleting this file in case the original file needs to be restored, or in the event that macros, AutoText entries, and other items need to be transferred to the new normal.dot/normal.dotm file.
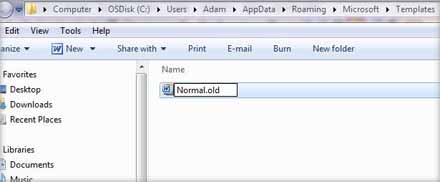
- Once the file is renamed, launch the MS Word application and you will notice a new normal.dot/normal.dotm file is automatically created. The new file will typically have the same settings as the prior normal.dot/normal.dotm file, but it is best to check and ensure the MS Word settings are configured to the recommended settings.
- The next time the DESS Word Client or EXEditor application is launched, it will use the new normal.dot/normal.dotm template file. If prompted with the message "The normal.dot at the workstation is different from that at the server. Do you wish to use the local copy?" then select Yes to use the local copy.
NOTE: The above process will not copy the MS Word AutoText entries, macros or certain customizations to the new file. These items can be transferred to the new file by using the Organizer feature in MS Word. This feature is found in MS Word by accessing the Tools menu, selecting Templates and Add-ins and clicking the Organizer button.
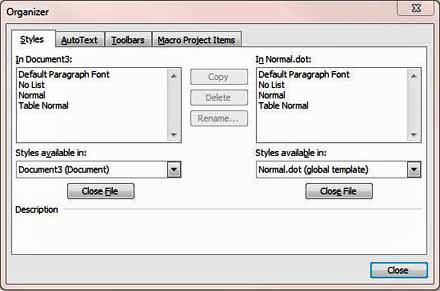
For more information about recreating the normal.dot/normal.dotm file, login to iSupport and search for solution 14850: How to Recreate the Normal.dot / Normal.dotm Template File if it Becomes Corrupted. For information about configuring the recommended MS Word settings, search for Document Number: L-3301-003 Software Installation Guide. If you are not an iSupport subscriber, click iSupport Timesaver for more information on how to become a member.
_______________back to top_______________
Did you know you could turn off Spell Check in Worktype Template Headers and Footers?
Headers and footers in Worktype Templates often contain data that is automatically populated, such as; patient name, provider names, medical record number, visit ID, etc. Because the dynamic information in document headers and footers changes so frequently and the transcriptionist usually would not be modifying text in these areas, it may beneficial to disable spelling and grammar checking of the header and footer. The following describes how to turn off spell check and grammar checking for a Worktype Template Header and Footer:
- Launch the DESS TextSystem Explorer application and login.
- Expand a Site and Worktypes.
- Right-click a Worktype of choice and select Edit Template.
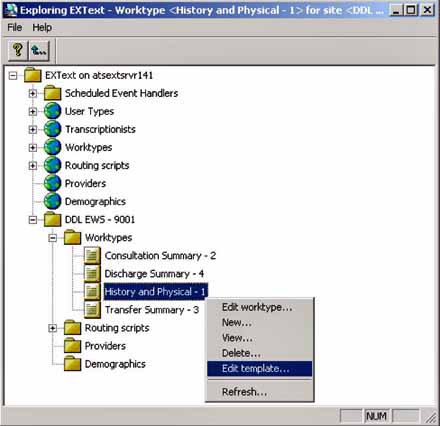
- Depending on the version of MS Word installed, follow the steps below:
Microsoft Word 2003
- In Word 2003, select Styles and Formatting from the Format menu.
- Right-click on the Header style, and select Modify.
- On the Modify Style dialog, click the Format button and select the Language option from the drop-down.
- Place a checkmark in the box next to “Do Not Check Spelling or Grammar”
- Click OK on the Language dialog.
- Click OK on the Modify Style dialog.
- Right-click the Footer style, and select Modify.
- On the Modify Style dialog, click the Format button and select the Language option from the drop-down.
- Place a checkmark in the box next to “Do Not Check Spelling or Grammar.”
- Click OK on the Language dialog.
- Click OK on the Modify Style dialog.
- Press CTRL-N to save the template and return to the TextSystem explorer application.
Microsoft Word 2007
- In Word 2007, select the fly-out button on the Styles pane. (pictured below in yellow on the lower, right-hand side)
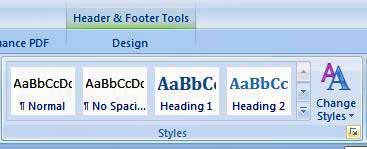
- The Styles Dialog Fly-out is displayed.
- Right-click the Header style and select Modify.
- On the Modify Style dialog, click the Format button and select the Language option from the drop-down.
- Place a checkmark in the box next to “Do Not Check Spelling or Grammar”.
- Click OK on the Language dialog.
- Click OK on the Modify Style dialog.
- Right-click the Footer style, and select Modify.
- On the Modify Style dialog, click the Format button and select the Language option from the drop-down.
- Place a checkmark in the box next to “Do Not Check Spelling or Grammar.”
- Click OK on the Language dialog.
- Click OK on the Modify Style dialog. Press CTRL-N to save the template and return to EXT explorer.
Note: If for some reason the headers and footers are in other styles, you may need to select the text and manually apply the "Do not check" setting through the Tools Language Set Language dialog.
For more information on disabling spelling and grammar checking on Worktype templates, login to iSupport and search for solution 14852: How to Turn off Spell check in Headers and Footers on Worktype Templates.” If you are not an iSupport subscriber, click iSupport Timesaver for information on how to become a member.
back to top
|