|
 eTIPS eTIPS
Did you know you could reverse the rewind and fast forward foot pedal functionality for an Enterprise Editor transcriptionist?
If you have a transcriptionist, or, a group of transcriptionists who would like to have the rewind and fast forward functions on their foot pedal reversed, there is an option to change the foot pedal functionality in the Transcriptionists' Master Profile settings.
You can accomplish this by launching the Dictaphone Enterprise Speech System (DESS) VoiceSystem Explorer application and customizing the master profile assigned to the transcriptionists. You can customize the master profile of an individual transcriptionist or create a separate master profile for a group of transcriptionists.
Click the play button on the following eTIPS video image for a brief demonstration on how to reverse the rewind and fast forward functionality on the foot pedal.

With the DESS VoiceSystem Master Profile open, perform the following to reverse the rewind and fast forward functionality of the foot pedal:
- Navigate to Master Profile Boomerang tab.
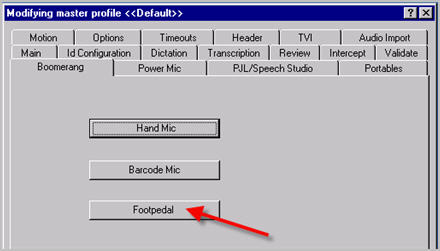
- Click the Footpedal button to open the Boomerang Footpedal dialog box.
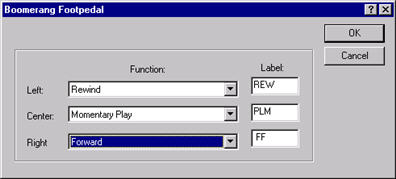
The default setting assigns the left button to fast forward and the right button to rewind. The above screen shot shows the settings to reverse the rewind and fast forward buttons on the foot pedal.
- Make the following changes to reverse the default settings for the rewind and fast forward buttons on the foot pedal:
- Click the Left Function drop down and select Rewind.
- Click the Center Function drop down and select Momentary Play, if not already selected.
- Click the Right Function drop down and select Forward.
- Click the OK button to save the changes and exit the Boomerang Footpedal dialog box.
- Click the OK button to save changes to the Master Profile.
- At this point, if you created a separate Master Profile, remember to assign this Master Profile to the Transcriptionists who would like the reverse foot pedal functionality, otherwise, save the customized Master Profile for the individual transcriptionist in the user profile.
_______________back to top_______________
Did you know you could quickly change a user's assigned Master Profile and/or Administrative Group?
The DESS VoiceSystem Explorer application has a shortcut to allow for quickly making a change to a user profile, specifically, changing the assigned Master Profile and/or Administrative Group.
You may find this feature helpful for many reasons such as:
- When transcriptionists have the need to switch to a different Master Profile to allow for transcribing from a different pool script, there is a shortcut to quickly change the assigned Master Profile, which includes a different pool script.
- If a user is leaving your facility for a period, you can quickly change the assigned Administrative Group to one that does not allow the user access to the system. Simply switch it back when the user returns.
Typically, users are added to the DESS VoiceSystem by accessing the VoiceSystem Explorer application and expanding a Site > Master Profile. Then, right click and choose Add User. From here, you navigate through the options and enter information about the user.
Once a user is added to the system, you can quickly change the Master Profile and Administrative Group, currently assigned to the user, without the additional steps needed to modify the user profile. The following describes how to use shortcuts to assign a different Master Profile and/or Administrative Group to a user.
- Launch the DESS VoiceSystem Explorer application and log in.
- Expand a Site.
- Click Users and the right pane will populate with all users for this site.
- Navigate to a user and click the user so it is highlighted.
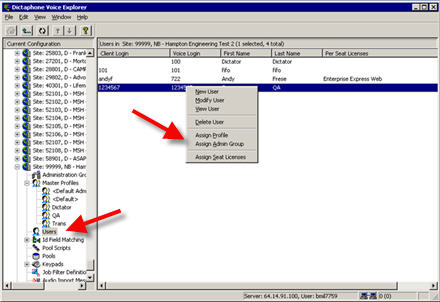
- Right click the highlighted user and choose one of the following:
- Assign Profile - Allows you to select a different master profile assignment.
- Assign Admin Group - Allows you select a different Administrative Group assignment.
For more information about user profile settings, log in to iSupport and search for solution, 10136: EXVoice Operator Manuals. Locate the "System Administrator Courseware and Reference Guide" under the appropriate version of your system. If you are not an iSupport subscriber, click iSupport Timesaver for information on how you may get started.
_______________back to top_______________
Did you know providers are able to configure EWS to display more or less columns of patient information on the EWS Visit List and Reports List?
The designated EWS system administrator initially configures the default columns of patient information displayed on the Enterprise Workstation (EWS) Visit List and Reports List. However, an EWS user can choose to either use the default columns or select from a list of columns to display on these lists.
The following describes how a provider may choose from a selection of columns and rearange the order in which columns display on the Visit List and Reports List.
- Launch the EWS application and log in.
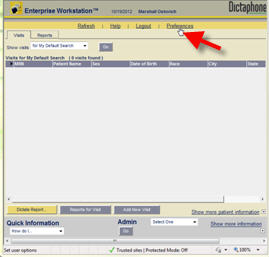
- Click the Preferences link, found on the ribbon near the top.
- Click the Visit List or Report List tab. The Report List tab is shown below.
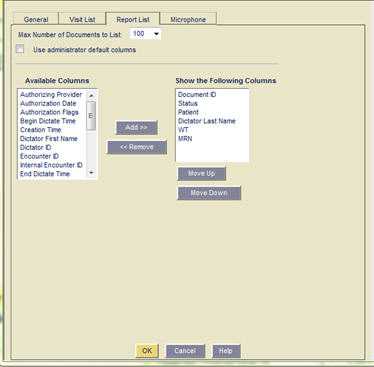
- At this point, you have two choices to determine which columns will display on the EWS Reports List:
- Select the checkbox related to the Use Administrative Default columns if you would like to use the default columns defined by your system administrator, and then click the OK button to save and exit.
- Clear the checkbox related to the Use Administrative Default columns to enable the option to select your own columns. Continue with next step.
- From within the Available Columns list, choose your own columns by selecting any number of column headings listed, and then click the ADD>> button to move them to the Show the Following Columns list.
- Click OK to save your changes and exit.
TIP: You can also:
- Remove columns: by selecting them from within the Show the Following Columns, and click the <<Remove button to move them back to the Available Columns list.
- Rearrange the order of columns: by clicking an individual column heading within the Show the Following Columns box and click the Move Up or Move Down buttons.
NOTE: The changes take effect immediately upon returning to the Reports List tab in EWS. Perform the same steps described above to make changes to the Visit List tab in EWS by simply accessing the Visit List tab instead of the Report List tab in EWS preferences.
For more information about Enterprise Workstation, log into iSupport and search for solution: 10207 Enterprise Workstation Operator Manual. If you are not an iSupport subscriber, click iSupport Timesaver for information on how you may get started.
back to top
|