|
 eTIPS eTIPS
Did you know a provider must remove any dictation anomalies from a transcribed report before electronically signing it?
During the course of transcribing a report for a provider, a Medical Transcriptionist (MT) may encounter a spoken word or phrase that can't be understood. When this occurs, an MT will use a tool that places a 'Dictation Anomaly’ marker at the precise location within the report. When a provider accesses the transcribed report from within the Enterprise Workstation application, the 'Dictation Anomaly' marker will appear in the report highlighted with yellow. The provider must resolve the "Dictation Anomaly" before the system will allow the provider to electronically sign the report.
Click the play button on the following eTIPS video to see a brief demonstration about how a provider can resolve a 'Dictation Anomaly.'

The following provides step-by-step instruction for a provider to remove a dictation anomaly:
- Login to the Enterprise Workstation.
- Navigate to the Reports tab and search for transcribed documents by choosing the I can sign filter.
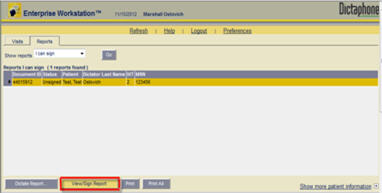
- Select a report from the list and click the View/Sign Report button. The un-signed report will appear in the screen. Dictation anomalies appear in the report highlighted in yellow, shown below.
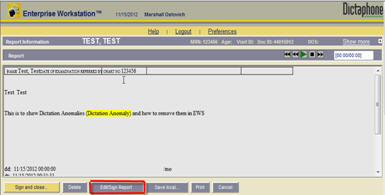
- Click the Edit/Sign button to access the report for editing.
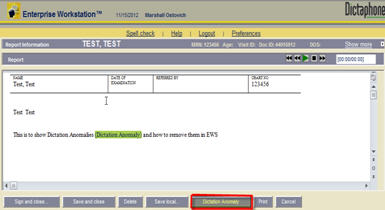
- Click the Dictation Anomaly button to move the insertion point to the location of each blank segment of the report (where the transcriptionist had difficulty understanding the recorded audio).
- Once all the dictation anomalies are resolved, click the Sign and Close button to complete the electronic signature process.
NOTE: All Dictation Anomalies must be resolved before the system will allow a transcribed report to be electronically signed.
For more information about EWS Dictation Anomalies, login to iSupport and search for solution, L-3141-001: Dictate and ESig with Visits. If you are not an iSupport subscriber, click iSupport Timesaver for information on how you may get started.
_______________back to top_______________
Did you know Dragon® Medical 360 | Mobile Recorder allows you to easily view the upload status of dictations?
From the main screen of the application click on the Dictations tab. A dictation can be in one of three states:
- Fully uploaded
- Currently uploading
- Waiting to be uploaded
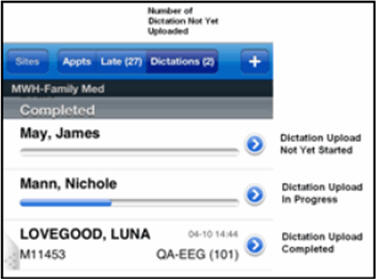
In the illustration above:
- The dictation for Lovegood, Luna is fully uploaded. The value immediately under the patient name (M11453) is the confirmation number and can be used to track the dictation in the dictation screen.
- The dictation for Mann, Nichole is currently uploading. The line underneath is a progress bar that shows the percentage complete.
- The dictation for May, James is waiting to be uploaded. When this dictation begins to upload, the progress indicator will be animated to show the percentage complete.
For more information about Dragon® Medical 360 | Mobile Recorder, login to iSupport and search for solution 14339: Dragon® Medical 360 | Mobile Recorder User's Guide. If you are not an iSupport subscriber, click iSupport Timesaver for information on how you may get started with iSupport.
_______________back to top_______________
Did you know you could modify a group of providers' Telephone dictation keypad controls that are used to record and pause dictation, rewind, fast-forward, playback, etc.?
When a provider dictates a report by using a standard telephone, the keypad is used to control the recording of dictation as well as playback, rewind, fast-forward, etc. The default setting to toggle in an out of record is the 2 key. However, if a provider would prefer to use the 1 key as the record toggle, this is easily accomplished by modifying the keypad for that specific provider or, more commonly, for an entire group of providers.
The telephone Dictation Keypad is configured in the Dictaphone Enterprise Speech System (DESS) VoiceSystem Explorer application. The following provides step-by-step instruction on how to modify the currently assigned Telephone Dictation Keypad for an entire group of providers.
I Find out which keypad is currently assigned to the group of providers.
- Login to the DESS VoiceSystem Explorer application.
- In the left pane, expand the Site where the providers reside.
- Expand Master Profiles.
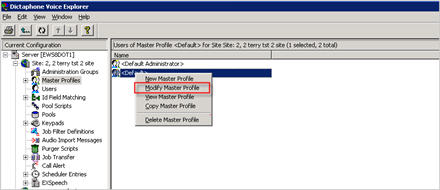
- Right click on the Master Profile assigned to the group of providers and select Modify Master Profile.
A Modify master profile dialog box will appear.
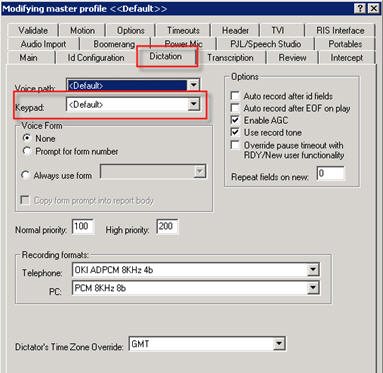
- Select the Dictation tab of the Master Profile.
- Take note of the section labeled Keypad:. This setting identifies the dictation keypad currently assigned to this group of providers.
- Click the OK or Cancel button to exit the Master Profile settings.
II Modify the Dictation Keypad assigned to the group of providers.
- In the left pane of the DESS VoiceSystem Explorer application, expand Keypads.
- Click Dictation to see the list of Dictation Kaypads displayed in the right pane.
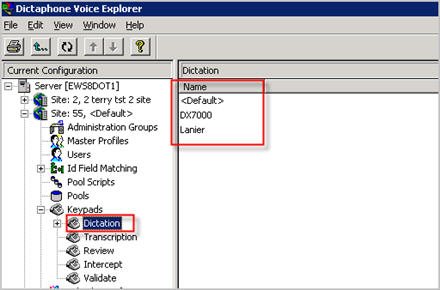
- Locate the keypad you wish to modify.
- Right click on the keypad and select Modify Keypad.
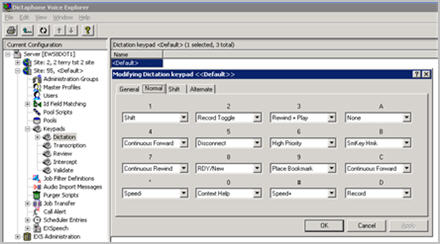
- Here you will see three tabs that can be configured for the Telephone Dictation Keypad including: Normal, Shift, and Alternate. Configure all three tabs to your desired configuration, and then click OK to save your changes.
For more information about Keypad settings, login to iSupport and search for solution, 10136: EXVoice Operator Manuals. Locate the "System Administrator Courseware and Reference Guide" under the appropriate version of your system. If you are not an iSupport subscriber, click iSupport Timesaver for information on how you may get started.
back to top
|