|
 eTIPS eTIPS
Did you know you could view audit information about access to voice jobs and text documents by using the DESS VoiceSystem Access Audit feature?
System administrators frequently ask how they can audit the lifecycle and access of jobs. The VoiceSystem Access Audit feature is built into the Job Lister application. The Access Audit feature is a popular feature and is quite easy to use. Our July 2011 edition of eTIPS includes a recorded video, which will step you through Access Audit. You can watch this video by clicking the play button on the following eTIPS video image.

The Access Audit feature is enabled on a per system basis. Access Audit allows you to run audit reports with the Job Lister application. Access Audit reports provide detailed access events for both the DESS VoiceSystem and TextSystem; detailing voice job and document activity for up to the past 6 months, or longer if your system has been configured for it.
In the example presented below you can see: who created a new document, if that document was later edited, as well as when and if it was viewed and by whom. You can also see when voice jobs were accessed and listened to. Access Audit lets you see when a document was uploaded or routed, in addition to other important information about access to reports and patient information.
NOTE: To view the Access Audit reports you must have the Job Lister: Access Audit privilege added to your assigned administration group in the VoiceSystem Explorer application.
Perform the following steps to view Access Audit information:
- Launch the DESS VoiceSystem Job Lister application and log in.
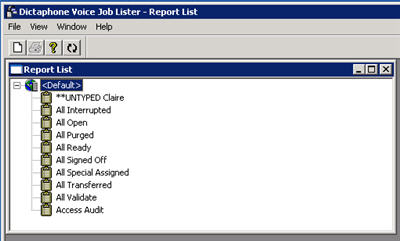
- Double click the Access Audit report from the available reports list.
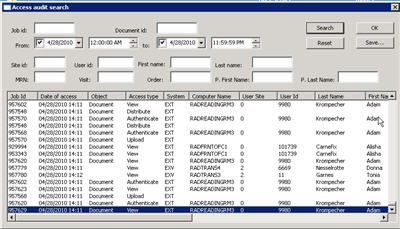
- On the Access Audit search screen, enter search criteria to narrow your search results, and then click the Search button.
TIP: The search results can be sorted like any other standard Job Lister report by clicking on a column heading. The search results can also be saved as a CSV file to be opened and formatted in another application such as Microsoft® Excel.
For more information about Access Audit and other VoiceSystem features, including Operation and Administration manuals, login to iSupport and search for Solution 10136: EXVoice Operator Manuals. If you are not an iSupport subscriber, click iSupport Timesaver to learn more how you may get started with iSupport.
_______________back to top_______________
Did you know you could use the VoiceSystem Job Lister application to determine peak dictation port usage for a given time frame?
When thinking about VoiceSystem dictation capacity, a frequently asked question is: “How can I determine what the peak, or maximum, channel/port usage of my system is within a given time period?”
You can use the VoiceSystem Job Lister application to determine this easily and quickly. Follow these steps to generate a Joblister quick report or you can create your own new report specifically for this purpose.
- Launch the Job Lister application and log in.
- Rick-click any existing/saved report on the reports list and choose quick report from the context menu.
- On the Main tab, select the statuses: ready, signed off, open, interrupted, transferred, and special assigned.
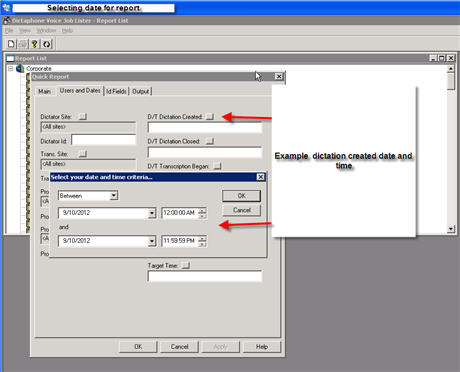
- On the Users and Dates tab, select the D/T Dictation Created ellipsis button and enter the dates and times range you are interested in. The example below shows one day 9/10/2010 (the whole day) selected.
Note: if you are interested in only one site in a multiple site system you will also have to select that site under the Dictator site tab.
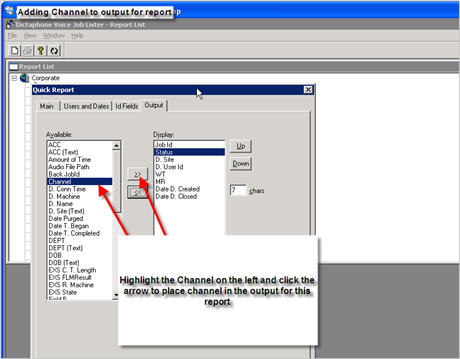
- On the Output tab, select the desired report criteria. If not already included, you can add Channel to the report.
- Click OK and the report will run.
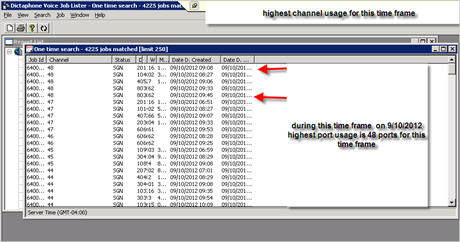
- Click on the column name header for Channel to sort the report ascending or descending by Channel. The highest numbered channel will show the maximum amount of channels utilized (dictated) for the desired time period.
Note: This same approach can also be useful if you are looking for peak periods of dictation volume by checking the time the dictation was created at.
EXAMPLE: Create date and time frame reference:
Example: Adding channel to output column:
Example: Results show 48 channels in use between 8:47 a.m. and 9:45 a.m.
For more information about Job Lister Reports, log in to iSupport and search for solution, 10136: EXVoice Operator Manuals. Locate the "System Administrator Courseware and Reference Guide" under the appropriate version of your system. If you are not an iSupport subscriber, click iSupport Timesaver for information on how you may get started.
_______________back to top_______________
Did you know an administrator could setup a default patient list for a provider to select from while dictating reports in EWS?
In EWS, the Visit tab is where a provider will search for a specific patient and then dictate a report about the patient. The Visit tab also allows for a Default Visit Search enabling a provider to select from a current list of patients, as opposed to needing to search for the patient. The Default Visit Search is configured by selecting a timeframe for a patient's visit to the hospital or clinic along with the provider's role with the patient (i.e. attending, consulting, referring physician, etc.).
The following are examples of common configurations used by providers:
- In a hospital, a common configuration would include all patients over the past 10 days where the provider's role with the patient is attending physician.
- In a clinic, a common configuration would include all patients for today (1 day) where the provider's role with the patient is the attending physician.
The following describes how to setup a Default Patient List for a provider:
- Launch the DESS VoiceSystem Explorer application and log in.
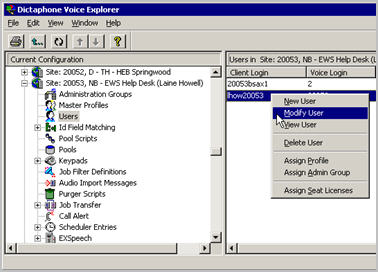
- Expand a Site and click Users.
- In the right pane, right click a user and select Modify User.
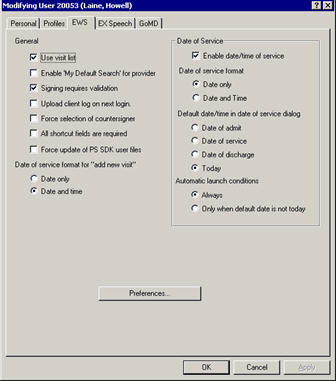
- Click the EWS tab.
- If you would like the provider to have the option to configure his or her own Default Search, click the option Enable “My Default Search” for providers so a check mark appears in the box.
- In the Date of Service group, click the option to Enable date/time of service.
- Select additional date/time options in the Date of Service group.
- Click the Preferences button.
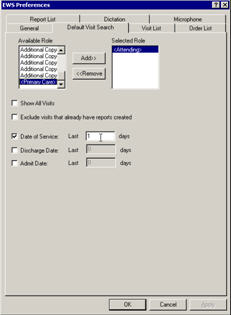
- Select the Default Visit Search tab.
- Select an Available Role and click the Add button to move the role into the Selected Role box.
- Select Date of Service, Discharge Date, or Admit Date and enter the number of days.
- Click OK to save the changes and exit.
- Click OK to save the user profile and exit.
NOTE: Once the setup is complete and the Enable “My Default Search” for provider option is enabled, the provider will have access to the same “Default Visit Search” setting found in the DESS VoiceSystem Explorer application. See the image below.
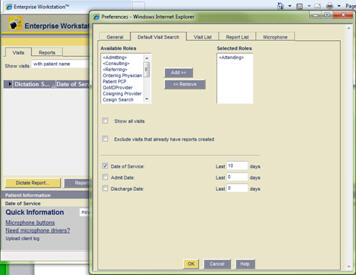
- The provider accesses the Default Patient Search in EWS by navigating to the Visit tab and selecting “Default Search” from the Show Visits drop down box.
For more information about Enterprise Workstation, log into iSupport and search for solutions:
- 10207 Enterprise Workstation Operator Manual
- 10115 EXText System Administrators Courseware and Reference Guide
If you are not an iSupport subscriber, click iSupport Timesaver for information on how you can get started.
back to top
|