|
 eTIPS eTIPS
Did you know DESS EXEditor version 8.3.1.1 enables users to manage signature destinations as well as related routing and upload actions on documents that are waiting for electronic signature?
The release of EXEditor 8.3.1.1 adds new document signature management features. Users with the Signature Queue Management privilege will be able to manage signature destinations, related routing and upload actions, on documents that are currently waiting for electronic signature. Previous versions of EXEditor allowed view-only access to document signature status.
Click the play button on the following eTIPS video image for a brief demonstration on how to configure and use the Signature Queue management feature.

When using EXEditor version 8.3.1.1, clicking the Signature button on the Document Properties window will bring up a list of current Signature Destinations, as shown below.
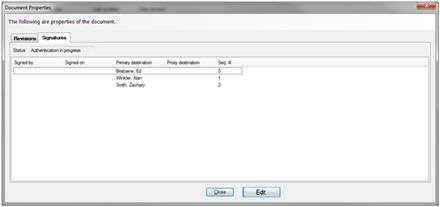
The SEQ# indicates the signatures are ordered and must be signed in that order. If all SEQ# entries are 0 (zero), then anyone in the list can sign and finalize the document.
In the Signature tab of the Document Properties, clicking the Edit button will open the Edit Signature Script window, as shown below.
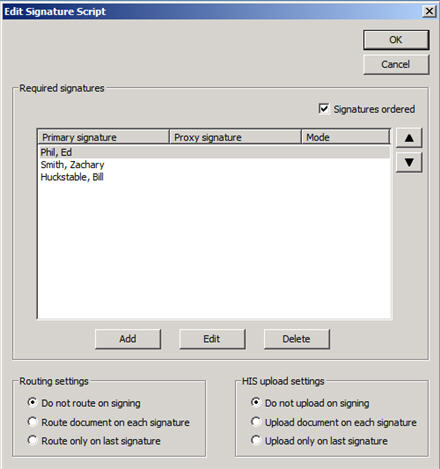
The Edit Signature Script dialog box provides the user the following capabilities:
- Add a destination to the list
- Remove a destination from the list
- Select a destination and move it up or down to change the order
- Determine what routing action to take after a particular list entry has signed the document
- Determine any HIS uploading action that needs to take place after a particular list entry has been signed
Please note:
- You can only remove a destination if there is more than one. Removing the last destination will finalize the document. If you remove the last destination, you will be forced to add a destination before closing or canceling the signature edit operation.
- Adding a destination will allow you to add a single provider or a group, but only from Provider/Group signature destinations within the same site.
For additional information about EXEditor features and operations, login to iSupport and search for solution: 10128, "EXSpeech Operator Manuals." Locate your version of the Transcriptionist/Editor Courseware and Reference Guide - Enterprise Editor. If you are not an iSupport subscriber, click iSupport Timesaver for information about how you may get started.
_______________back to top_______________
Did you know there are settings to define how an EWS user is permitted to resume an EWS session that has timed-out due to inactivity?
When an Enterprise Workstation (EWS) user session is idle for a period of time that exceeds the system configured inactivity timer, the system will automatically terminate the user's session and return to the EWS login page. The login page will appear with options based on predefined settings permitting the user to either re-enter a password to re-initiate the session or to have the user begin a new session by entering a user id and password. The chosen option is a site-wide setting affecting all EWS users within a particular VoiceSystem site.
The setting for these options is located in the DESS VoiceSystem Explorer application by choosing the option to modify a site, and then navigating to the Enterprise Workstation tab. The available options are found on the lower part of the Enterprise Workstation tab, as shown below:
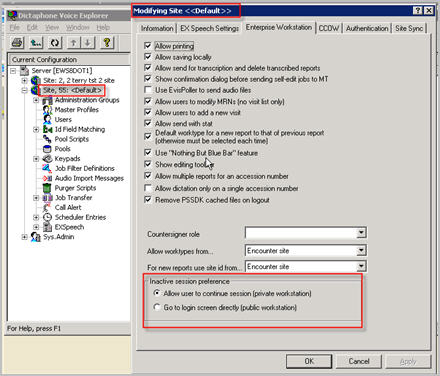
Option 1: Allow user to continue session (Private Workstation) - This option allows the EWS user to continue a timed out session by simply reentering a password. This option is typically chosen when the EWS users will access the system by using a computer that resides in private area, e.g., in the user's office or home.
Option 2: Go to login screen directly (Public Workstation) - This option forces the EWS user to begin a new session by reentering both user id and password. This option is more commonly chosen when the EWS users will access the system by using computers located in public areas and/or to add an extra layer of security to help protect patient information.
For more information about EWS options and features, login to iSupport and search for solution: 10207: "Enterprise Workstation Operator Manuals." Select the "System Administrator Courseware and reference Guide" pertaining to your version of software. If you are not an iSupport subscriber, click iSupport timesaver for information about how you may get started.
_______________back to top_______________
Did you know the EXEditor application is an add-in to Microsoft® Word?
The EXEditor application is largely an add-in to Microsoft Word (MS Word). Like most MS Word add-ins, base word processing functionality is managed by MS Word, with features and functionality augmented by the add-in itself, in this case EXEditor.
An add-in application for MS Word can be disabled by MS Word at any time. MS Word typically encounters errors during its normal operations and proceeds to disable any and all add-ins until the source of the problem has been corrected. Of course, any time the EXEditor add-in is disabled by MS Word, the EXEditor application will no longer function correctly. Two common symptoms of a disabled EXEditor add-in are:
- EXEditor shortcuts will not work or
- EXEditor will not load.
Below is an example of how a disabled EXEditor add-in will appear in MS Word:
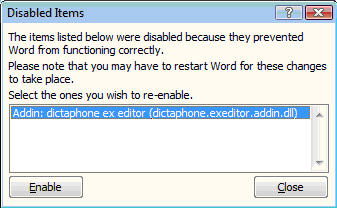
The EXEditor add-in will need to be re-enabled to restore functionality to EXEditor. Depending on the MS Word version being used, the steps to access MS Word's Disabled Items list are different. Below are the steps to access the Disabled Items list in MS Word 2003, 2007 and 2010. Once you have accessed the Disabled Items list, you can click on the disabled EXEditor add-in item, found in the dialog box, and then click the Enable button in order to re-enable it. These steps will need to be performed in MS Word while EXEditor is not being used.
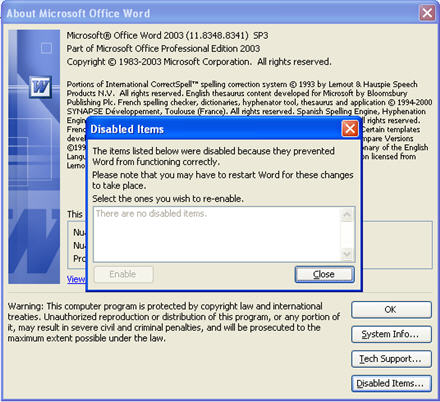
Perform the following to locate the Disabled Items list in MS Word 2003:
- Launch the MS Word application.
- Navigate to Help > About Microsoft Office Word > Disabled Items.
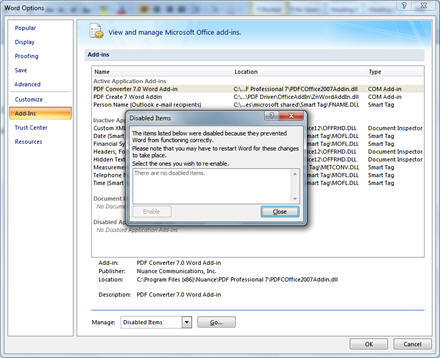
Perform the following to locate the Disabled Items list in MS Word 2007:
- Launch the MS Word application.
- Navigate to Office Button > Word Options > Add-Ins > Disabled Items > Go.
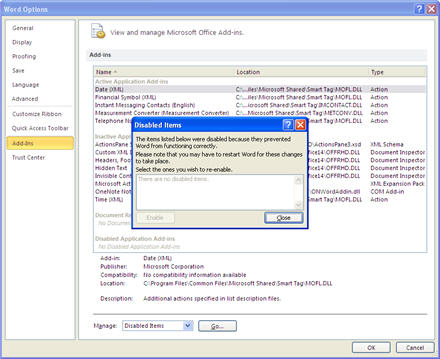
Perform the following to locate the Disabled Items list in MS Word 2010:
- Launch the MS Word application.
- Navigate to File > Options > Add-Ins > Manage > Disabled Items > Go.
For additional information about EXEditor add-in, login to iSupport and search for solution 13633: EXEditor message “Error starting Site. Please make sure that Site add-in is not disabled” in Word 2007. If you are not an iSupport subscriber, click iSupport Timesaver for information about how you may get started.
Please note: You can find additional information about Microsoft Office add-ins at the following Microsoft websites:
http://msdn.microsoft.com/en-us/library/ms268871(v=vs.80).aspx
http://msdn.microsoft.com/en-us/library/vstudio/ms268871.aspx
http://support.microsoft.com/kb/827706 for older versions of Word.
back to top
|