|
 eTIPS eTIPS
Did you know you could send a blind carbon copy of a document to a provider?
The Enterprise Editor (EX Editor) application allows you to send a copy of a document to a printer, fax, email, or batch on the system for a specific provider. However, there may be times when you wish a copy to be sent without including the name of this provider recipient on the CC list of a document.
Click the play button on the following eTIPS video to learn how to send a blind carbon copy of a document to a provider.

_______________back to top_______________
Did you know the DESS VoiceSystem requires a client login setup for each provider using the Partial Dictation feature?
Partial Dictation, also known as a dictation marker, is a feature that was added to the DESS system in version 8.3. After implementing the Partial Dictation workflow you may have noticed that Partial Dictation jobs, created by some providers in the EMR, were imported to the DESS system with an Author ID of 999999. This typically happens when providers, who are creating partial dictations, do not have a corresponding Client Login or the client login parameter has been disabled for these providers in the DESS VoiceSystem.
Note: The Author ID passed from the EMR system must match the provider's Client Login in the DESS VoiceSystem.
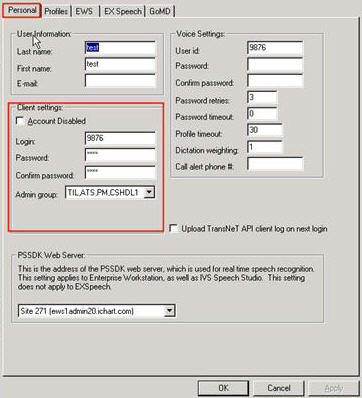
To correct this, ensure that each provider has a corresponding Client Login enabled on the DESS VoiceSystem. To check this configuration, simply login to the DESS Voice System Explorer application and select a provider who will use the Partial Dictation feature. Right-click the User account and select Modify. On the Personal tab, shown below, ensure the Client Login feature is enabled by unchecking the Account Disabled checkbox. In addition, verify that the Client Login (name) is identical to the Author ID being sent from the EMR system for the partial dictations (dictation markers).

For more information about your DESS SpeechSystem and its components, log into iSupport and search for solution L-3311-003: What's New in DESS 8.3. If you are not an iSupport subscriber, click iSupport Timesaver for information on how you may get started.
_______________back to top_______________
Did you know that Enterprise Reporting (EX Reporting) supports exporting report results to Microsoft® Excel in .zip format?
Microsoft® Excel is a frequently used application to further format exported report results from EX Reporting. Reports can include large datasets such as, Transcription Summary reports, which typically span many months resulting into very large files.
EX Report export functionality has been enhanced to include Excel formatted report results exporting that will compress the data in .ZIP format, which dramatically reduces the file size.
To download reports in the .ZIP format, simply choose Excel Zipped as the export format type after generating your desired report, as shown below.

Note: You must have a third-party tool such as WinZip installed on your computer to decompress and use .ZIP formatted files.
For more information about EX Reports, login to the EX Reports administration web site and click the link "View Product Information and User Guides for Reporting here."
_______________back to top_______________
Did you know you could limit the list of available dictation worktypes on the Dragon Medical 360 | Desktop Recorder?
In most customer environments, not all providers dictate reports related to all worktypes in use at that institution. For example, Radiologists rarely (if ever) dictate History and Physical reports. DM360 Desktop Recorder makes it easy for a provider to hide worktypes he or she never uses for dictation. Some systems have dozens, if not hundreds of defined worktypes. Hiding unused worktypes will make worktype selection much easier at the beginning of each new session and report.
The following describes how to hide or display worktypes you wish to appear in your worktype selection list:
Customize Worktype List
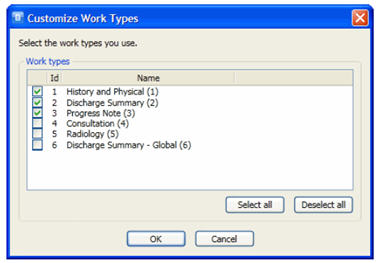
From the Options menu (click the Dragon logo). You can choose which of the available worktypes you want to display in your toolbar's drop-down list.
To customize which work types appear in this list:
- Click the Dragon logo in the upper-left corner of the toolbar.

- Select Options > Custom work types.

- Click the check box next to the worktypes you want to display (or use the Select all or Deselect all buttons).
- When finished, click OK.
For more information about Dragon Medical 360 | Desktop Recorder installation and operation, login to iSupport and search for document, ESSA002 Installing Dragon Medical Recorder and Its Prerequisites. If you are not an iSupport subscriber, click iSupport Timesaver for information on how you may get started. Additionally, the built-in application help provides the most comprehensive and up to date information about using this application.
back to top
|