|
 eTIPS eTIPS
Did you know Dragon® Medical 360 | Mobile Recorder allows Providers to place a dictation on hold, visit the next patient, and then resume with the dictation on hold?
This feature enables the physician to quickly stop the dictation of the current report to perform other tasks such as viewing a different patient’s information, and then returning to the incomplete report (placed on hold) to finish the dictation.
To place a dictation on Hold using an iPhone or an iPad device:
- Tap Stop to stop recording dictation.
- Tap Hold. The dictation is saved in the Drafts section.
To resume dictation of a saved draft from an iPhone or an iPad device:
- From the Dictations tab, tap the dictation report to resume.
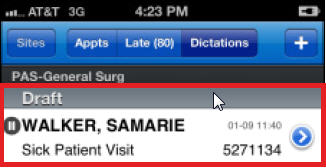
- When the Dictate view displays, you can resume dictation. The recording position automatically begins at end of the existing audio.
To place dictation on Hold from an Android device:
- Tap Record/Pause to stop recording dictation.
- To save the dictation draft, tap the BACK or Menu button, and then:
- Tap Hold+New, or
- Tap Hold+Next.
Note: The dictation is saved in your Draft folder.
To resume dictation of a saved draft from an Android device:
- From the Dictations list view, tap the Drafts folder, and then select the dictation report to resume.
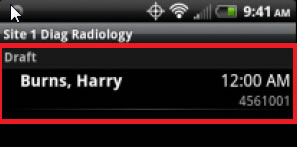
- When the Dictate view displays, you can resume dictation. The recording position automatically begins at end of the existing audio.
For more information on Dragon® Medical 360 | Mobile Recorder, login to iSupport and search for solution 14339: Dragon® Medical 360 | Mobile Recorder User's Guide. If you are not an iSupport subscriber, click iSupport Timesaver for information about how you may become a member.
_______________back to top_______________
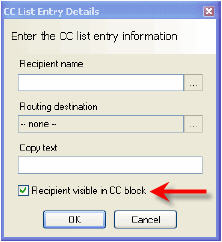
Did you know the TextSystem allows you to add blind cc recipients to document routing?
With any document, you can modify the CC list to change who receives a copy of the document and how that document is distributed to each person. This CC list is included in the body of the document as a part of the document text. There may be times when you wish to include providers to receive a copy of the document, but don't wish to display the name of the recipient in the CC list on the document for others to see. The CC List Entry Details dialog box, within the Enterprise Editor or Word Client applications, allow you to set individual recipients for the document as invisible, or "blind copied." Blind CC recipients are not included in the CC block displayed on the document.
Click the play button on the following eTIPS video image to see a demonstration on how to add a Blind CC recipient to a document.

Perform the following steps to add a blind cc recipient to a document by using Enterprise Editor:
- Launch the Enterprise Editor (EXEditor) application and begin a new document.
- With the document open, press Ctrl+A. The document routing and CC information is displayed.
- To add a new recipient to the list, press Alt+A or click Add CC. The CC List Entry Details dialog opens.
- Select a recipient and routing method for this document.
- Clear the "Recipient visible in CC block" check box.
- Click Ok when finished.
For additional information about Blind CC and other EXEditor or Word Client features, login into iSupport and search for solutions:
- L-3233-005 - Enterprise Editor Transcription/Editor Courseware and Reference Guide.
- L-2956-003 - Word Client Courseware and Reference Guide.
- L-2957-008 - System Administrator Courseware and Reference Guide.
If you are not an iSupport subscriber, click iSupport Timesaver for information on how you may become a member.
_______________back to top_______________
Did you know you could change the list of User Defined Fields displayed on the Variable Entry Screen in EXEditor and Word Client?
When starting a report either manually or from Dictation, the Word Client Document Information screen, also known as the Variable Entry Screen (VES), is presented to the Medical Transcriptionist (MT):
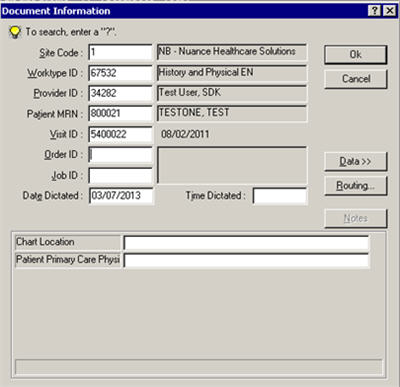
The lower section displays User Defined Fields (UDFs), which are created by the DESS TextSystem Administrator. You can change the UDFs by editing the VES Setup options for either a site profile or a worktype by using the DESS TextSystem Explorer application.
The Variable Entry Screen (VES) settings can be configured to use the same VES screen for every worktype within a site or to allow custom VES screens for each worktype within the site.
To change the VES Setup options:
- Launch the TextSystem Explorer application and login.
- Right click the Site name, and select Edit site profile….
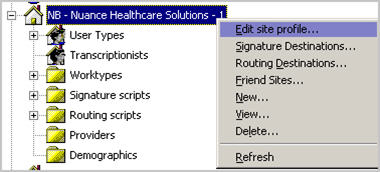
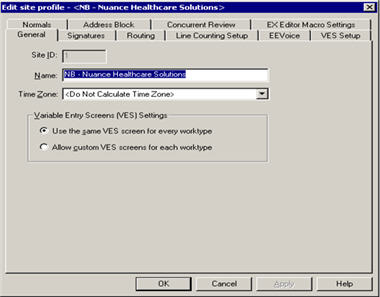
The Edit site profile dialog window displays.
- Perform one of the following:
- If the Variable Entry (VES) Settings option is configured to “Allow custom VES screens for each worktype,” each worktype will be configured with unique VES setup options. Continue to step 4.
- If the Variable Entry (VES) Settings option is configured to “Use the same VES screen for every worktype,” VES settings in this site will be uniform across all worktypes within this site. Skip to Step 5.
- Expand the Site of the worktype you want to change. Expand Worktypes, then right click a worktype in the list and select Edit worktype….
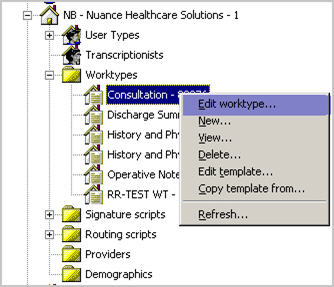
The Edit worktype dialog window displays.
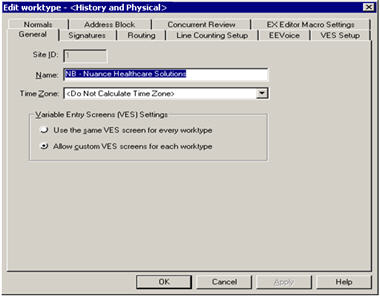
- Click the VES Setup tab.
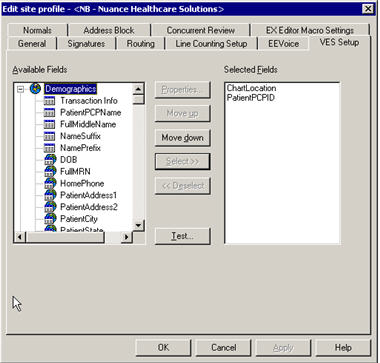
- From the VES Setup tab, you can add, remove, or arrange the order of UDFs, and change the properties of them:
- To add a field to Selected Fields, select the field from the Available Fields list, and then click Select.
- To remove a field from the Selected Fields list, select the field from the Selected Fields list, and then click Deselect.
- To change the order of the fields, select a field in the Selected Fields list, and then click the Move Up or Move Down buttons.
- To change UDF properties, select a field in the Selected Fields list, and then click Properties.
The VES Field dialog window will display.
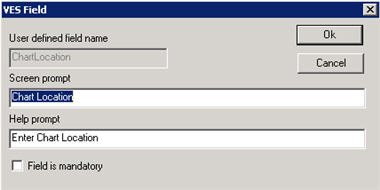
- From the VES Field dialog window, you can change the Screen prompt, Help prompt, and set the field as mandatory:
- To change what the UDF screen prompt displays to the MT, edit the Screen prompt text.
For example, the UDF shown above is called Chart Location. To change what the MT sees, edit the Screen Prompt text from “Chart Location” to “Patient Chart Location,” the MT sees, “Patient Chart Location.” The UDF name does not change, only what the MT sees on the VES screen changes.
- To change what the UDF Help prompt displays to the MT, edit the Help prompt text. The help prompt appears when the user clicks in this field on the VES. The displayed prompt describes the information the user should provide in the field.
- To change a UDF as mandatory for a screen, check the Field is mandatory box.
NOTE: Setting Field is mandatory requires the MT to enter the data before starting the document.
- Click OK to save all the changes.
NOTE: You may need to log out and log back in to see the implemented changes.
For more information about the DESS TextSystem, login to iSupport and search for solution 15008: Dictaphone Enterprise Speech System Service Manuals. If you are not an iSupport subscriber, click iSupport Timesaver for information about how you may become a member.
back to top
|


 Contacting Support