|
 eTIPS eTIPS
Did you know you could use the "Find" command to quickly locate a user's profile in the DESS VoiceSystem Explorer application?
Locating a user's profile in Dictaphone Enterprise Speech System (DESS) VoiceSystem Explorer application will let you modify or customize the user's profile settings.
Click the play button on the following eTIPS video image for a brief demonstration on how to quickly find a user's profile in the DESS VoiceSystem Explorer application.

To locate a user's profile by using the Find command:
- Launch the DESS VoiceSystem Explorer application.
- From Dictaphone Voice Explorer, click Users. The user list displays.
- Select a user in the list.
- On the Menu bar, click Edit and select Find.
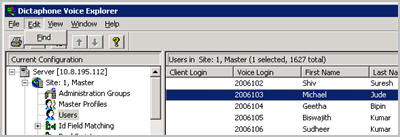
- When the Find dialog box appears, type the first or last name of the user you want to find in the Find What box, and then click Find Next.
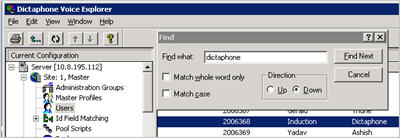
NOTE: The Find dialog box also allows you to choose which direction to search, either up or down, and whether or not to match case or whole word only.
For more information about user profile settings, login to iSupport and search for solution, 10136: EXVoice Operator Manuals. Locate the "System Administrator Courseware and Reference Guide" under the appropriate version of your system. If you are not an iSupport subscriber, click iSupport Timesaver for information about how you may become a member.
_______________back to top_______________
Did you know you could limit the worktype selection list that providers see when they begin a dictation in Enterprise Workstation?
The selection of work types can be made either in the provider’s profile or the user type settings in the Dictaphone Enterprise Speech System (DESS) TextSystem Explorer application depending on the level of delimitation required. Changes to the user type setting will affect all providers assigned to that user type. However, changes to the Provider’s profile will only affect the specific provider.
Determine which setting you need to change, and follow the appropriate steps:
Edit worktype list based on the providers' user type:
- Login to the DESS TextSystem Explorer application with administrative privileges.
- From the user type section, find the providers' user type to set.
- Right-click the user type name, and select Edit User Type.
- From the Edit User Type dialog, select the Common Worktypes tab.
- Available Worktypes (left) shows the work types available within the DESS Text system.
- Selected Worktypes (right) shows the work types currently available to users of the specific user type in the EWS worktype dropdown.
- To add a worktype, select the worktype from within the Available Worktypes list and click Add>>. The worktype displays in the Selected Worktypes list.
- Click OK to save the changes.
Edit worktype list based on a specific provider:
- Login to DESS TextSystem Explorer with administrative privileges.
- Right-click Providers, and select Find Provider.
- Enter the First, Last Name, or provider ID number.
- Right-click the Provider's user type name, and select Edit User Type.
- From the Edit Provider dialog, select the Common Worktypes tab.
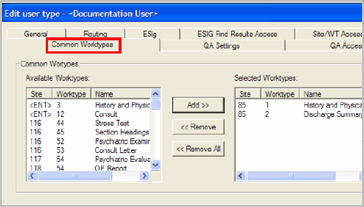
- Available Worktypes (left) shows the work types available within the DESS Text system.
- Selected Worktypes (right) shows the work types currently available to users of the specific user type in the EWS worktype dropdown.
- To add a work type, select the work type from within the Available Worktypes list and click Add>>. The work type displays in the Selected Worktypes list.
Note: This adds the work types you have selected for the provider.
- Click OK to save the changes.
For additional information about modifying User Types to limit available Work types for EWS users, login to iSupport and search for solution: 10207: Enterprise Workstation Operator Manuals. From within this article, click the link to open document L-3033-006: System Administrator Courseware and Reference Guide. Refer to “Chapter 5: EXText - Setting Up User Types for Privileges, Routing, and Common Worktypes,” beginning on page 63. If you are not an iSupport subscriber, click iSupport Timesaver for information about how you may get started with iSupport.
_______________back to top_______________
Did you know from the ESP Control Panel you can save and load ESPs to and from locations available to your PC?
ESPs (Expanded Sentences and Phrases) can help increase the productivity of a Medical Transcriptionist (MT) or Editor when using keyboard short-cuts that insert common phrases or sentences in the current document. For example, an MT can configure an ESP keyboard short-cut for "dob" to automatically insert the unabbreviated text, "Date of Birth." This reduces the number of keystrokes made by the transcriptionist or editor, which results into increased productivity.
Word Client and the EX Editor applications use the ESP utility that allows you to type predefined abbreviations of words or phrases, which automatically types the expanded words or phrases.
From ESP Control Panel >> Files, you can save or load an ESP to or from any 'My Computer' location available on your PC.
Save... |
Will let you save any changes made while working in the ESP Control Panel for the current document to the default ESP location. |
Save as... |
Will let you save a copy of an existing ESP to any My Computer location on your PC. |
Load... |
Will let you load an ESP from any location available from My Computer. |
Saving ESPs to an external location on a regular basis is good practice. Regular backups can provide access to your most recent ESPs in case of accidental deletion or a PC crash.
To save a copy of an existing ESP to another location available to your PC:
- Press the Ctrl key twice. The ESP Control Panel displays with the local available ESPs.
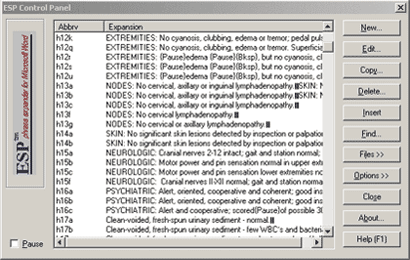
- From the ESP Control Panel, select Files >> Save as.... The Save Expansions As dialog displays.
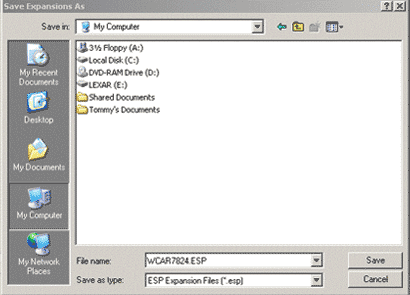
- Click My Computer and navigate to the location where you want to save the ESP.
- Click Save.
To load an existing ESP from another 'My Computer' location:
- Press the Ctrl key twice. The ESP Control Panel displays with the local available ESPs.
- From the ESP Control Panel, select Files >> Load.... The Load Expansions dialog displays.
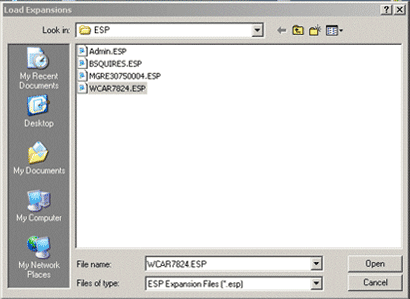
- Click My Computer and navigate to the location where the ESP file you want to load exists.
NOTE: The default paths to local ESP files:
- Word Client - C:\DocNet\Bin
- EX Editor for Windows XP (user profile path) -
C:\Documents and Settings\<username>\Application Data\Dictaphone\ESP
- EX Editor for Windows 7 -
C:\Users\<username>\AppData\Roaming\Dictaphone\ESP.
- Select the *.ESP file to load, and click Open. The Expansions list is loaded on the ESP Control Panel.
- To save your changes, select Files >> Save to save the current list or select Files >> Save As... in order to save the current list to another location.
For additional information about saving or loading ESPs, login to iSupport and search for Solution 10128: EXSpeech Operator Manuals, or locate your version of the Dictaphone Enterprise Speech System Word Client Transcriptionist/Editor Courseware and Reference Guide (L2956), and see Using Normals and ESP's. If you are not an iSupport subscriber, click iSupport Timesaver for information about how you may get started with iSupport.
_______________back to top_______________
Did you know you could download Dragon Medical 360 | Mobile recorder applications that support different Apple iOS and Android devices?
The current version of the Dragon Medical 360 | Mobile Recorder application is 2.1.3. As always, your licensed application users can download and install the application from the Apple iTunes or Google Play stores. Updates to the application are advertised automatically whenever a new release becomes available.
Version 2.1.3 of the Dragon Medical 360 | Mobile Recorder application is supported on these Apple iPhone and iPad devices:
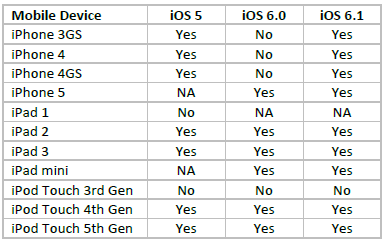
Version 2.1.3 of the Dragon Medical 360 | Mobile Recorder application is supported on these Android operating systems:
- Version 2.2.x (Froyo) or later
- Version 2.3.x (Gingerbread) or later
- Version 4.0.6 (Ice Cream Sandwich) or later
- Version 4.1.x (Jelly Bean) or later
For more information on Dragon® Medical 360 | Mobile Recorder, login to iSupport and search for solution 14339: Dragon Medical 360 | Mobile Recorder User's Guide. If you are not an iSupport subscriber, click iSupport Timesaver for information about how you may become a member.
back to top
|