|
 eTIPS eTIPS
Did you know creating address blocks allows you to set up a mini-template of provider addresses based on provider roles or provider names?
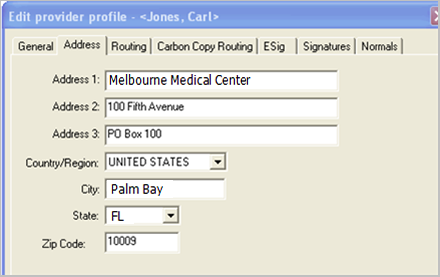
Address blocks allow a transcriptionist to quickly insert a provider's entire address by entering a single item as opposed to transcribing all parts of the address. Address blocks can be created if your system has the address information populated in the "Address" tab of every provider's profile, as shown.
Click the play button on the following eTIPS video for a brief demonstration on how to create and use an address block.

To create an address block:
- Launch the DESS TextSystem Explorer application and log in.
- Right-click the site that will include the address block and select Edit site profile.
- Select the Address Block tab.
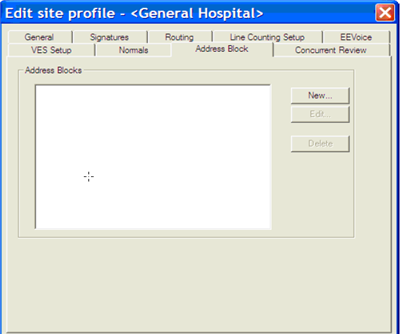
- In the Address Blocks group click the New button. A Create Address Block dialog box will appear.
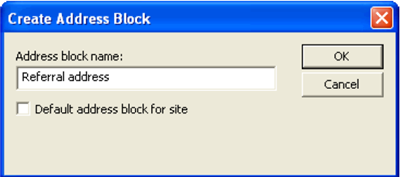
- In the Address Block Name field, enter a name for the Address Block.
- If you would like this address block to be the default for this site, check Default address block for site.
- Press Ctrl+K to open the Select a Token dialog, which displays a list of tokens you can use to build the address block.
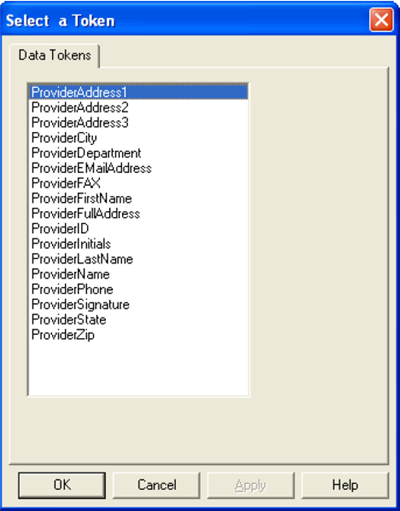
- Select a token, and then click the OK button to add the token to your address block.
- Repeat steps 7 and 8 to continue adding additional tokens. For example, you may consider choosing the following tokens:
ProviderAddress1
PrividerAddress2
ProviderCity
ProviderState
ProviderZip
- Once all tokens are added, press Ctrl + N to close the template.
Once an address block is created for a site, the transcriptionist can easily insert the address into a document by performing the following steps.
- Launch the DESS TextSystem EXEditor or Word Client application and log in.
- Create a new document or search for and open an existing document to edit.
- Locate the point within the document where you would like to insert the address block and press Ctrl+Shift+B to display the Address Block Selection box.
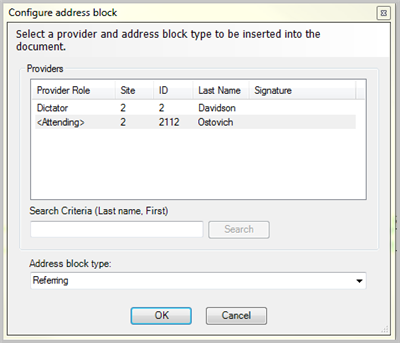
- Select a Provider Role or search for and select an Individual Provider.
- From the Address Block Type, select the block type.
- Click OK to add the address block for the selected provider into the document, as shown below.

For more information about Address Blocks, login to iSupport and search for solution L-2955-006: Enterprise Text, System Administrator Courseware and Reference Guide. If you are not an iSupport subscriber, click iSupport Timesaver for information on how you may get started with iSupport.
_______________back to top_______________
Did you know you could set the length of time a provider can pause the recording of a dictation when dictating a report via telephone?
The DESS Voice System allows an administrator to configure the maximum amount of time a provider could place the recording of dictation into pause mode. When the pause timeout is exceeded, the system will disconnect the provider and send the incomplete dictation for transcription or save it as an open report for the provider to access on his or her next dictation session.
To set the pause timeout duration:
- Launch the DESS VoiceSystem Explorer application and log in.
- In the Current Configuration list, expand the Master Profiles list.
- Right-click the provider group for the pause timeout duration you wish to set, and then select Modify Master Profile.
- From the Modifying master profile dialog, select the Timeouts tab.
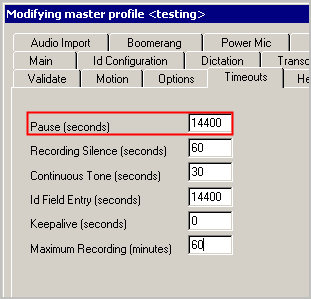
Pause timeout is set to 4 hours
- In the Pause (seconds) box, enter the number of seconds you want the pause timeout duration to last.
TIP: If you would like the providers to hear a continuous notification prompt while in pause mode, continue modifying the master profile as follows:
- From the Modify master profile dialog, select the Options tab.
- From the Pause Prompt group, click Beep, and click OK. The providers will hear a subtle "beep beep" every few seconds while in pause mode.
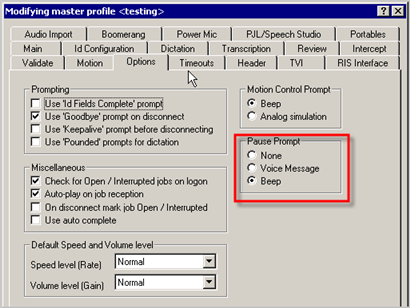
Note: These settings can also be applied to a customized master profile assigned to an individual provider.
For more information about master profile timeout settings and customization, login to iSupport and search for solution 10136: EXVoice Operator Manuals. Locate the "System Administrator Courseware and Reference Guide" under the appropriate version of your system. If you are not an iSupport subscriber, click iSupport Timesaver for information on how you may get started with iSupport.
_______________back to top_______________
Did you know a provider could maximize the use of shortcuts in EWS self-edit by using a variety of jump codes?
When using EWS with Self-Edit enabled, you have the ability to use ‘Shortcuts’ to insert text into your report by using a simple keyword identifier. Shortcuts can save the user time when used properly, and one way to increase the benefit of using shortcuts is to utilize the various ‘Jump Code’ options available. Provided below are the various jump codes you can use in shortcuts:
Standard Jump Codes in EWS:
- Any place that you insert the [ ] characters in a shortcut represents a ‘jump code’ within EWS.
- You can quickly jump to these symbols by using the arrow keys on your microphone.
- The jump codes can be very handy when strategically placed throughout a shortcut to allow the Self-Edit user to quickly navigate through the shortcut template. The shortcuts move the cursor to the next set of the jump code. If you tap the right arrow on your microphone, the cursor moves to the next shortcut, and inversely, if you tap the left arrow on your microphone, the cursor moves to the previous jump code.
- This speeds up Self-Edit Dictation by allowing the user to quickly move between the various sections and shortcuts.
Jump Code Options:
- [ ] - Where left and right brackets are inserted within a shortcut allows the user to hit the arrow keys on the microphone to immediately highlight the jump code. This gives the dictator the ability to either dictate the value to display in the report, or if no value is needed, the dictator can say ‘scratch that’, and the symbols will be removed.
- [<>] - This jump code behaves the same as the [ ] jump code, but the arrows inside indicate to EWS to delete the jump code (both brackets and the arrows) automatically if the EWS Self-Edit user chooses not to use them. This is useful when there are several of these jump codes in a shortcut template, but not all of them require dictation for each patient. Instead of having to jump to remove each jump code manually, the EWS software automatically removes the non-edited jump codes once ‘Sign and Close’ is pressed to complete the dictation.
- [<Default Text>] - You can set up a jump code to contain ‘Default Text’ that you would want to display if you choose to not touch this jump code during your dictation. This is useful if you dictate a particular section of a shortcut the same way for most patients, but occasionally need to change it. You can set it up as shown above to eliminate the need to stop at each jump code. Instead, whatever default text you have between the less than and greater than symbols will remain in your report if you do not manually touch the jump code.
Jump Code Examples:
- Common Usage of the [ ] Jump Code:
Using the following within your shortcut would give you the ability to toggle quickly between the different sections within your SOAP Note. You would use the right arrow key on the microphone to highlight the first jump code for the Subjective section, and then begin dictating. When you complete that section, you would hit the right arrow on your microphone, and be taken to the exact point where you would begin to dictate the Objective section.
SUBJECTIVE: [ ]
OBJECTIVE: [ ]
ASSESSMENT: [ ]
PLAN: [ ]
- Common Usage of the [< >] Jump Code:
These jump codes work the same as [ ] jump codes, but the benefit of using [< >] is that if there is no need to dictate for a particular section, the jump code is removed. For example, if a patient had no allergies, you can simply leave the [<>] after allergies and EWS will automatically remove [< >] once ‘Sign and Close’ is pressed.
Before ‘Sign and Close’ is pressed:
ALLERGIES: [<>]
MEDICATIONS: [<>]
PAST MEDICAL HISTORY: [<>]
After ‘Sign and Close’ is pressed:
ALLERGIES:
MEDICATIONS:
PAST MEDICAL HISTORY:
- Common Usage of a Jump Code with a Word or Phrase:
This is a useful feature that can save you time while dictating within a short-cut. If you usually dictate a certain word or phrase within a jump code, you can automatically set them to the default word or phrase. Once set, you will only need to change the default word or phrase when necessary.
Before ‘Sign and Close’ is pressed:
Sex: [<Male>]
Smoker: [<No>]
History of Substance Abuse: [<No>]
After ‘Sign and Close’ is pressed:
Sex: Male
Smoker: No
History of Substance Abuse: No
For more information about EWS, login to iSupport and search for solution 10207: "Enterprise Workstation Operator Manuals." Select the "System Administrator Courseware and reference Guide" pertaining to your version of software. If you are not an iSupport subscriber, click iSupport Timesaver for information on how you may get started with iSupport.
back to top
|