|
 eTIPS eTIPS
Did you know a provider can forward a transcribed medical report to another provider to review, edit, and authenticate (electronically sign) from the EWS software application?
Click the play button on the following eTIPS video image for a brief demonstration on how a provider can forward a transcribed medical report to another provider to review, edit, and authenticate.

To send a transcribed medical report to another provider for authentication:
- Login to EWS.
- From the Enterprise Workstation dialog, select the Reports tab.
- From Show reports, select I can sign. The list of patient reports available for signing by that provider display.
- From the list of reports, select the patient report to submit for a countersignature, and click View/Sign report.
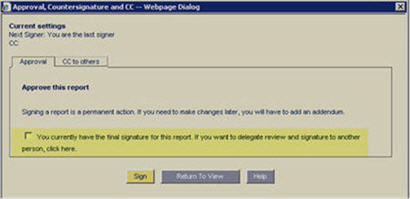
- Click Sign. The Approval, Countersignature and CC - Webpage dialog displays.
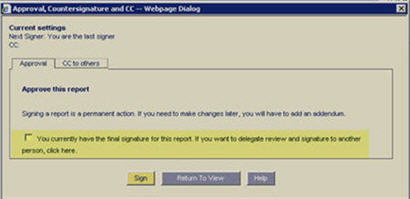
- On the Approval tab, select the checkbox to delegate review and signature to another provider. The Approval, Countersignature and CC - Webpage dialog displays another area where you may Request an additional signer.
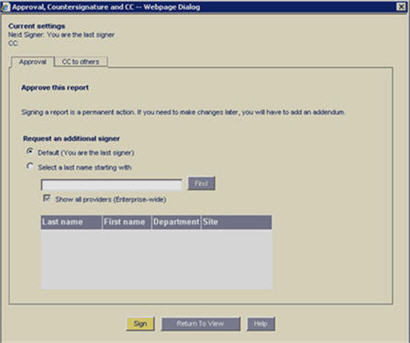
- From the Request an additional signer area, click Select a last name starting with.
- In the Find box, enter the last name or portion of the last name of the provider you want to countersign the report, and click Find. The list of available providers displays.
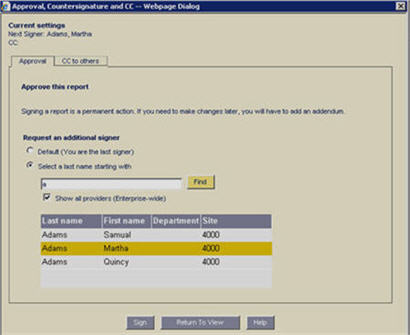
- Select the provider's name, and click Sign. This report will be authenticated by you and will now show in the countersigning Provider's ESig queue for an additional authentication.
The original and countersigning providers must have permissions set in the DESS TextSystem Explorer application to view and authenticate documents and an assigned ESig password. Additionally, the settings for the provider who submits the countersignature request must have the appropriate Site/WT access configured in the DESS TextSystem Explorer application in order to see the intended countersigner in the provider search results list. The "Confirm Signature By" option for the provider must also be set to Dialog Box.
For more information about the DESS TextSystem user settings or Electronic Signature workflows, login to iSupport and search for solution: 10207, Enterprise Workstation Operator Manual and solution: 10115, EXText System Administrators Courseware and Reference Guide.
If you are not an iSupport subscriber, click iSupport Timesaver for information about how you may become a member.
_______________back to top_______________
Did you know that using best dictation practices with EWS Self Edit helps you to achieve the highest possible recognition accuracy?
In eTIPS article, January 2010, Volume 2, Number 1, steps were provided to improve Enterprise Turbo Speech Recognition accuracy. This article provides best dictation practices to improve accuracy for EWS with Self Edit enabled. After you have read the Enrollment and Training scripts for EWS with Self Edit enabled and you attain Adapted status, proper dictation techniques are critical in achieving optimal recognition accuracy. Using best practices with the Enterprise Workstation provides excellent voice recognition when the system is used properly.
To improve accuracy for EWS with Self Edit enabled, practice the following recommended dictation and tool optimization habits:
Recommended Dictation Habits
- Collect your thoughts before beginning to dictate.
- Hold the microphone 2-3 inches from your mouth. If there is a lot of background noise, hold the microphone closer.
- Turn the microphone off when you are not speaking or if you need to move away from it.
- Speak as naturally and consistently as possible, without pausing between words. Speak at a normal rate, not too quickly nor too slowly. You should not:
T a l k S l o w l y ...... Or. Say. Only. One. Word. At. A. Time.
- Speak in phrases or complete sentences, not...like...this.
- Speak as you would to someone sitting across the desk from you. Do not speak too loudly or too softly.
- Pronounce words normally. Do not over-enunciate.
- Dictate clearly in normal speaking voice at a normal rate.
- Pause slightly before and after small words such as a and the if they are being lost or misrecognized.
- Speech-recognition accuracy is best when you establish a cadence, speaking in six- to eight-word phrases followed by a brief pause.
- Avoid making extraneous sounds such as clearing your throat or inserting ahs or ums between words.
- Refrain from habits that will confuse the speech recognition system, such as chewing gum, eating, drinking, or conversing with others.
- Avoid dictating over background noise such as a radio.
- If the first words at the start of your dictations are usually misrecognized, press the Dictate button on your microphone, pause briefly, and then start speaking.
- Avoid spelling out medical terms or other words. If you must spell out a name, use the International Alphabet (military alphabet) and precede each letter with the word "letter."
Recommended Tool Optimization Habits
- Be sure to properly read the Microphone Wizard the first time you use EWS on any new PC.
This wizard sets your default recording volume.
Reading the Microphone
Wizard again may significantly improve recognition accuracy and ensure that the recording level is appropriately set.
- Design and use efficient Voice Shortcuts to insert practical templates into your EWS Self Edit dictation.
- Utilize Jump Codes to speed up the time it takes to navigate through your dictation.
- Make good use of the Pronunciation button to train words or phrases that do not get recognized properly. When possible, it is best to train a phrase as opposed to a word. This is perfect for adding new medications, proper names to your voice model, or for training words or phrases that do not get recognized based on how you speak.
For more operational information regarding EWS, login to iSupport and search for solution: 10207, Enterprise Workstation Operator Manuals. Select the System Administrator Courseware and Reference Guide pertaining to your version of software.
If you are not an iSupport subscriber, click iSupport Timesaver for information about how you may become a member.
_______________back to top_______________
Did you know that incorrect client pc DPI display settings can cause EXEditor users from seeing all the patient demographics on the Document Information Screen (VES)?
Setting the correct DPI allows more content to be seen on the pc. Below are DPI settings for Windows 7 and Windows Vista Operating Systems (OS).
To change the DPI Settings for Windows 7 OS:
- From Start, select Control Panel.
- From the Control Panel dialog, select Appearance and Personalization, and then click Adjust screen resolution. The Make it easier to read what's on screen dialog displays.
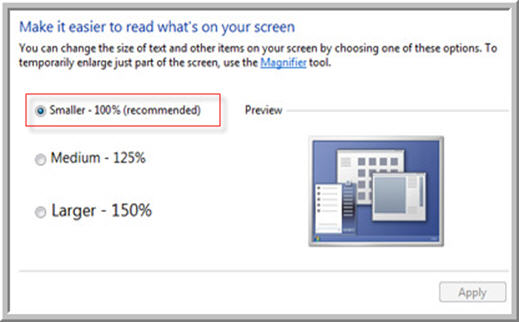
- Select Smaller - 100% (recommended). This is the default setting.
- Click Apply.
- Reboot your computer to apply the DPI setting.
To change the DPI Settings for Windows Vista OS:
- From Start, select Control Panel.
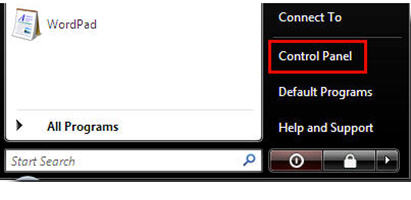
- From the Control Panel dialog, select Appearance and Personalization, and then click Personalization.
- From the Personalization dialog, select Adjust font size (DPI). If you are prompted for an administrator password or confirmation, type the password or provide confirmation. The DPI Scaling dialog displays.
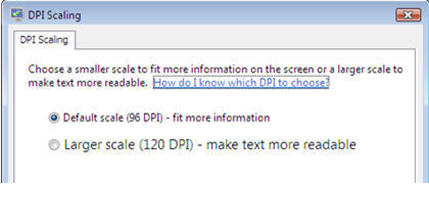
- From the DPI Scaling dialog, select Default scale (96 DPI) - fit more information, and click OK.
- Reboot your computer to apply the DPI setting.
For more information about DPI settings with EXEditor, login to iSupport and search for solution, 14204: Unable to see user defined fields in EXEditor.
If you are not an iSupport subscriber, click iSupport Timesaver for information about how you may become a member.
back to top
|