|
 eTIPS eTIPS
Did you know you could determine the version of Dragon Medical 360 | Mobile Recorder you are using?
From your mobile device, you could determine which version of Dragon Medical 360 | Mobile Recorder (DM360 | Mobile Recorder) is installed.
To access the version information:
- For Inpatient List users, tap Action,
 , then tap Settings, , then tap Settings,  . .
OR
For Outpatient List users (or users with no patient list), tap Settings,  . .
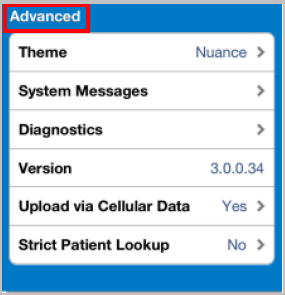
- From the Settings screen, select Advanced. Version displays the version for the installed DM360 | Mobile Recorder. For example:
For more information about DM360 | Mobile Recorder Installation and Configuration, login to iSupport and search for What's New in Dragon Medical | 360 Mobile Recorder and the Administrator & User Guide, Dragon Medical 360 | Mobile Recorder.
If you are not an iSupport subscriber, click iSupport Timesaver for information about how you may become a member.
_______________back to top_______________
Did you know you could avoid sending Stat Jobs to the Automatic Concurrent Review Queue?
Automatic Concurrent Review allows you to send predetermined quantities of created or edited documents to the Quality Assurance (QA) staff for review prior to completion. Because these documents are withheld from any distribution until QA review is complete, this can impact the turnaround time for them. The DESS TextSystem allows you to bypass sending stat (high priority) jobs to the Automatic Concurrent Review queue so that turnaround time is impacted at a minimum for these jobs.
Click the play button on the video image below to view a short demonstration on how to configure a group of transcriptionists to prevent sending stat jobs to Automatic Concurrent Review.

To configure the system to bypass sending stat (high priority) jobs to the Automatic Concurrent Review queue:
- Login to the DESS TextSystem Explorer application.
- From User Types, right-click the user type for the transcriptionists where ACR filters are configured, and select Edit User Type.
- From the QA Settings tab, select Ignore Stat Jobs.
- Click OK.
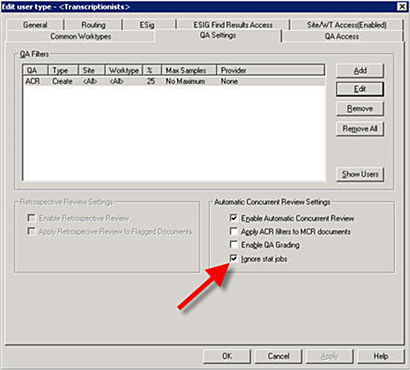
NOTE: Stat jobs are defined as those that have a priority greater than the setting for the same users in Voice Explorer.
To set the job priority:
- Login to the DESS VoiceSystem Explorer application.
- From the Site/Master Profile, right-click the master profile, and select Modify Master Profile.
- From the Transcription tab, Automatic Concurrent Review Settings area, select Transnet Details.
- Locate the Priority over x is considered HIGH setting and enter a value.
- Click OK.
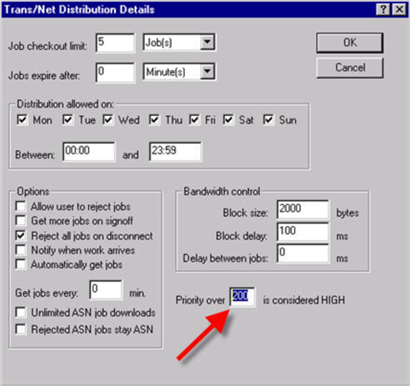
NOTE: Since the value in the example above is set to 200, any job with a higher value, would be considered a stat job and ignored by the ACR filters. Priority 200 jobs will not be considered stat jobs in this example. However, changing the value to 199 will allow the priority 200 jobs to ignore the ACR filter.
For more information about the DESS TextSystem user administration, login to iSupport and search for Administrator Courseware and Reference Guide, Enterprise Text L-2955-006.
If you are not an iSupport subscriber, click iSupport Timesaver for information about how you may become a member.
_______________back to top_______________
Did you know the maximum checkout time and expiration settings for jobs put on HOLD can be managed to prevent transcribed content from being lost?
When a downloaded in process voice job is placed on hold because the Medical Transcriptionist (MT) receives a priority request to start a STAT job, the voice job's on-hold checkout time clock still counts. When the job on hold reaches the maximum checkout time limit, the job is automatically returned to the pool without content. Increasing the checkout time and expiration options may prevent content loss.
To set the job checkout limit and expiration options from the DESS VoiceSystem Explorer application:
- Expand the appropriate site and the list of master profiles.
- Right-click the master profile of the transcriptionist you want to set, and select Modify Master Profile.
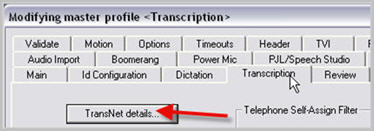
- Select the Transcription tab, and then click Trans/Net details....
NOTE: On the Trans/Net Distribution Details dialog, you can set options: Job checkout limit to Job(s) or Minute(s) and the Jobs expire after to Hour(s), Minute(s), or Day(s).
- For the selected MT, set the job checkout limit and the jobs expire after options, and then click OK.

For more operational information about managing master profiles, login to iSupport and search for solution 10136 EXVoice User Documentation.
If you are not an iSupport subscriber, click iSupport Timesaver for information about how you may become a member.
_______________back to top_______________
Did you know you could clear unwanted or unrecoverable documents from the DESS Correction Client (EXEditor) recovery folder?
Sometimes a document will be present in the EXEditor recovery folder you either do not wish to recover or it causes an error when opened.
For example, a corrupted recovery document can be the result of an application crash, power outage, or a PC issue.
Clearing the EXEditor Recovery Folder:
- Close EXEditor and any open Microsoft® Word applications.
- Using Windows Explorer for Windows® XP or Windows 7 OS users, locate one of the following recovery folders:
Windows XP Users:
C:\Documents and Settings\<your windows logon id>\Local Settings\Application Data\Dictaphone\EXEditor\Site(x)\Recovery
Windows 7 Users:
C:\Users\<user>\AppData\Local\Dictaphone\EXEditor\Site(x)\Recovery
NOTE: If the AppData folder is not visible, click on Organize | Folder and search options, click the View tab then select show hidden files, folders, and drives and click OK.
- From the Recovery folder, select Ctrl and the file or files you want to delete, then right-click and select Delete.
- Close Windows Explorer, and then re-open Windows Explorer to confirm that you deleted the files from the recovery folder.
For more information about clearing recovery files, login to iSupport and search for solution 16162: Clearing the EXEditor recovery folder.
If you are not an iSupport subscriber, click iSupport Timesaver for information about how you may become a member.
_______________back to top_______________
Did you know you could manually execute batch routing jobs?
To manually execute a batch routing job:
- Login to the Dictaphone Enterprise Speech System (DESS) TextSystem Explorer application.
- Right-click the DESS TextSystem name, server IP address or the site where the batch routing destination resides, then select Routing Destinations.
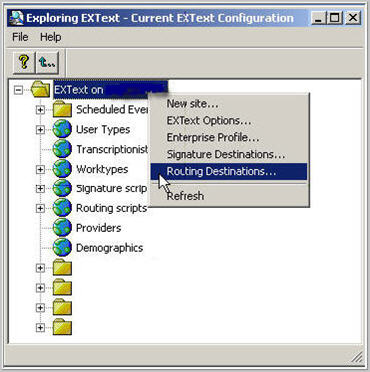
- From the Routing Destinations dialog, select the Batch Routing tab.
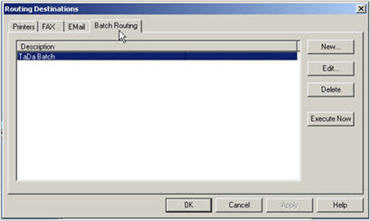
- Select the batch route that you want to run, and click Execute Now.
For further information on manually running batch jobs, login to iSupport and search for solution 10897: Manually Firing Batch Jobs or the System Administrator Courseware and Reference Guide pertaining to your software version.
If you are not an iSupport subscriber, click iSupport Timesaver for information about how you may become a member.
back to top
|