|
 eTIPS eTIPS
Did you know you can use a voice command to quickly access a favorite website?
If you have an internet website you frequently access, such as WebMD, saved as a favorite in Internet Explorer, you can save this favorite to your desktop as a shortcut and then use a voice command to launch the Internet browser and navigate directly to that particular site.
Click the play button on the following eTIPS video for a brief demonstration on how to quickly access a website by using a voice command.

Perform the following to create a desktop shortcut for a favorite website and access it by using a voice command:
- Launch Internet Browser.
- Locate the website in your list of favorites.
- Right-click the link to the website and select copy.
- Right-click anywhere on the desktop and select paste.
- Turn on the Dragon Medical microphone.
- Say, "Open Shortcut Name" (Replace shortcut name with the actual name of the shortcut on the desktop; i.e. WebMD).
- The Internet browser will open and navigate to the site automatically.
_______________back to top_______________
Did you know about the full capability of Speech Node Collections in Dragon Medical 360 | Network Edition?
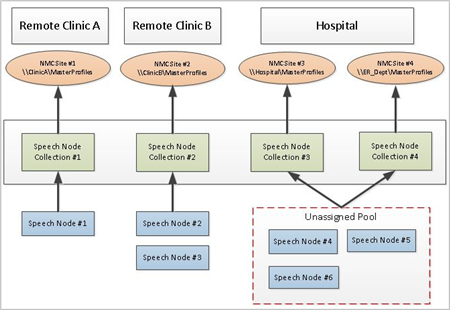
The Speech Node Collection feature, introduced in Dragon Medical 360 | Network Edition (DM360|NE) 1.0 Service Pack 2, is configured within the Nuance Management Console (NMC). Essentially, it assigns specific Speech Node(s) to user profiles within specific NMC Sites. Each NMC Site is normally configured for a specific master profile repository.
Distinct advantages of this feature include the ability to:
- Physically co-locate Speech Node(s) and the master profile repository at a remote geographical customer location such as a clinic. This improves the speed/performance of profile and optimization activity as related to network bandwidth.
- Reserve a pool of unassigned Speech Nodes that will be shared between Speech Node Collections that do not have any assigned Speech Nodes. This means that Speech Nodes do not necessarily have to be assigned to a Speech Node Collection.
The following guidelines should be observed:
- A Speech Node Collection can only be assigned to one (1) single master profile location.
- Multiple NMC Sites can be assigned to a single Speech Node Collection provided the same master profile repository is used.
- You can only assign a Speech Node to one (1) single Speech Node Collection.
- Assigning Speech Node Collection to "<None>" when configuring the NMC Site prevents optimization from running for that NMC site.
- If all available Speech Nodes are assigned to Speech Node Collections, any remaining master profile locations either not assigned to a Speech Node Collection or assigned to an empty Speech Node Collection, will not be optimized. To resolve, either a new Speech Node must be created or an existing Speech Node must be moved from another Collection.
The diagram below outlines one example of Speech Node Collection implementation.
Please note: Separate DM360|NE user accounts are required if the same provider will dictate at different physical locations that are assigned to different NMC Sites (and different master profile locations). This would require a separate NMC author license (Physician or Non-Physician) for each user account.
_______________back to top_______________
Did you know about common causes that restrict the vSync feature from providing Full Text Control in Dragon Medical 360 | Network Edition?
Full Text Control (formerly Select-and-Say) allows a healthcare provider to select recognized text by voice and then perform any number of functions upon that selection. This includes displaying the Correction menu or simply dictating replacement text. This function depends on Dragon’s ability to constantly obtain information about the current text field's content within the target application (EHR). For instance, Dragon Medical must know where words and sentences begin and end, so spacing and capitalization can be appropriately applied.
vSync provides Full Text Control in a Citrix environment where the target application is published by Citrix.
Some common causes that restrict vSync from providing Full Text Control can include:
- vSync being permanently disabled at the Dragon Medical client by hot key combination:{Ctrl+Shift+F9}.
- vSync being disabled for their current session at the Dragon Medical client by hot key combination: {Ctrl+F9} (Basic Dictation Control invoked).
- vSync setting being disabled (unchecked) at the Dragon Medical client (DragonBar>Tools>Options>Miscellaneous tab>Enable vSync Full Text Support).
- Basic Dictation Control setting being enabled (checked) at the Dragon Medical client (DragonBar>Tools>Options>Miscellaneous tab>Automatically Switch to Basic Dictation Control).
- vSync setting being disabled at the Nuance Management Console (NMC) Site.
- Mismatched vSync versions between the Citrix server and Dragon Medical client.
- vSync at the Dragon Medical client requiring reinstallation using the vSync Restoration patch. This can occur whenever the Citrix client software on the workstation is updated or reinstalled.
Otherwise, additional causes (below) can be identified by Dragon Medical Technical Support team through the dragon.log file from the Dragon Medical client (Start>Programs>Dragon Medical xx.x>Show Dragon Log). Dragon logging (MiniTracker) from the Citrix server may also be requested by Technical Support.
- vSync reverts to NatText / Global Dictation mode due to communication timeouts with the Citrix server. This can be caused by: network latencies, Citrix server resource and performance issues, too many simultaneous Citrix client connections at the Citrix server, slow Citrix-published application response (database queries), or workstation latencies.
- vSync reverts to NatText / Global Dictation mode due to an unsupported windows class within the target application.
_______________back to top_______________
Did you know how the Dragon client login and authentication process works for Dragon Medical 360 | Network Edition?
The following steps and diagram below outline what occurs when a Dragon Medical user account, created on the Nuance Management Console (NMC), logs into the Dragon Medical 360 | Network Edition product.
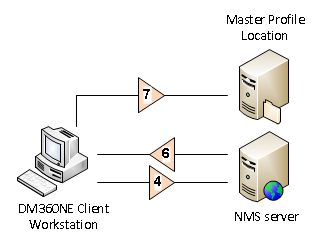
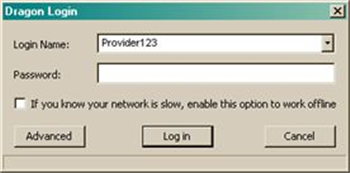
- The healthcare provider logs in with the Dragon Medical user account at the Dragon Login window on the client workstation.
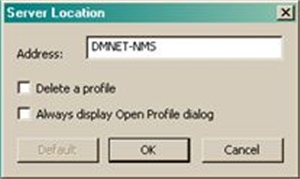
- The Dragon Medical client attempts to access the Nuance Management Server (NMS) based on the configured NMS Server Location Address.
- Provided the workstation is able to access the NMS server, the user account is authenticated against the NMS server.
- Once authentication is accomplished, the NMS sends a data package to the workstation that includes NMC configuration values, but especially the master profile location (UNC, mapped drive, or HTTP(s)) from the NMC Site configuration.
- The workstation ends communication with the NMS server until the next request to login and authenticate.
- The workstation then attempts to use the master profile location value to directly access the Dragon user account's master profile. Success is dependent upon the required Windows security permissions (read, write, and modify) across the master profile's folder structure.
- Profile synchronization then occurs directly between the master profile location and locally-cached profile on the workstation.
_______________back to top_______________
Did you know how to attach a dragon.log file to an iSupport Service Request through the web channel?
The dragon.log file can provide a wealth of information to the Dragon Medical Technical Support team when troubleshooting issues reported by our customers. The steps below will guide you through the steps to attach the dragon.log file when creating a Service Request through our iSupport web channel.
The dragon.log file can be found on either the Dragon Medical client workstation, or from the Nuance Management Console (NMC) if logs are being saved to the network on the Dragon Medical 360 | Network Edition product. Our focus here will be on procuring the dragon.log file from the client workstation or other saved locations.
- At the client workstation, click Start>Programs>Dragon Medical xx.x>Show Dragon Logs. The Windows Explorer screen will appear with the dragon.log file highlighted.
- Note the dragon.log locations below:
Win 7: C:\Users\[Win acct]\AppData\Roaming\Nuance\NaturallySpeakingXX
Win XP: C:\Documents and settings\[Win acct]\Application Data\Nuance\NaturallySpeakingXX
- Copy the dragon.log file to a location like your desktop that can be easily browsed to when creating the iSupport Service Request
- Log into iSupport with your registered iSupport user credentials:
https://isupport.nuance.com
- At the Users Home screen under How can we Help You, click Create Service Request.
- Create the Service Request selecting the Request Type, and entering the Problem Summary and Problem Details.
- At the bottom of the window, click Add Attachment.
- Browse to the copied dragon.log file and click Browse. There is a 5MB size limitation per file.
- Enter a short Description noting the provider, date, and issue.
- Click Attach.
- Complete creating the Service Request by clicking the Next button and finally the Submit button.
back to top
| 
 Contacting Support