|
 eTIPS eTIPS
Did you know you could add multiple dictation sources to your Dragon user profile?
With Dragon Medical 360 | Network Edition, you can add or remove a dictation source by enabling the “Always display Open Profile dialog” option within the Dragon client. The “Always display Open Profile dialog” option is stored under the “Advanced” button on the “Dragon Login” screen.
Click the play button on the following eTIPS video image to see a demonstration on how to add new dictation sources.

Perform the following to add a new dictation source:
- Double click the Dragon Medical icon to bring up the login screen.
- Click Advanced and enable the Always display Open Profile dialog option.
- Click OK to save the setting.
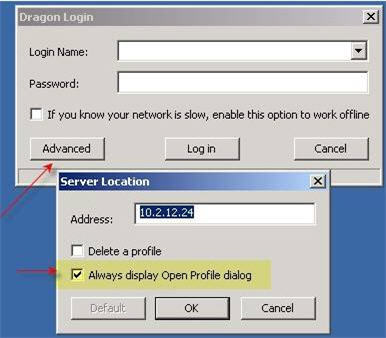
- Enter your login name and password, and then press Log In.
- Click on Source – New in the Open Profile window to add a new dictation source.
- Once added, click OK to complete the configuration.
_______________back to top_______________
Did you know Dragon Medical Practice Edition (version 2) includes Web Application Support that provides Full Text Control when an end-user dictates into Web mail applications?
Web application support means support for selected browser-based applications using Rich Internet Application (RIA) support. RIA support installs extensions in supported Web browsers.
Supported Web Browsers
Dragon Medical Practice Edition 2 provides RIA support for the following Web browsers:
- Internet Explorer 9 (32 bit) or higher
- Mozilla Firefox 12 or higher
- Google Chrome 16 or higher
Support web applications
Enabling and using Web application support
An end-user performs the following general steps to enable web application support:
- Ensures the requirements for web application support are met.
- Launches Dragon and launches the browser.
- Clicks or says "Yes" at the prompt to enable the browser extensions or perform the steps in the "Enabling Web Application support in a supported browser" section of the "Dragon Medical Practice Edition 2 - Administrator Guide."
NOTE:
To access this guide, login to iSupport and search for solution 14526: Dragon Medical Practice Edition User's Guides. Click the link related to L-3659 - Administrator Guide.
- Goes to the site for the Web application they want to use and logs in to their account.
- Determine if the feature is turned on. See Verifying Web Application support is on, which is also found in the Administrator Guide.
- Begin a dictation session in the web application.
NOTES:
- On Windows XP - To use RIA on a Windows XP computer, use Firefox or Chrome. Internet Explorer 9 is not available with Windows XP.
- With Google Chrome - RIA does not work if using Chrome's Incognito mode.
- After an end-user enables the extensions in Internet Explorer, they must restart the browser or open a new tab before they can use the new commands.
- Web application support commands don't work if an end-user is working off line.
To learn more about what's included in the Dragon Medical Practice Edition version two release, login to iSupport and search for solution 14526: Dragon Medical Practice Edition User's Guide. Click the link related to L-3659 - Administrator Guide. If you are not an iSupport subscriber, click iSupport Timesaver for information about how to get started with iSupport.
_______________back to top_______________
Did you know the mouse function on the PowerMic II could be disabled?
The mouse functionality on the PowerMic II can be disabled by accessing the Mouse settings in the control panel on your PC. Once disabled, buttons to the left and right of the pointing device along with the trigger button on the backside of the PowerMic II will no longer work. The scan button and the buttons on the top half of the PowerMic II are not affected by disabling the Mouse.
Perform the following to disable the Mouse function on the PowerMic II:
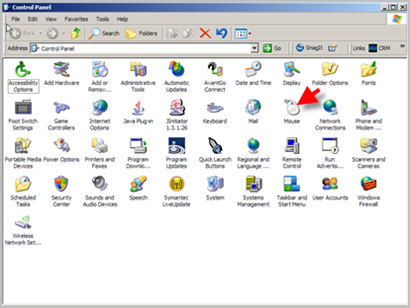
- On the task bar, click the start button and select Control Panel.
- Double-click the Mouse icon to open the Mouse Properties dialog box.
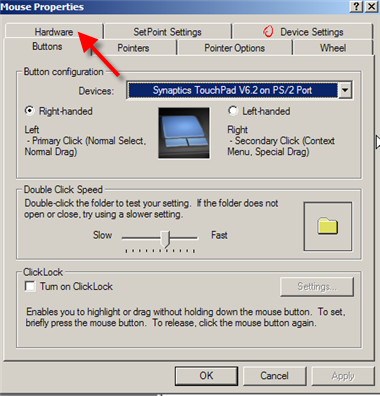
- Click the Hardware tab.
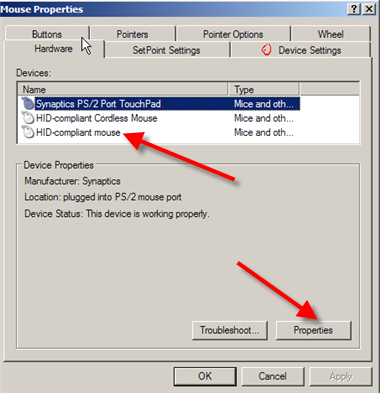
- In the Devices area, click HID-compliant mouse so it is highlighted.
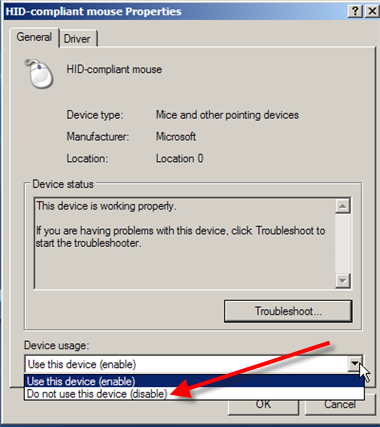
- Click the Properties button to open the HID-compliant mouse Properties dialog box.
- On the General tab in the Device Usage area, click the drop-down box and select Do not use this device (disable).
- Click the OK button to save the change and return to the Mouse Properties dialog box.
- Click OK to save and exit.
back to top
| 
 Contacting Support