|
 eTIPS eTIPS
Did you know PowerScribe 5.0 has a feature that allows a Radiologist to recall a recently signed report and revise it before it is uploaded?
When this feature is enabled, a radiologist is able to recall a report for a short period of time after the report was signed. The amount of time is based on a value entered in the "Sign output delay time (sec)" setting, which is configured by the PowerScribe System Administrator. Once configured, when a radiologist signs a report, the report will not upload for the amount of time configured in this setting, usually 5 minutes, allowing the Radiologist to recall the signed report during that period of time.
Once a report is recalled, the Radiologist is able to revise the report and then re-sign it. When a signed report has reached the "Sign output delay time (sec)" limit, the system will upload the report to the RIS/HIS and reject any attempts to recall it.
Click the play button on the following eTIPS video for a brief demonstration on how to set the Sign Output Delay in PowerScribe 5.x.

Perform the following to enable this feature:
- Login to the PowerScribe Administrator Client.
- In the left pane, select System.
- Click the General Settings icon.
- Click the Report Settings tab, if it's not already selected.
- In the Signature in PowerScribe section, set the Sign output delay time (sec) to your desired time. (A value of 300 will allow for a 5 minute delay.)
NOTE: A value of 0 (zero) will disable this feature.
- Click the Apply button to save your settings.
For additional information about configuring General Settings in the PowerScribe Administrator client, click iSupport and search for solution 10129: PowerScribe Operator Manuals. Within this solution, click the link related to document L-2961-005 - System Administrator Courseware and Reference Guide. If you are not an iSupport subscriber, click iSupport Timesaver for information about how you may get started with iSupport.
_______________back to top_______________
Did you know you could use the Audit Log Tool to review PowerScribe version 5 Audit Logs?
Administrative Users of PowerScribe version 5 are able to view the audit logs to identify who, when and what workstation a particular report was interacted with. In addition, administrators will have answers to specific user activities including; who deleted, edited, changed workflow, changed report state at what workstation, and when did this incident occur.
Please Note: Do not run this tool on the Server. When creating the folders, you may use names that you choose but do not use the Nuance application folders or folder names.
Perform the following steps on your workstation.
- Login to iSupport and search for solution: 14692 How do we review Audit Logs for PowerScribe V5?
- At the end of solution 14692, download the AuditLogViewer .zip file.
- Create a folder on Drive C (for example, C:\PWSAuditView.) and extract the .zip file to that folder.
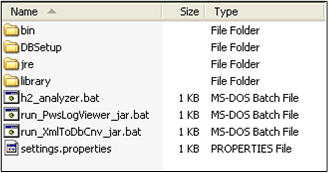
- The unzipped contents are as follows:
- Create a new subfolder under the folder you created in the step above to hold the audit logs (for example, C:\PWSAuditView\PWSAuditLogsInput).
- Obtain the audit logs from the PowerScribe Application Server, which are found in the Input Directory.
- Locate the run_PwsLogViewer_jar.bat in the main folder and click on it to run the application. The following window displays.
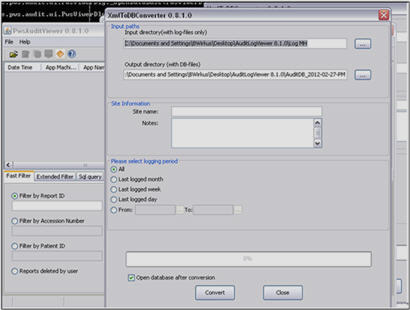
- In the Input directory box, enter the path to the Input subfolder that you created above to hold the Audit Logs (for example, C:\PWSAuditView\PWSAuditLogsInput).
- Complete the Site Information section by entering the Site name and any notes you choose to include about this audit.
- Select the logging period for the logs.
- Click Convert.
- When the conversion is finished, click Close. You will be taken to the main screen and then the Database info box displays.
- On the Database info box, click Do not show if you prefer not to see this box again for this conversion.
- Click OK and the Main screen displays:
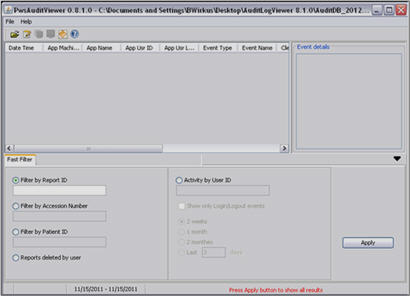
- Enter data in the appropriate field to search for the required information.
- Click Apply on the main screen. The information will display:
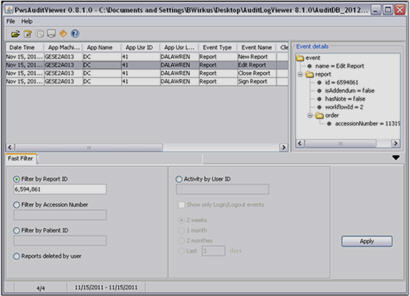
- At this point, you can export your data by clicking the Notepad icon on the tool bar.
- If you wish to create a new Audit Log Database, click the yellow diamond icon.
For additional information about using the Audit Log Tool, login to iSupport and search for solution: 14692 How do we review Audit Logs for PowerScribe V5? If you are not an iSupport subscriber, click iSupport Timesaver for information about how you may get started with iSupport.
_______________back to top_______________
Did you know you could turn off the voice recording requirement for Critical Results messages?
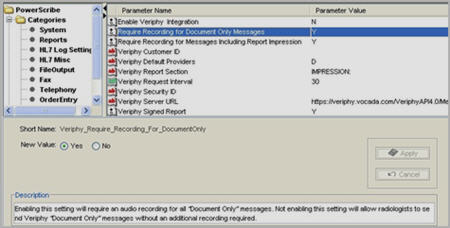
PowerScribe administrators are able to suppress the recording requirement for a Document Only message created by using the Critical Results integration.
This is accomplished by changing a parameter setting in the PowerScribe Admin Portal. Setting the "Require Recording for Document Only Messages" parameter to a value of "No" will suppress this requirement. Once suppressed, the radiologist will no longer be forced to record a message; however, the option to record a message remains available to the radiologist if he or she chooses to use this feature on selected reports.
Please Note: The Critical Results feature is built into PowerScribe version 5.0.1.7 and up, if your facility has version 5.0.1.6.1, please contact Nuance Technical Support for the patch. For additional information on how to contact Nuance Technical Support click Contact Support.
back to top
| 
 Contacting Support