|
 eTIPS eTIPS
Did you know you could add location information to PowerScribe 360 | Reporting Reports?
CMS, Medicare and Medicaid require, for billing, the location of where the report was read. There are several options available in PowerScribe 360 | Reporting (PS360|R) to fullfill this requirement including:
- Use a fill-in field with a default value.
- Use a fill-in field with a pick list.
- Use a custom field that is exportable.
- Include workstation name in the HL7 message.
- Additional chargeable options to accommodate specific needs.
For more information about adding location to reports, log in to iSupport and search for solution: 15247 "Adding location data to a report." If you are not an iSupport subscriber, click iSupport Timesaver for information about how you may get started with iSupport.
_______________back to top_______________
Did you know how to determine what version of PowerScribe 360 | Reporting you are using?
When calling into the Nuance Technical Support center or creating an iSupport Service Request ticket you will be asked for your product version. This information is necessary for the support engineer to correctly troubleshoot your issue. You can locate your product version in the Administrator Portal or the PowerScribe 360 | Reporting (PS360|R) Client.
From the Portal
- Log in to the Administrator Portal.
- The version is located in the lower left corner of the screen.
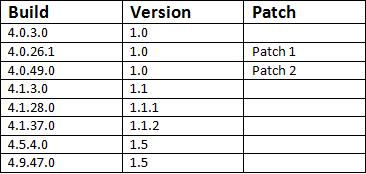
- It is a 4 digit number which looks something like 4.x.x.x this number correlates to a product version listed in the chart below.

From the Client
- Log in to the client.
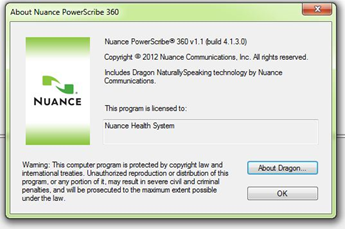
- From the Help menu select About Nuance PowerScribe 360…
- The version will be displayed as shown below.

The following chart shows the available versions:

_______________back to top_______________
Did you know an Administrator could import or export AutoText from within the PowerScribe 360 | Reporting Administrator Portal?
Administrators can manage AutoText from the PowerScribe 360 | Reporting (PS360|R) Administrator Portal, where they can promote, delete, export, import, and edit the properties of all AutoText in the system. The following examples depict importing and exporting an AutoText from PowerScribe 360.
Log in to the PowerScribe 360 Administrator Portal, and select the Setup group and click the AutoText tab.
To Import AutoText
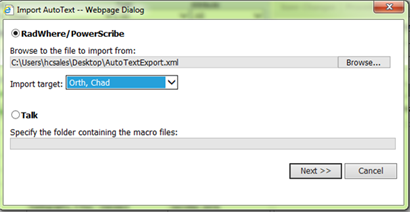
- Click the Import link.
- Browse to the XML file that contains the AutoText or template you wish to import.
- Select a specific site or a specific user as your Import target.

- Select all AutoText you wish to import to your target.
- Click Import.
To Export AutoText
- Select one or more AutoText to export.
- Click the Export link to create an XML file containing the AutoText just selected.
- Save the file to your computer.
back to top
|