|
 eTIPS eTIPS
Did you know you could use the Reset User Interface feature to correct screen appearance issues encountered by PowerScribe 360 | Reporting Users?
On occasion, users may experience a problem with screen appearance in PowerScribe 360 | Reporting. Common issues include missing icons, speech menu is greyed out, or inability to resize window panes, etc.
If a user is reporting screen appearance problems across multiple workstations, an administrator can restore his or her user interface (UI) to the initial factory settings by using the RESET UI feature, which is found in the admin Portal.
Perform the following to reset the UI for a user:
- Have the provider log out and close PS360|Reporting completely.
- Launch the Admin Portal and log in with administrative credentials.
- Navigate to the Setup > Accounts page.
- Select the User.
- Click the Preferences link.
- Click the RESET UI State link.
- When the confirmation message appears, click OK to reset this user's UI State.
- Click the Close Window link to exit.
Note: Please do not use the RESET to Defaults selection as this will return the provider's user preferences settings to the system level settings. In addition, the provider should be made aware that any screen preference changes made in the past such as; window resizing/positioning, font sizes and colors, will need to be reset.
_______________back to top_______________
Did you know Custom Fields could be made exportable through an HL7 message to the RIS?
Custom fields are data items (metadata) associated with an order. For example: measurements, radiation dosage information, reference web- links, referring physician contact information, alerts, and flags, are all examples of custom fields. Custom fields can be created to allow data items to be entered as Free-Text or by selecting predefined data items from a Pick List.
Custom fields can be exported through the HL7 Interface to the RIS along with the Final and/or Preliminary Reports, depending upon their intended purpose. If the custom field is marked as required, it must be populated with a value by the Radiologist prior to signing the report.
Perform the following to create a Free-Text Custom Field:
- In the Administrator Portal, click Setup > Sites.
- From the drop-down list at the upper right, select a Site.
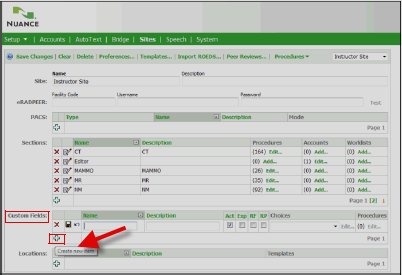
- In the Custom Fields section, click the Create new item icon to begin creating a custom field.

- Type a Name for your custom field.
- Type a Description (optional).
- Choose from the following options:
- Act (active) is automatically selected, which causes the field to appear in the merge field Custom drop-down listing in the PowerScribe 360 | Reporting client application.
- EXP This option causes the data in the field to be exportable in the HL7 message by the Bridge to the RIS.
- RF This option requires that the radiologist populates the field with a value prior to signing the final report.
- RP This option requires that the radiologist populates the field with a value prior to signing a preliminary report.
- Click the Commit Changes icon to save the new field. The illustration below shows an example of a free-text custom field.

For more information about working with custom fields, login to iSupport and search for solution 14686: PowerScribe 360 | Report User Documentation. Locate and click the link L-3344-008, which will open the System Administrator Guide v1.5, and navigate to Chapter 11: Custom Fields. If you are not an iSupport subscriber, click iSupport Timesaver for information about how you may get started with iSupport.
_______________back to top_______________
Did you know the Vocabulary Editor allows a radiologist to access and make changes to the full set of words in the speech vocabulary?
In the PowerScribe 360 | Reporting Dictation Client the radiologist can use the Vocabulary Editor to view the full set of words included in the speech vocabulary, train words, and set various properties. The Vocabulary Editor provides access to the written form and spoken form (if different) of all words in the speech vocabulary.
To add a word to the speech vocabulary:
- Launch the PowerScribe 360 | Reporting - Dictation Client and login.
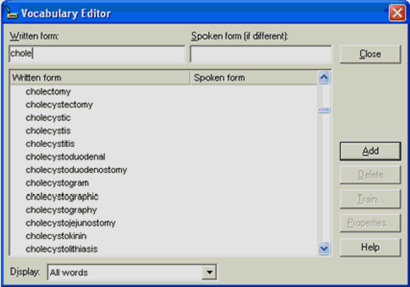
- Select Speech > Vocabulary Editor from the menu bar. The Vocabulary Editor dialog box opens.

- In the Written form field, type the word as it is to appear in your documents.
- If the word is pronounced differently than it is spelled, type the word phonetically in the Spoken form field.
Caution: Modifying an existing word in the Vocabulary Editor is intended for advanced users. Use extreme care when making changes to word properties, because unexpected results can occur.
To modify a word in the vocabulary:
- Select Speech > Vocabulary Editor from the menu bar. The Vocabulary Editor dialog box opens.
- Search for and select the word you want to change.
- Click Properties and make your desired changes.
- Click OK to save and exit.
For more information about working with the Vocabulary Editor, login to iSupport and search for solution 14686: PowerScribe 360 | Report User Documentation. Locate and click the link L-3344-008, which will open the System Administrator Guide v1.5, and navigate to Chapter 9: Provider Training - Intermediate and Advanced. If you are not an iSupport subscriber, click iSupport Timesaver for information about how you may get started with iSupport.
back to top
|