|
 eTIPS eTIPS
Did you know there are documents available to assist you with troubleshooting Java issues?
Having trouble with Java? Checkout our Java troubleshooting information in the PowerShare help section.
Troubleshooting Java – Images not uploading
Troubleshooting Java - Advanced
_______________back to top_______________
Did you know you can embed our viewer/uploader tool on your web portal?
PowerShare widgets allow you to take the uploader and/or viewer applet on the PowerShare webapp and embed it in your own company web portal or RIS/HIS application. The PowerShare Uploader Widget allows users to upload image sets (studies) from a local CD/folder to the PowerShare cloud. The PowerShare Viewer Widget allows users to view image sets (studies) stored on the cloud.
Because PowerShare Widgets consist of URLs hosted by PowerShare, they can be easily embedded on a web page or triggered to open as a popup window. PowerShare Widget access is authenticated against existing PowerShare user accounts. Your application team can link the integration to a single API user account, or pass in each user's PowerShare account for more detailed web audit trails.
Contact our PowerShare Support Team for assistance and additional information regarding the PowerShare Widgets integration. Try out our example portal with the PowerShare Viewer Widget at https://widgets.seemyradiology.com/demo/viewer.html.
The PowerShare Support Team can be contacted by phone at (866) 809-4746 or by email at support@nuancepowershare.com.
_______________back to top_______________
Did you know you can burn Patient CDs from NuancePowerShare.com?
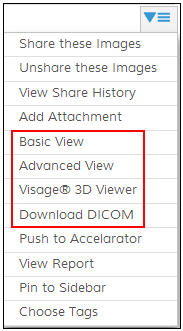
When a patient CD is preferred in place of the traditional image share request, users may download a zipped copy of an image set by using the Download DICOM option.
Downloading the DICOM data set will retrieve a ZIP file with the original files that were uploaded to PowerShare.
To download a DICOM image set, click the Download DICOM item from an image's drop-down menu (see illustration below). When using this feature you have an option to include an embedded viewer within the downloaded ZIP file. (Note: It is recommended to include the optional viewer when burning CDs)

Burning downloaded ZIP to CD
- Insert a writable disc, such as a CD-R, CD-RW, DVD-R, DVD-RW, or DVD+RW disc, into your computer's CD, DVD, or Blu-ray Disc burner.
- In the AutoPlay dialog box that appears, click Burn files to disc using Windows Explorer.
(If the AutoPlay dialog box doesn't appear, click the Start button  , click Computer, and then double-click your disc burner.) , click Computer, and then double-click your disc burner.)
- In the Burn a Disc dialog box, type a name for this disc in the Disc title box, click With a CD/DVD player, and then click Next.
- Open the zip file that contains the files you want to burn, and then drag the files into the empty disc folder.
(To select more than one item, press and hold the Ctrl key, and then click the files you want to burn.)
- On the toolbar, click Burn to disc, and then follow the steps in the wizard.
The selected files are copied to the disc. When the disc burning is complete, the disc burner tray will open and you can remove the disc. You can now use the disc in another computer or in some CD or DVD players.
back to top
|