|
 eTIPS eTIPS
Did you know you could increase Enterprise Turbo Speech accuracy by maintaining word lists and formatting options?
The Customization Client is utilized to add words and phrases to your factory default Language Models and to customize the formatting of draft text. This is useful for adding place, provider, and hospital/clinic names specific to your facility into the Language Models. This enables the words to be recognized by Enterprise Turbo Speech.
Words can be added to the Language Models (LM) using the Manual Input tab or the LM Adaptation tab. The LM Adaptation tab contains a list of words identified at least three times (configurable number) in the edited documents which are not contained in the Language Models. These words need to be assigned to the appropriate word list category such as Brand Medication, Generic Medication, Department, Heading, Hospital/Clinic, etc. If you do not want to add the words to the Language Model, you must click on the Reject button and they will no longer be displayed in the LM Adaptation tab.
TIP: As a time saver, you can use the Shift or Ctrl keys to select multiple words and assign them to a category.
It is recommended that you manage the LM Adaptation word list every few days to keep the lists up to date.
NOTE: It is important to add the words or phrases you want formatted as Headings only into the Heading category. If you add it to another category, it is likely that it will be formatted as general text.
For more information about using Customization Client, log in to iSupport and search for solution #10128: EXSpeech Operator Manuals, and locate your version of the Administrator Courseware and Reference Guide.
If you are not an iSupport subscriber, click iSupport Timesaver for information about how you may become a member.
_______________back to top_______________
Did you know that inserting tokens into normals helps save valuable transcriptionist's time?
Normals contain canned text that a transcriptionist can insert into the body of a report to save typing time. As an example, if every time a normal chest X-Ray is dictated, the text should be formatted the same way and contain the same words. A normal can be used to insert this text by having the MT type a simple abbreviation then pressing a keystroke to insert the appropriate text. Normals can contain a brief amount of text or up to several paragraphs of text, allowing you and your staff to increase productivity significantly.
Tokens can be inserted into normals which allow the transcriptionist to save more time. The token may include information such as the patient's age, date of birth, Referring Physician, etc. The token will automatically populate this information in the normal's text eliminating the need to look it up and insert it manually.
Both Word Client and Enterprise Editor allow you to insert any available token into a normal.
To insert a token in a normal for Word Client:
- Open any document, or start a new document.
- Press Ctrl+Y to create a new normal. Ensure no body text is selected when you do this.
- Enter an abbreviation and description for the normal, then choose whether this will be a shared and/or enterprise normal.
- Type the text to appear in the normal, and press Ctrl+K to insert a token at the desired location.
- When finished typing the text of the normal, press Ctrl+N to save it to the system.
To insert a token in a normal for Enterprise Editor:
- Open any document, or start a new document.
- Press F10 to create a new normal. Ensure no body text is selected when you do this.
- Enter an abbreviation and description for the normal, then choose whether this will be a shared and/or enterprise normal.
- Type the text to appear in the normal, and press Ctrl+Alt+K to insert a token at the desired location.
- When finished typing the text of the normal, press Ctrl+N to save it to the system.
For more information about managing documents and shortcuts, log in to iSupport and search for solution #13818: EXEditor and Correction Client User Documentation. Locate the "Transcription/Editor Courseware and Reference Guide" under the appropriate version for your system.
If you are not an iSupport subscriber, click iSupport Timesaver for information about how you may become a member.
_______________back to top_______________
Did you know that Enterprise Editor has a Floating Audio Player?
You can configure the Enterprise Editor audio player to float and stay visible on screen as you are actively editing a document. The Floating Audio Player option is enabled from the Enterprise Editor main screen.
To enable the Floating Audio Player:
From the Menu, click View and select Word Floating Audio Player.
The audio player is enabled and remains visible while editing the document. You will notice that the player remains translucent while typing so you can see the content of the document. Clicking on the player will set focus to it so you may use the audio positioning controls.
Click the play button on the following eTIPS video image for a brief demonstration on how to enable the Word Floating Audio Player in Enterprise Editor.

For detailed information on Enterprise Editor, log in to iSupport and search for solution #13818: "EXEditor and Correction Client Operator Manuals.
If you are not an iSupport subscriber, click iSupport Timesaver for information about how you may become a member.
_______________back to top_______________
Did you know that VoiceSystem Job ID Fields 1 through 6 can be configured with static values for DMMR dictations, similar to telephone dictations?
Including static values in DESS VoiceSystem Job ID Fields 1 through 6 can expedite dictation workflow and aid with system management. For example, if a provider always dictates reports using the same work type, a static value in the work type field will expedite the dictation process by eliminating the need for the provider to enter the work type for every dictation.
Static values in these fields can also be used to segregate dictations into different Job Lister Reports or Pools based on location, specialties, etc. For example, a static value of 5 in Field 4 might be used to identify dictation jobs from location A, while a static value of 6 may indicate location B.
The DESS VoiceSystem supports auto population of static data in these fields, regardless of the dictation source. How this is configured may vary depending on the source of the dictation. For example, in traditional telephony dictation, this configuration takes place on the ID Configuration tab in the Master Profile. These same static fields are particularly useful for DMMR based dictation jobs in environments where work types are normalized to specific meanings within your institution.
To configure static values for iPhone/DMMR Providers:
- Launch the DESS VoiceSystem Explorer application and login with your User ID and Password.
- From the Site, click Master Profile to expand the list.
- In the right pane, double-click DMMR Providers Master Profile.
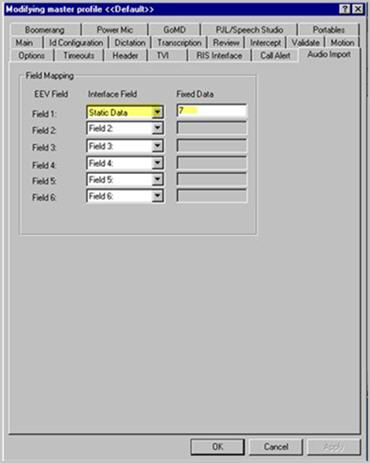
- From the Modifying master profile dialog, click Audio Import.

- In the Field Mapping group, click Interface Field related to the Field which will include static data and select Static.
- In the Fixed Data field, enter the static data.
- Click the OK to save changes and then close the Master Profile.
For more information about administering and configuring fields and features in the DESS VoiceSystem, log in to iSupport and search for "System Administrator Courseware and Reference Guide, Enterprise Express VoiceSystem, L2957-008." For information about administering the DMMR system, search for "Dragon Medical Mobile Recorder for Dictaphone Enterprise Speech System, L3360-003."
If you are not an iSupport subscriber, click iSupport Timesaver for information about how you may become an iSupport member.
|