|
 eTIPS eTIPS
Did you know you could attach a Sticky Note to a Dictation Job?
The Sticky Notes feature lets you pass important information on to the MT about the related dictation job. If a Sticky Note has been added to a job, the note will automatically appear when the transcriptionist or editor starts the job in the Word Client or EXEditor application. The Sticky Note message appears in a pop-up window, which is shown below.
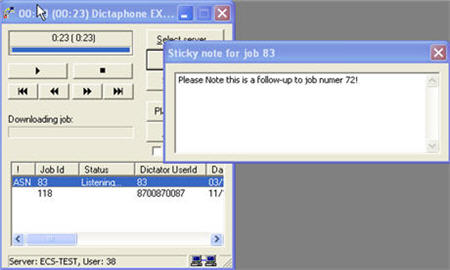
Click the play button on the following eTIPS video image for a brief demonstration on how to send a Medical Transcriptionist a sticky note on a dictation job.

In order to add Sticky Notes to jobs you will need to have the Edit sticky note privilege assigned to your user account in the VoiceSystem Explorer application. This is accomplished by performing the following:
- Launch the VoiceSystem Explorer application and login.
- Expand your Site.
- Click Administration Groups.
- In the right pane, right-click the administrative group associated with your User ID and select Modify Group.
- Click the Privileges tab.
- Click the Available Privileges drop down box and select the Job Lister application.
- In the Available Privileges list, select the Edit sticky note privilege so it is highlighted.
- Click the Add >> button to move this privilege to the Selected Privileges list.
- Click OK to save and exit.
A Sticky Note can be added to a dictated job with the Job Lister application by performing the following:
- Launch the VoiceSystem Job Lister application and login.
- Run a report that includes jobs that has not been transcribed.
- Right-click on a job in the report list and select Edit Sticky Note. The Note dialog box appears:
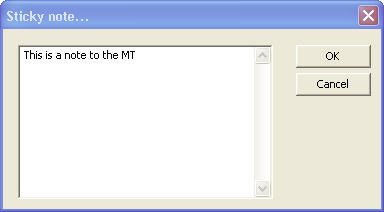
- Type your note in the open area.
- Click OK to save your note and exit.
You can also add a Sticky Note to a job with the Word Client application. In Word Client, press Ctrl-J to open the Document Information screen, and then click the Notes button. This will bring up the Edit Sticky Note window. Add your text message and then click Ok to save and close the Sticky Note window. Click Ok again to close the Document Information screen. Your note is now attached to the job.
You can add a Sticky Note with the EXEditor application by pressing Ctrl-Alt-J to open the Document Information screen. The Notes section is to the left colored in yellow and resembles the "sticky notepads," which you may have seen in office supply stores.
For more information about using the sticky notes feature, log in to iSupport and search for solution #14079 Did you know you can attach a sticky note to a dictation job? If you are not an iSupport subscriber, click iSupport Timesaver for information about how you may become a member.
_______________back to top_______________
Did you know that changing the background color of Enterprise Editor (EXEditor) can make it easier to see the selected encounter in the Visit list?
Enterprise Editor (EXEditor) uses the same color as the background color used to highlight the encounter in the visit list that corresponds with the dictation job when creating a new document. The color similarity can be difficult to distinguish between the related background color on the computer and the encounter color in the visit list. This seems to be particularly true in Windows 7.
Enterprise Editor (EXEditor) uses the 3D Objects option on the Advanced appearance setting to set the color. You can change the settings to make it easier for you to see the selected encounter in the Visit list.
To change the background color for a Windows 7 desktop:
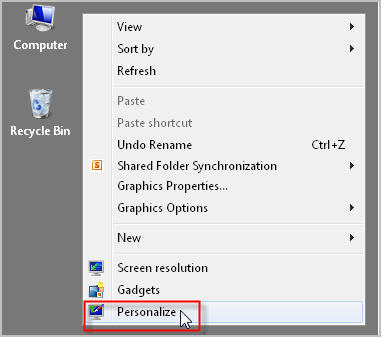
- Right-click on the desktop and select Personalize.
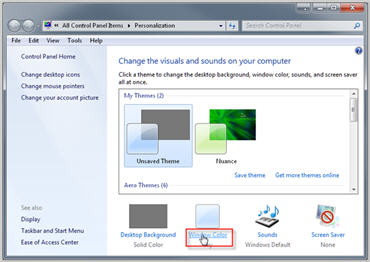
- From the Personalization dialog, select Window Color.
- From the Windows Color and Appearance dialog, select Advanced appearance settings....
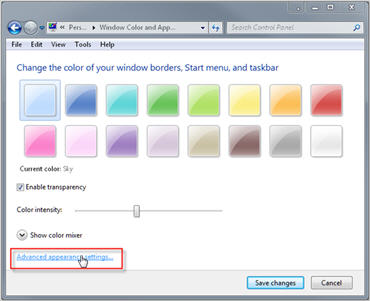
- From the Windows Color and Appearance Item list, select 3D Objects and select Color 1, and then click Apply.
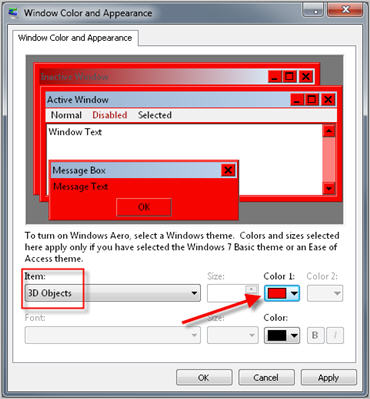
Enterprise Editor (EXEditor) background color is changed and is easier to view the selected encounter in the Visit list. Note that the color red is used to better illustrate this example.
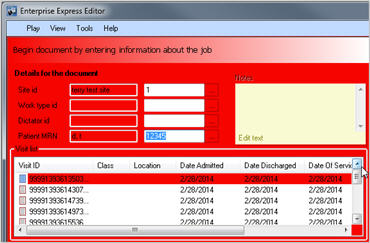
For more information about Enterprise Editor (EXEditor), login to iSupport and search for solution #13818 EXEditor and Correction Client User Documentation.
If you are not an iSupport subscriber, click iSupport Timesaver for information about how you may become a member.
_______________back to top_______________
Did you know you could reassign and change the operation of your DM360 | Desktop Recorder foot pedal?
You can configure the DM360 | Desktop foot pedal by reassigning the pedals and setting the record pedal operation.
To reassign the DM360 | Desktop Recorder foot pedals:
- Click the Dragon logo,
 on the toolbar and select Options, and then click Food pedal configuration. on the toolbar and select Options, and then click Food pedal configuration.
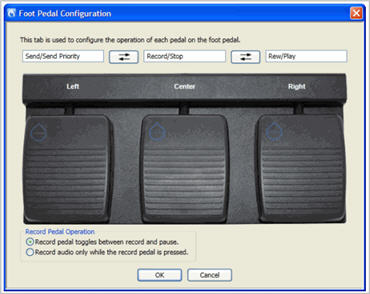
- From the Foot Pedal Configuration dialog, click the reassign buttons
 until the foot pedal functions are set to the desired configuration. until the foot pedal functions are set to the desired configuration.
- Click OK.
To set the DM360 | Desktop Recorder record pedal operation:
- Click the Dragon logo,
 on the toolbar and select Options, and then click Food pedal configuration. on the toolbar and select Options, and then click Food pedal configuration.

- From the Foot Pedal Configuration dialog, select a Record Pedal Operation:
- Record pedal toggles between record and pause: Choose this setting if you want to press and release the Record pedal to begin recording, and then press and release the Record pedal again to pause recording.
- Record audio only while the record pedal is pressed: Choose this setting if you prefer to press and hold the Record pedal while recording. When you release the Record pedal in this mode, recording is paused.
- Click OK.
For more information about the DM360 | Desktop Recorder, see the online Help that is built into the application. You can access that Help from the menu bar at the top of the application screen.
_______________back to top_______________
Did you know it is possible to improve DESS speech recognition accuracy with the proper dictation techniques?
There are dictation techniques that can improve the recognition accuracy of DESS Automatic Speech Recognition (ASR) jobs. Remember that even though speech recognition technology today is very accurate, accuracy is rarely 100% perfect across all reports by a given provider. By following certain dictation guidelines, providers can enjoy better recognition accuracy and improve the efficiency of your operation. Some of the more common techniques we recommend are:
Use a Dictation Friendly Environment
- Try to dictate in a quiet area. Background noises such as conversations or tones/noises from medical equipment can cause recognition errors.
- If there is some background noise, try to keep the microphone facing away from the source of the noise.
Always Organize Your Thoughts Before Dictating
- Try to compose the sentence in your head before dictating.
- Dictate instructions to the Transcriptionist at the end of the dictation.
- Try not to repeat or correct phrases during the dictation.
Proper Enunciation of Words Is Important!
- Speak clearly - you may speak quickly as long as the words are spoken clearly.
- Speak at a normal volume and maintain that same volume throughout the dictation. Fluctuations in volume (especially a sudden decrease) may cause recognition errors.
- Keep the microphone at a consistent distance from your mouth.
- Try not to clear your throat, yawn, chew gum, eat, or drink during a dictation. This can cause insertions of or recognition errors.
- Though not required, if punctuation is spoken, it will increase the accuracy of punctuation in the Draft text. For example; by dictating "colon" after heading words, this will ensure a particular word is formatted as a Heading in the draft text.
Nuance has a Speech Recognition Dictation Techniques.
For more information about Automatic Speech Recognition (ASR) accuracy, and for a quick reference card you and print and give to your providers, login to iSupport and search for document L-2950-004: Speech Recognition Dictation Techniques.
If you are not an iSupport subscriber, click iSupport Timesaver for information about how you may become a member.
back to top
|