|
 eTIPS eTIPS
Did you know you could disable the alternate written form of a spoken word?
When a radiologist dictates a phrase or sentence and the written form of a particular word within the phase or sentence is not as expected, the Radiologist can change the written form for the given word. In addition, words may also have an alternate written form enabled, which allows the system to choose from two or more written forms for a spoken word. In some cases, the radiologist would not like the alternate form of a spoken word to populate the report. This commonly occurs with words such as "limited" and "established," where these words also include an alternate word form by default. Meaning, the word "limited" may populate in a report with its written form "limited" or its alternate written form "Ltd."
For example; A radiologist dictates the phrase, "Limited examination due to..." and the system populates the report with "Ltd. examination due to..." The speech recognized text populated the report with the alternate written form "Ltd." The radiologist would prefer that the system populate her reports with the written form "limited" and never choose the alternate written form "Ltd."
This issue is easily resolved by disabling the alternate written form for the word "limited," which will prevent the system from choosing "Ltd."
The following describes how to disable the alternate written form of a spoken word, in this case, the word "limited:"
- Launch the PowerScribe 360 | Reporting client application and login with self-edit credentials.
- On the Menu bar, click Speech > Vocabulary Editor.
- Search for the word limited.
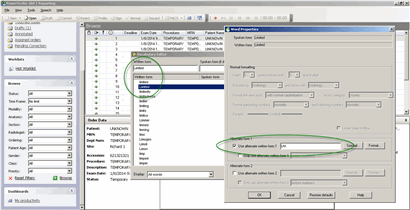
- Highlight the word limited and click Properties. A Word Properties dialog box will appear.

- In the Alternate Form group, uncheck the Use alternate written form 1 option.
- Click OK to return to the vocabulary editor.
- Exit the Vocabulary Editor.
For more information about using the vocabulary manager, login to iSupport and search for solution #14686: PowerScribe 360 | Reporting User Documents. Click the link related to document "L-3624-001 - System Administrator Guide v2.0." If you are not an iSupport subscriber, click iSupport Timesaver for information about how you may get started with iSupport.
_______________back to top_______________
Did you know the PowerScribe 360 | Reports system needs to be configured with a path that points to a new Critical Results URL by June 15, 2014?
As a result of Nuance's branding change from Veriphy to PowerScribe 360 | Critical Results, Nuance will be phasing out the https://veriphy.vocada.com URL that is used to accomplish an integrated workflow between Nuance's PowerScribe 360 | Reporting and PowerScribe 360 | Critical Results systems.
The PowerScribe 360 | Reporting system configuration settings related to the PowerScribe 360 | Critical Results integration will be impacted by this change. Specifically, the configuration settings that include a path pointing to the https://veriphy.vocada.com/ URL will no longer work as of June 15, 2014. In order to avoid an interruption in Critical Results workflows, these settings need to be modified so the paths are pointing to the new URL, https://ps360criticalresults.com/, before June 15, 2014. After this date, your system will no longer function as appropriate unless this new path is in place.
IMPORTANT: In addition to modifying the path configured in the PowerScribe 360 | Reporting system, make sure to work with your IT department to ensure traffic to and from this new URL, https://ps360criticalresults.com, is allowed.
Click the play button on the following eTIPS video image for a brief demonstration on how to verify that your PowerScribe 360 | Reporting system is properly configured with the new path.

Perform the following to verify that your system settings are configured with the correct path to the new PowerScribe 360 | Critical Results URL, and, if necessary, change it:
- Login to the PowerScribe 360 | Reporting Admin Portal.
- On the Menu bar, click the drop-down arrow and select the Setup menu option.
- On the Setup menu bar, click the System link.
- Click the Configuration link.
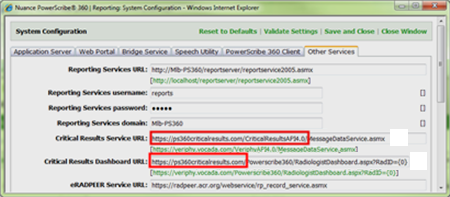
- In the System Configuration dialog, click the Other Services folder.

- Verify that the beginning of the path in the Critical Results Service URL text box matches the New path defined below. If not, replace the first part of the Old path, defined below, with the New path, also defined below.
Do not delete or make any changes to the rest of the path.
OLD: https://veriphy.vocada.com/
NEW: https://ps360criticalresults.com/
- Verify that the beginning of the path in the Critical Results Dashboard URL text box matches the New path defined below. If not, replace the first part of the Old path, defined below, with the New path, also defined below. Do not delete or make any changes to the rest of the path.
OLD: https://veriphy.vocada.com/
NEW: https://ps360criticalresults.com/
IMPORTANT: Again, make sure to work with your IT department to ensure traffic to and from this new URL, https://ps360criticalresults.com, is allowed.
If you would like assistance with verifying that the PowerScribe 360 | Reporting and PowerScribe 360 | Critical Results integration settings are configured correctly, login to iSupport and submit a service request or call Nuance's PowerScribe 360 | Reporting Technical Support team at (800) 833-7776
_______________back to top_______________
Did you know Nuance merged various iSupport Knowledge Base Solutions into the PowerScribe 360 | Reporting Help files?
The PowerScribe 360 | Reporting Client Application and Admin Portal Help files now include various iSupport Knowledge Base (KB) solutions beginning in version 2.0.
PowerScribe 360 | Reporting help files are available to assist the user with configuring and using the application, along with information related to resolving system behavior issues.
The help files are easily accessed in both the PowerScribe 360 | Reporting Client application and the Admin Portal by performing the following:
PowerScribe 360 | Reporting Client Application Help
- Launch the PowerScribe 360 | Reporting Client application and login with your credentials.
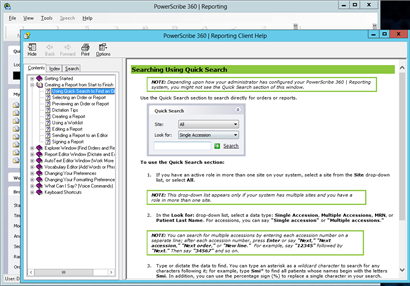
- On the Menu bar, click Help > Help Topics. The PowerScribe 360 | Reporting Client Help window appears, as shown below.

PowerScribe 360 | Reporting Admin Portal Help
- Launch the PowerScribe 360 | Reporting Admin Portal and login with your credentials.
- On the Menu bar, locate and click the
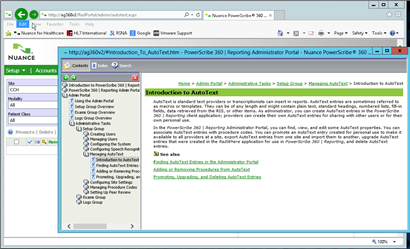
 icon to access help. This icon is available on all screens where help is available. When clicked, it will open the help file and automatically navigate to the related help topic. The image below shows the help window. icon to access help. This icon is available on all screens where help is available. When clicked, it will open the help file and automatically navigate to the related help topic. The image below shows the help window.

back to top
|