|
 eTIPS eTIPS
Did you know the PowerScribe 360 | Reports system needs to be configured with a path that points to a different Critical Results URL, immediately please?
As a result of Nuance's branding change from Veriphy to PowerScribe 360 | Critical Results, Nuance will be phasing out the https://veriphy.vocada.com URL that is used to accomplish an integrated workflow between Nuance's PowerScribe 360 | Reporting and PowerScribe 360 | Critical Results systems.
The PowerScribe 360 | Reporting system configuration settings related to the PowerScribe 360 | Critical Results integration will be impacted by this change. Specifically, the configuration settings that include a path pointing to the https://veriphy.vocada.com/ URL will no longer work in the near future. In order to avoid an interruption in Critical Results workflows, these settings need to be modified so the paths are pointing to the new URL, https://ps360criticalresults.com/.
IMPORTANT: In addition to modifying the path configured in the PowerScribe 360 | Reporting system, make sure to work with your IT department to ensure traffic to and from this new URL, https://ps360criticalresults.com, is allowed.
Click the play button on the following eTIPS video image for a brief demonstration on how to verify that the PowerScribe 360 | Reporting system is properly configured with the new path.

Perform the following to verify that your system settings are configured with the correct path to the new PowerScribe 360 | Critical Results URL, and, if necessary, change it:
- Login to the PowerScribe 360 | Reporting Admin Portal.
- On the Menu bar, click the drop-down arrow and select the Setup menu.
- On the Setup menu bar, click the System link.
- Click the Configuration link.
- In the System Configuration dialog, click the Other Services folder.
- Verify that the beginning of the path in the Critical Results Service URL text box matches the New path defined below. If not, replace the first part of the Old path, defined below, with the New path, also defined below.
Do not delete or make any changes to the rest of the path.
OLD: https://veriphy.vocada.com/
NEW: https://ps360criticalresults.com/
- Verify that the beginning of the path in the Critical Results Dashboard URL text box matches the New path defined below. If not, replace the first part of the Old path, defined below, with the New path, also defined below. Do not delete or make any changes to the rest of the path.
OLD: https://veriphy.vocada.com/
NEW: https://ps360criticalresults.com/
IMPORTANT: Again, make sure to work with your IT department to ensure traffic to and from this new URL, https://ps360criticalresults.com, is allowed.
If you would like assistance with verifying that the PowerScribe 360 | Reporting and PowerScribe 360 | Critical Results integration settings are configured correctly, log in to iSupport and submit a service request or call Nuance's PowerScribe 360 | Reporting Technical Support team at (800) 833-7776
_______________back to top_______________
Did you know there is a feature that allows a Radiologist to quickly report a dictation problem?
If a Radiologist is experiencing problems during the dictation of a report, he or she can quickly report this by utilizing a built in feature in the PowerScribe 360| Reporting client application's Help file. This feature enables Radiologists to report a problem in real time and include a note to explain what happened. Once reported, the Radiologist informs the PS360|R system administrator who simply creates a service request either by calling Nuance support or by opening a service request from within iSupport. In the meantime, the system will have already uploaded the current log files along with the user's note from the PC to the PS360|R server, where the Nuance Support Engineer can easily access the log files to better assess the problem.
Perform the following to Report a Dictation Problem by using the link in the PS360 |R client application's help file.
- Login to the PS360|R client application.
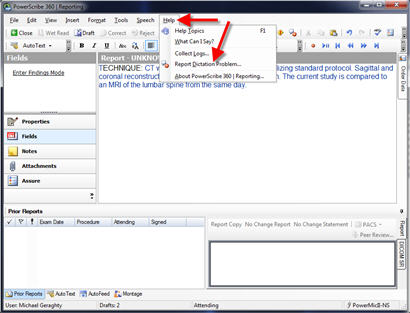
- On the Menu bar, click Help and select Report Dictation Problem...

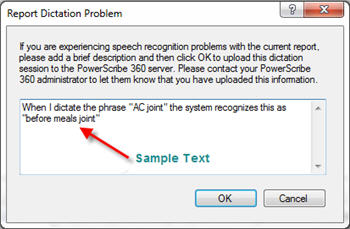
- When the Report Dictation Problem dialog box appears, type a brief description and then click the OK button.

- At this point, contact your onsite PS360|R system administrator and make him or her aware that submitted a dictation problem by using the "Report Dictation Problem" link from within PS360|R Help.
_______________back to top_______________
Did you know using the Audio Setup Wizard should be your first choice to help improve speech recognition accuracy?
The Audio Setting Wizard is the most powerful tool to help improve speech recognition accuracy. The best recognition accuracy comes from the best possible recording, which is the reason why this wizard is included in the PowerScribe 360 | Reporting client application. The Audio Setting Wizard is designed to figure out the most optimal recording level for your microphone while taking the quality of your sound system into consideration.
It is important to utilize this tool in a manner that will allow the system to make the best choice for your recording level. To ensure this occurs, please take the following into consideration when using this wizard.
- Speak at your normal volume level as when dictating a report.
- Do NOT place the microphone within two to four inches from your mouth when that is not the normal location when you dictate reports. Instead, place the microphone approximately 8 to 12 inches from your mouth. Doing this will increase the microphone recording level to a point that will allow you some flexibility in moving the microphone while dictating reports. I.e. leaning forward to take a closer look at the image, which pushes the microphone further away from your mouth, or, perhaps you decide to place your elbow on the arm of the chair, which moves the microphone further away.
- If the record level indicator within the Wizard drops below 50 percent, start over until the result is greater than 50 percent. Addition information about this setting is included in the step-by-step instructions that follow.
PLEASE NOTE: If you are running PowerScribe 360 | Reporting version 1.5, 2.0 or 2.5, you will need to make sure your system has been upgraded with the DNS patch before using the "audio setup wizard." We recently found an issue where the audio setting would not stick under certain conditions. This has been resolved in the DNS patch which is also included in version 2.1. For more information about upgrading, log in to iSupport and submit a service request or call Nuance's PowerScribe 360 | Reporting Technical Support team at (800) 833-7776.
Perform the following to run the Audio Setup Wizard in an efficient manner:
- Log in to the PowerScribe 360 | Reporting client application.
- On the Menu bar, click Speech > Audio Setup.
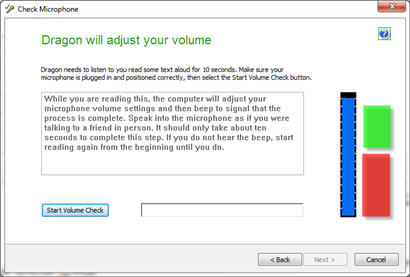
- When the Check Microphone dialog appears, read the content and then click the Next button. The "Dragon will adjust your volume" screen will appear, shown below.

- Click the Start Volume Check button and dictate the content found in the text box above it.
IMPORTANT: Watch the blue bar on the right to make sure it doesn't move down to the red zone. If it does, simply move the microphone farther away from your lips and click the "Start Volume Check" button again. Continue with this until the final reading is in the green area.
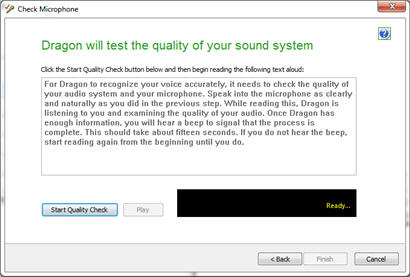
- Click the Next button to continue to the "Dragon will test the quality of your sound system" screen, shown below.

- Click the Start Quality Check button and dictate the content found in the text box above it.
- The system will "ding" and then show "passed" in the black box. At this point, click the Finish button to save your setting and exit.
back to top
|