|
 eTIPS eTIPS
Did you know you can upload Non-DICOM images?
When uploading medical images, non-DICOM images are supported. These images will be converted to DICOM in the process and added to the PowerShare repository. Currently, our system supports the following non-DICOM image formats: JPG, GIF, PNG, TIF, and PDF.
To upload JPG, GIF, PNG, TIF, and PDF images to PowerShare:
- Click the Images tab.
- Click the Upload link.
- In the Select Destination Folder section, select the name of the folder to which you want to upload the images. (As a patient, you should see only your folder already selected.)
- In the Find Images section, locate and select the folder that contains the images you want to upload and click Next. After a few seconds, the Select Images for Upload section displays thumbnail versions of the images in the folder you selected.
- Click each image that you want to add to the set to be uploaded. A blue border indicates that the image is currently selected.
- After all desired images have been added; click the Add Image Details button below the image thumbnail listing. A new window opens containing a form for the patient and image demographics.
- Complete all required fields and click Save.
- The Add Image Details button changes to a blue pencil icon, which you can click to return to the Demographics page and modify any of the data.
- Click the Start Upload button to begin uploading the image set to PowerShare.
 NOTE: This is a premium feature and needs to be specially enabled for the receiving repository. NOTE: This is a premium feature and needs to be specially enabled for the receiving repository.
_______________back to top_______________
Did you know you can attach documents to an image set?
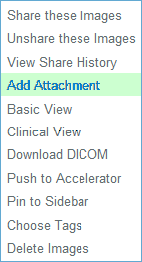
To attach documents to any image set, simply click the Add Attachment option in the drop-down context window that is located next to the image on which you wish to attach the file. Click the Browse button; select the desired file and then click Submit.

_______________back to top_______________
Did you know you can change your PowerShare Email/Login?
PowerShare accounts are tied to a user's email address. When logging in to the website, a user must enter an email address and password. Should a user wish to change their login, they will need to change their email address saved under their account.
 NOTE: All email notifications will be delivered to the email address used to log in to the website. NOTE: All email notifications will be delivered to the email address used to log in to the website.
To change your email address:
- Click here or log in to the PowerShare website at https://www1.nuancepowershare.com
- Go to the Account Settings page by clicking the Account Settings link, which is located in the drop-down menu next to your name (above the search tool at the top of the page).
- Under Account Settings, click the Personal Information button.
- Change the email address in the field provided and save your changes.
back to top
|