|
 eTIPS eTIPS
Did you know you can prevent the PowerMic II from periodically going in and out of record mode?
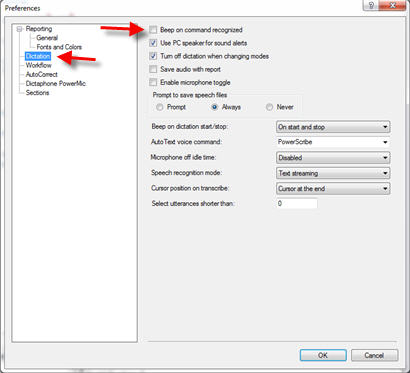
When the PowerScribe 360 | Reporting user profile option, “Beep on command recognized” is enabled and the PowerMic II DICTATE button is set to “toggle dictation on off”, the microphone will go in and out of record when moving to an auto-text fill-in field that doesn’t include a default value. To prevent the microphone from going in and out of record, you can either add a default value to the auto-text fill-in fields or simply disable the “Beep on command recognized” option.
Perform the following to disable the "Beep on command recognized" option:
- Login to the PowerScribe 360 | Reporting dictation client.
- On the Menu bar, click Tools > Preferences and the Preferences dialog will appear.
- In the left pain, select Dictation.

- Disable the Beep on command recognized option by clicking the related box so it appears unchecked.
- Click the OK button to save changes and exit Preferences.
_______________back to top_______________
Did you know you can prevent the PowerMic II from periodically going out of record mode?
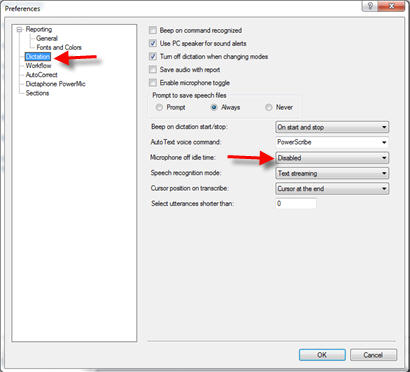
The PowerScribe 360 | Reporting dictation client has a user preference option, "Microphone off idle time", which allows a user to choose the maximum amount of idle time before the microphone will automatically go out of record. When a user has the PowerMic II DICTATE button set to “toggle dictation on off”, the microphone will go into record mode and allow for continuous recording of dictation without the need to maintain pressing the record button. When the system goes into record mode, the system begins counting idle time, i.e., dead air time or silence. Once the amount of idle time meets the value set in the "microphone off idle time" setting, the microphone will automatically exit record mode.
 |
IMPORTANT: The counting of idle time doesn't reset, or start over, when a user begins to dictate after an idle time period; it continues counting idle time for the entire time the microphone remains in record mode. The idle time counter will only reset when the user goes out of record mode. |
For example: Dr. Smith configures the "Microphone off idle time" setting to "10 seconds." Dr. Smith opens a study and presses the record button to go into continuous record. Dr. Smith dictates five seconds of content followed by 5 seconds of silence (microphone remains in record mode for both dictation and silence). Dr. Smith continues dictating 5 seconds of content followed by 4 seconds of silence. Dr. Smith dictates 5 additional seconds of content and then he is silent. After 1 second of silence the microphone turns off automatically. The reason why the microphone went out of record mode is because Dr. Smith's idle time during this recording session is now 10 seconds in length, which meets the "microphone off idle time" setting of 10 seconds. Refer to the 'Idle time counter' row in the image below.

Perform the following to disable the "Microphone off idle time" option:
- Login to the PowerScribe 360 | Reporting dictation client.
- On the Menu bar, click Tools > Preferences and the Preferences dialog will appear.
- In the left pain, select Dictation.

- Disable the Microphone off idle time option by using the drop-down to select Disabled.
- Click the OK button to save changes and exit Preferences.
_______________back to top_______________
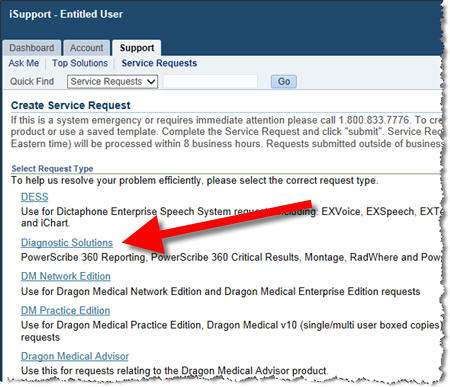
Did you know which Service Request type to choose when submitting a service request from within iSupport?
When submitting a service request from within Nuance iSupport, you are initially presented with a screen asking you to choose the type of service request you are submitting. The service request types are designed to automatically forward the service request to the appropriate support team. PowerScribe 360 | Reporting, falls under the Diagnostic Solutions service request type, along with Critical Results, Montage, and our legacy products RadWhere and PowerScribe.

If you are submitting a service request for any of these products, be sure to select Diagnostic Solutions to ensure the Service Request is routed to the appropriate team. Doing so, will eliminate valuable time that is lost while the service request is sitting in a different teams queue.
Did you know the status of the iSupport customer support portal since the upgrade?
As of May 24th, 2016, the Nuance iSupport customer support portal was upgraded to provide users with a new user-interface layout and improved performance.
This upgrade of Nuance iSupport has all the same function and features, plus the following added top enhancements:
- Changed appearance in the iSupport user interface page layout.
- New Dashboard links and icons in the navigation menu bar.
- New menu icons of Profile and Sign Out.
- The Home tab is renamed to Dashboard.
- Support tabs located on the left pane of the window rather than the right for ease of use.
The Service Request creation process and Knowledge Base views remain the same.
Refer to the iSupport solution below to stay current with What's New in iSupport:
Solution #17123 - What's New in iSupport
Reported Issues
The following issues have been reported since the support portal upgrade, affecting iSupport users:
- An intermittent issue has been resolved where accessing some URL links in iSupport and the Knowledge Base can present the error message below:
Access to the requested URI has been blocked by the URL Firewall. If you believe that you have reached this page while performing valid operations within the application, please send mail to ohs_admin@nuance.com explaining what you were doing when you got this error.

If this error is still encountered, please report and provide the specific URL address when emailing isupport.admin@nuance.com.
- An issue where some iSupport users are missing a single, or all, user-created Quick Links is currently under investigation. At this time, we are not able to automatically restore missing Quick Links and affected users will need to recreate their Quick Links. However, if a user cannot recall their Quick Links, they can request a list of their previous Quick Links by sending an email to: isupport.admin@nuance.com. Please include the iSupport user ID.
To learn more and to keep current with any changes to this topic, log in to iSupport and search for solution 17123: What's New in iSupport.
To save this solution as a Quick Link on the iSupport home page, click the Add To Quick Links button found on the upper-right of this, or any, iSupport solution.
back to top
|