|
Top
Conversations Connect 2017

Chicago: April 5-7, 2017
Atlanta: April 24-26, 2017
Ready to save your facility millions, take your PowerScribe knowledge to the next level and have a ton of fun all at the same time? Then you can’t miss Conversations Connect. In addition to amazing networking opportunities, you’ll learn best practices and gain hands-on experience that will immediately pay dividends in productivity, including:
Getting more out of PS360 with Business Intelligence and the user community
Scott Adair, Applications Supervisor for North State Radiology, explores the wealth of information in the PS360 database and how to put that information to use. Through Business Intelligence and leveraging the community, you can answer
the questions that matter to your organization and save time doing it.
Learning objectives:
- How to get all the answers — Business Intelligence and Nuance Report Builder
- Automation — targeted alerts and scripts
- Leveraging the user community
Sound interesting? There’s so much more!
Register now
We look forward to seeing you at Conversations Connect—and don’t forget to claim your $150 discount this month with the code ETIPS17!
Top

Our industry is moving fast, and you need to keep up to stay current. What new areas may affect you and your job?
Join us for Pre-Conference Workshops on Day 1 of Conversations Connect 2017 to get the latest updates and best practices such as:
- ClinDoc — Optimizing Dragon Medical Network Edition: Tips, Tricks and Pathology
- ClinDoc — Migrating to Dragon Medical One
- Clintegrity Coding — Health Data Analytics: Vital Skills for the HIM Professional
- Clintegrity CDI — A Three-part Tutorial on Value Based Purchasing
 There will be an additional fee for pre-conference sessions; fee is $95, includes all materials. You must be a registered delegate for Conversations Connect in order to register for a pre-conference workshop. There will be an additional fee for pre-conference sessions; fee is $95, includes all materials. You must be a registered delegate for Conversations Connect in order to register for a pre-conference workshop.
For more information, visit Conversations Connect at: nuance.com/go/conversations.
Top Join the Insiders—Nuance's exclusive user community!
- Connect with other PowerScribe Users (The Insiders replaces the former PS360 Listserv.)
- Share best practices
- Exclusive events like our virtual executive Round Table
- Rewards and discounts—including Conversations Connect!
But don't just take our word for it! Watch Aaron Summers from Trinity Health talk about his experience with the Insiders and why you should join.
Sound good? <click here> and we'll get your rewards underway. We can't wait to welcome you INSIDE.
Top
Nuance PowerMic III now available
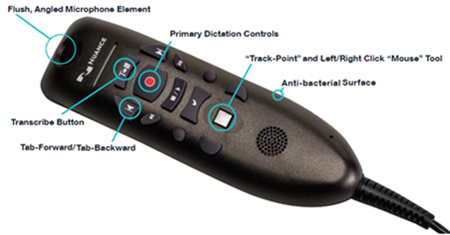
GREAT NEWS: PowerMic IIIs are now available to PowerScribe customers, offering simplified, thumb-control operation for dictating, navigating, reviewing and editing speech recognition-generated documents.
Key features include:
- USB connectivity for easy plug-and-play
- Unidirectional noise-cancelling microphone
- Companion to PowerMic Mobile
- . . . and more
Pricing remains the same as the PowerMic II, which has been discontinued as of February 23, 2017.
Click here to download the PowerMic III datasheet, and when you’re ready, call Tim Brilley at 321-255-8581 to get your order started.
Top
This month's eTips
Did you know you can import multiple custom words into a language model from a text file?
Adding custom words to your language models can improve speech recognition. Custom words might include place names, or the names of drugs or persons. For example, if a new drug comes on the market, you can add the drug name to all language models in your system. Adding words at the system level eliminates the need for providers to add the words themselves.
You can add individual words manually or import a list of words from a text file.
When creating your custom words text file, use one word per line; use a back slash to separate a word from its optional spoken form. You can specify more than one spoken form for a word.
For example:

To import words:
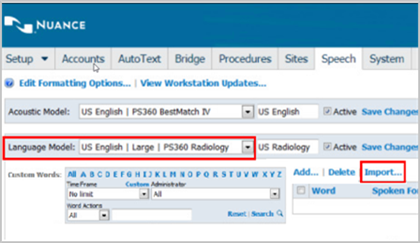
- In the Setup group, select the Speech tab.
- Select the language model into which you want to import the words.
- Click Import.
The Import Words dialog displays. 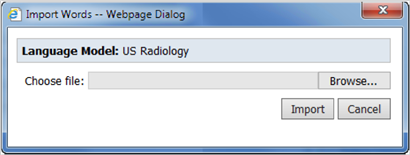
- Click Browse, and navigate to and select the file you want to import.
- Click Open. The file name and path display in the Choose file field.

- Click Import.
 If you attempt to import a spoken form for a word that is already in the system with another spoken form, a warning message displays. If you attempt to import a spoken form for a word that is already in the system with another spoken form, a warning message displays.
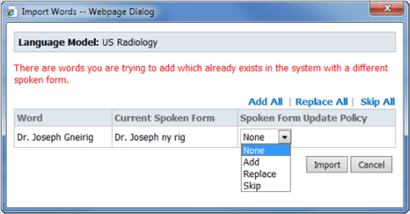
- Select an option:
- None: Do not add the new spoken form.
- Add: Add the new spoken form.
- Replace: Discard the existing spoken form, and add the new one in its place.
- Skip: Do not add the word.
- Click Import to continue.
Or
Click Add All, Replace All, or Skip All.
- Click Import.
The words in the file import into the selected language model, and appear in the list. Any words already in the language model will be skipped, unless you are adding a new spoken form.
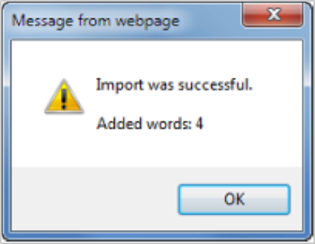
A message box indicates the number of words added and skipped.
Top
Did you know that Autoformatting Rules can be set for Dictated Text?
The autoformatting rules, also referred to as post-processing rules, determine how text appears in finished reports. You can change the default settings for these rules to fit your organization’s standards.
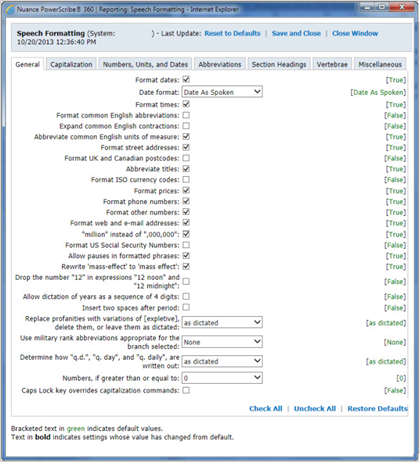
The Formatting dialog box allows you to set formatting rules for your entire facility.
To set the autoformatting rules:
- In the Setup group, select the Speech tab.
- Click Edit Formatting Options. The Speech Formatting dialog box displays.
- Set the options on the following tabs:
- General
- Capitalization
- Numbers, Units, and Dates
- Abbreviations
- Section Headings
- Vertebrae
- Miscellaneous
- On each tab, all the options provide green text in brackets that indicate the default values.
- True indicates the check box is selected.
- False indicates the check box is cleared.
- Option name bolded indicates that you have changed the value from the default.
 Tips: Tips:
- Click Check All to set all the values on the tab to True.
- Click Uncheck All to set all the values on the tab to False.
- Click Restore Defaults to set all values on the tab to their original defaults.
- Click Save and Close to save your changes.
The users will see the changes after their next login.
Top
Did you know that you can view Audit Logs at the System, Site, or Account levels?
Administrators can audit several types of events at the system, site, and account levels in the RadPortal. The types of events available are the same for both the system and site audits.
To view an audit log at the:
- System level, click Setup > System > Audit.
Or
Site
level, click Setup > Sites (select a site) > Audit.
- Filter your audit event list by:
- Site: Select one or all sites.
 The Site-level audit list shows only the current site. The Site-level audit list shows only the current site.
- Account: Select an administrator account or select all administrators.
- Type: Select a specific type of event or select all events:
- Create/Delete/Update Entity: Shows create, delete, and update events for entities such as systems and sites.
- Change preference: Shows changes in system or
site-level preferences performed by the selected administrators.
- Change configuration: Shows changes made to any of the tabs in the Setup > System > Configuration window.
- Change bridge option: Shows changes made in the
Setup > Bridge tab.
- Change worklist: Shows changes made to any worklists in the system Setup > System > Worklists.
- Import procedures: Shows procedure import information (procedure codes created, procedure codes updated, and procedure to category mappings).
- Import persons: Shows information about account/physician or patient imports.
- Time Frame: You can select a time from the drop-down list.
Or
Click Custom and create your own filter.
 In addition, several account-level items are available in the account audit log. In addition, several account-level items are available in the account audit log.
To view an audit log at the account-level:
- Click Setup > Accounts.
- Select the account you want to view, and click the Audit link.
To audit account activity:
- Find and select the account you want to audit.
- With the account displayed, click Audit.
 The events for this account appear by default in reverse chronological order. The events for this account appear by default in reverse chronological order.
To change the order of the event list:
- Click any column heading.
- Click again to reverse the order.
- Filter the events shown, by selecting one or more search criteria.
- Select an event type from the Type drop-down list. For example, you might select Logoff to see when the user has logged off the system.
- Select a time frame from the Time Frame drop-down list.
Or
Enter a date range:
- Click Custom, and select the start date from a calendar to insert it in the first text box.
- Click the second text box, and select an end date from the calendar.
 To revert back to choosing a time frame from a list, click List. To revert back to choosing a time frame from a list, click List.
- Select All, Admin, or Account from the Events drop-down list.
 If you select Admin, the search retrieves events this user caused as administrator, such as making a change to another user's preferences, or deactivating a user account. If you select Admin, the search retrieves events this user caused as administrator, such as making a change to another user's preferences, or deactivating a user account.
- Click Search.
Any events meeting your criteria appear in the list.
- To print the list, click Print.
 Other events that are available in the account-level audit log include: Other events that are available in the account-level audit log include:
- Change Username
- Change Personal Info
- Change Admin Rights
- Change Sections
- Change Supervisor
- Change Specialties
|