|
June 27 global malware incident
As we complete the restoration of our systems following the June 27 global malware incident, we want to thank our clients for their patience and partnership. We are inspired by those who stood by us during this recovery period, and we are sincerely grateful for their support.
Please stay connected with us on social media by following our Twitter, Facebook, and LinkedIn pages. You can subscribe to our What’s Next blog at the subscription link below.

Top
New support platform coming soon!
Nuance has heard your feedback about our current support systems and we have spent considerable time and effort over the past year implementing a new, comprehensive, efficient, and intuitive system based on Salesforce Service Cloud, a leading support architecture utilized by enterprise organizations worldwide.
Salesforce Service Cloud is an AI-powered platform that will allow Nuance support reps to quickly identify and resolve your issues, giving us a 360-degree view of your needs. Based on an agile platform, the system provides access to experts and articles relevant to your support requirements.
Nuance customers will also have self-service access, allowing you to view, edit, and receive updates on your support cases, as well as engage with Nuance reps using your preferred method of outreach, including:
As we approach Go-Live in November, you'll receive a direct email communication with further details on features, user best practices, and opportunities to provide feedback. Stay tuned for more updates!
Top
Radiology and the Cloud
It looks too good to be true, right? Cloud services that offer you and your organization the ability to scale imaging storage as needed, manage your resources, and provide seamless access, viewing, and sharing of medical images across organizations, departments and providers. It should all connect and support your patient care goals.
We're interested in hearing about your reality.
Are cloud services really the solution to your healthcare organization's medical imaging challenges? Answer a few questions, and we'll share the results. You'll see what your colleagues have to say and how it compares to your experience. We'll be able to take your feedback and offer you better solutions for image-sharing.
Click here to get started. We promise it won't take more than 2 minutes of your time.
Top
Join the Insiders—Nuance's exclusive user community!
- Connect with other PowerScribe Users (The Insiders replaces the former PS360 Listserv.)
- Share best practices
- Exclusive events like our virtual executive Round Table
- Rewards and discounts
But don't just take our word for it! Watch Aaron Summers from Trinity Health talk about his experience with the Insiders and why you should join.
Sound good? <click here> and we'll get your rewards underway. We can't wait to welcome you INSIDE.
The Nuance Diagnostics Group has events throughout 2017, so let’s plan to keep in touch.
Visit engage.nuance.com/meeting or call Tim Brilley today at 321-255-8581. If you’d like to pre-schedule some time to meet, we’ll get it on the calendar.
| ARC 2017 |
May 21-25, 2017 |
Marriott Wardman Park Hotel
Washington, DC |
520-521 |
| SIIM 2017 |
June 1-3, 2017 |
David L Lawrence Convention Center
Pittsburgh, PA |
322 |
| AHRA 2017 |
July 9-12, 2017 |
Anaheim Convention Center
Anaheim, CA |
254 |
Top
Webinar Library
You can now stream or download recorded Webinars.
Top
This month's eTips
Did you know that PowerScribe 360 Reporting V4.0 allows for better control distribution of Preliminary Reports?
In order to provide better automated distribution of preliminary reports, PowerScribe 360 Reporting V4.0 provides the following steps when a provider marks a report as Preliminary:
- An Attending provider dictates a report and saves it as Preliminary (Residents will Approve; Editors will Finish).
- The preliminary report appears in the Explorer window with a green check mark indicating it was sent successfully.
- An attending re-opens the Preliminary report, edits, and saves the report.
- In PowerScribe 360 Reporting v4.0 the following are new portions of the Preliminary workflow:
- After saving, the report is NOT distributed.
- The report appears in the Explorer window with a green check mark followed by an asterisk (*), indicating that the report was edited since the time it was distributed. This also means that the version of the report in the RIS\HIS is old and does not match what is in PowerScribe 360 Reporting.
- The report is once again marked as Preliminary (or Approve or Finish).
- The report appears in the Explorer window with a green check mark but with no asterisk, indicating that the report was distributed. The version of the report in the RIS\HIS and in PowerScribe 360 Reporting are now the same.
Additionally, the discard feature for distributed reports is now disabled in PowerScribe 360 Reporting. Preliminary reports that have been distributed to the RIS\HIS and opened in the client application, cannot be discarded from within the client application. The only exception to this is if you have administrative rights in the client application that allows you to discard the report. These reports can still be discarded by an administrator logged into the Administrator Portal of PowerScribe 360 Reporting.
Top
Did you know that you can view Author Productivity - Detailed Activity reports from the Management Reports in the PowerScribe 360 Reporting Administrator Portal?
Management Reports in PowerScribe 360 Reporting allows administrators to look at several aspects of productivity on the system, including author productivity.
The Author Productivity – Detailed Activity reports shows the start and end time of each report within the supplied date range, as well as the time that the report was signed by the radiologist. Unsigned reports do not appear in this report.
To run this report:
- On the Reports tab, select the Author Productivity – Detailed Activity report from the drop-down list.
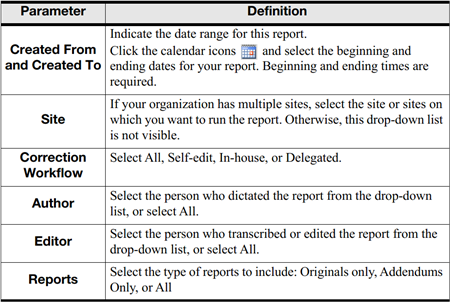
- Use the following table as a guide for entering values.
- Click View Report.
The results will appear. 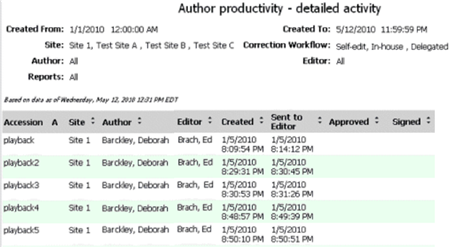
The Author Productivity – Detailed Activity report includes the following information:
- Accession: The identifying number assigned in the RIS. This column can contain multiple values.
- A: The addendum sequence number. For an original report, this column is blank.
- Site: The site where the report was created.
- Author: First and last name of the provider who initiated the report.
- Editor: First and last name of the editor who corrected the report, if applicable.
- Created: Date and time that the provider initiated the report.
- Sent to Editor: Date and time that the provider clicked the Correct button on the PowerMic, other microphone, or in the dictation window.
- Note: Sent to Editor shows the time that the provider first clicked the Correct button. The date and time do not update if the provider dictates additional text.
- Approved: Date and time a resident approved the report, if applicable.
- Signed: Date and time the attending provider signed the report.
Top
Did you know that if you have the optional Quality Check feature you can configure how and when it runs?
Quality Check for PowerScribe 360 Reporting checks your report for common errors in consistency, identifies these errors, and allows you to review and\or correct them prior to signing your report.
Quality Check also has the ability to identify and highlight potential critical results and Actionable Findings dictated into your report.
Once the Quality Check feature has been enabled on your system you can configure the following preferences to determine how and when it runs.
- Choose one or more items which to run your consistency check. Currently your choices are Critical Test Results; Gender Mismatches; and Laterality Mismatches.
- Configure Quality Check to run automatically or manually.
To configure which items on which to run consistency checks:
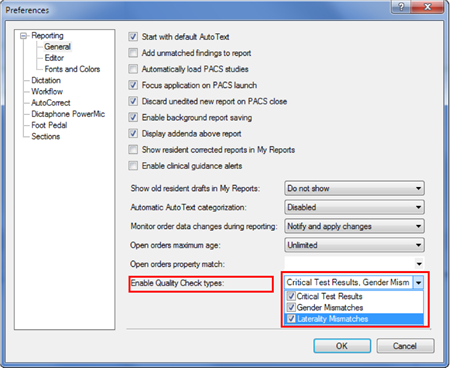
- Click Tools > Preferences > General.
- Click the drop-down arrow to the right of the Enable Quality Check types item.
- Select (or clear) the check boxes based upon your specific requirements.
To configure how Quality Check runs (automatically or manually):
- Click Tools > Preferences > Workflow.
- Select (or clear) the Perform Quality Check at signoff check box.
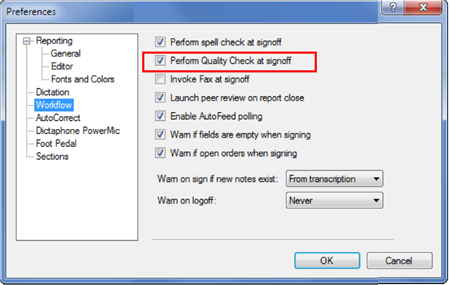
This information can be used when deciding how to configure Quality Check:
- If you check this check box, Quality Check is configured to run automatically, and runs when you begin your signature workflow from the Report Editor window. If no inconsistencies are detected in the report, the Quality Check dialog box does not open, saving you a step in your signature workflow. (Signing a report from the Explorer screen does not run Quality Check).
- If you clear this check box, Quality Check is configured to run manually. Use the voice command “Start Quality Check” to run the consistency check, or click the Start Quality Check icon
 on the tool bar. on the tool bar.
|