|
|
New support portal will include
Salesforce Community Cloud
As Nuance Healthcare transitions to a new Support platform
in 2018, one of the most exciting features of the system will
be Salesforce Community Cloud, allowing customers to
collaborate with one another and support reps to share
knowledge and best practices. Customers will also be able to
find trending articles and posts and rate the best answers to
questions posted by the group.
Key benefits from Salesforce Community Cloud include the
ability to:
- Network with your industry colleagues
- Share experiences and best practices for using Nuance
solutions
- Provide feedback to Nuance about our solutions
- Receive up-to-the-minute information from Nuance
- Participate in roundtables and small-group events that
provide access to Nuance leadership
- Search knowledge articles
- Log cases via the community
- Interact with an agent through Live Chat
Bookmark THIS PAGE for more information about
Salesforce Community Cloud, along with ongoing updates about
the new Support platform overall. Happy Holidays! We look
forward to seeing you in our new “community” soon!
Top
PowerUser monthly webinar
series
| AutoText
for Administrators |
Tuesday,
Dec. 19, 2017 |
11:00
AM Eastern Standard Time |
~1
hour |
| Summary:
During this PowerUser webinar, how to manage AutoText
in the PowerScribe 360 Reporting application, such as
importing, exporting, and basic troubleshooting topics
that an Administrator may encounter will be
presented. |
To attend the AutoText for Administrators webinar, click
Register to sign up.
Top |
Peer-to-Peer webinar
| Optimizing
Radiology Workflow: A Transformation at Baptist Health South
Florida |
Tuesday,
Jan. 9, 2018 |
01:00
PM Eastern Standard Time |
~1
hour |
| Summary:
During this peer-to-peer webinar, Jonathan Messinger, MD,
medical director for imaging informatics for Baptist Health
South Florida, will share Baptist Health's experience in
transitioning to a leading-edge enterprise workflow solution
with PowerScribe 360 Workflow Orchestration. Dr. Messinger
will discuss challenges faced, lessons learned, best
practices, and realized benefits with the implementation of
this intelligent worklist and communication platform. Don't
miss the opportunity to learn how this world-class healthcare
organization is increasing efficiency, streamlining workflow,
enhancing communication, and improving patient
care. |
To attend the Optimizing Radiology Workflow: A Transformation at
Baptist Health South Florida webinar, click Register to sign up.
Top
Webinar Library
You can now stream or download previously recorded Webinars.
Top
This month's eTips
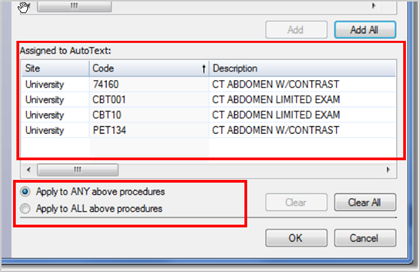
Did you know that when you assign multiple procedures to
a default AutoText, you can now select either Any or All as the
default choice for these items?
In PowerScribe 360 Reporting v4.0 as a Provider, when building
AutoTexts, you can now select either the Apply to ANY above
procedures or Apply to ALL above procedures
preference to assign multiple procedure codes to a default
AutoText.

Selecting ANY assigns the AutoText as the
default when one or more of the selected procedure codes
associated with the AutoText are present in the report when
initiating dictation.
Selecting ALL assigns the AutoText as the
default when all of the selected procedure codes associated
with the AutoText are present when initiating dictation.
Information to consider for Both ANY and ALL selections.
Top
Did you know that you can filter which Clinical Guidance
rules are visible when invoking the Clinical Guidance add-on feature
in the PowerScribe 360 Reporting client?
By setting the Relevant Guidance Filter, you can control which
Clinical Guidance Rules are displayed when Clinical Guidance is
invoked.
Use the Show relevant guidance only checkbox to
automatically filter which guidelines are displayed when you open a
report based on modality, anatomy, age, and gender. If your
current report does not have any relevant guidelines, none are
shown on the Clinical Guidance tab.
- Unchecking Show relevant guidance only
displays all available guidelines in the system.

Checking Show relevant guidance only
displays only the relevant guidelines for the
report.
- You can use the voice command “Show relevant guidance
only” to show only relevant guidelines. Issue the voice
command a second time to see all guidelines regardless of whether
they are relevant to your report. You can also use the
Show relevant guidance only checkbox to perform
the same function.
- The setting for this checkbox/voice command is sticky, meaning
that it retains its current status from login to login until you
change it.
Top
Did you know that running the audio setup wizard on a
regular basis can greatly improve your speech
recognition?
Audio Setup automatically adjusts the volume level of your
microphone to its optimal setting, providing the PowerScribe 360
Reporting system with the best possible audio input, which in
turn improves your speech recognition results.
Running Audio Setup is a very important first step in ensuring
the best possible speech recognition by the system.
You will be prompted to run the Audio Setup the first time you
log in to a PowerScribe 360 Reporting workstation. In
addition, you will be prompted to run Audio Setup when:
- You log in to a workstation from which you have not previously
dictated.
- You (or someone) has unplugged the PowerMic and plugged it
into a different USB port on a workstation from which you have
previously dictated.
Audio Setup is your first line of defense when misrecognition
occurs.
If you share a workstation with other providers, if you work in a
room with multiple workstations, or if you use a different
workstation every day, run Audio Setup
daily.
If you work in your own office (in which you use the same
workstation and the noise environment is relatively quiet), run
Audio Setup only if you detect a decline in your speech recognition,
or if your voice has changed due to cold, cough, or laryngitis.
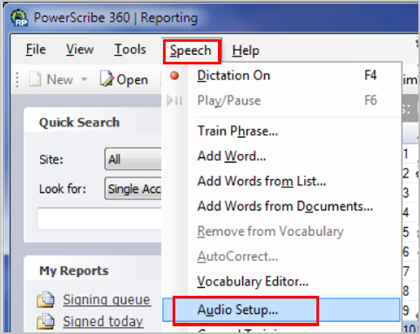
To manually run the Audio Setup:
- Log in to the PowerScribe 360 Reporting client.
- From Speech, select Audio Setup.

NOTE: The position of the microphone, the
volume setting, and head positioning are important for speech
accuracy.
You should place the microphone at the furthest position you
will encounter during a typical day of dictation. Doing this will
increase the microphone recording level to a point that will allow
you some flexibility in moving the microphone while dictating
reports, for example, leaning forward to take a closer look at an
image, or perhaps you decide to place your elbow on the arm of the
chair, which moves the microphone further away.
Speak at your normal dictation volume with your head focused on
the monitor(s) as you would typically be while dictating.
- Follow the instructions in the dialog boxes. The entire
process should take only a minute or two.
- Log out of the application, then log back in again.
|


